线程池 线程池介绍 池化技术现在已经屡见不鲜了,线程池、数据库连接池、Http 连接池等等都是对这个思想的应用。池化技术的思想主要是为了减少每次获取资源的消耗,提高对资源的利用率。
线程池提供了一种限制和管理资源(包括执行一个任务)的方式。 每个线程池还维护一些基本统计信息,例如已完成任务的数量。
使用线程池的好处:
降低资源消耗:通过重复利用已创建的线程降低线程创建和销毁造成的消耗。
提高响应速度:当任务到达时,任务可以不需要等到线程创建就能立即执行。
提高线程的可管理性:线程是稀缺资源,如果无限制的创建,不仅会消耗系统资源,还会降低系统的稳定性,使用线程池可以进行统一的分配,调优和监控。
自定义线程池
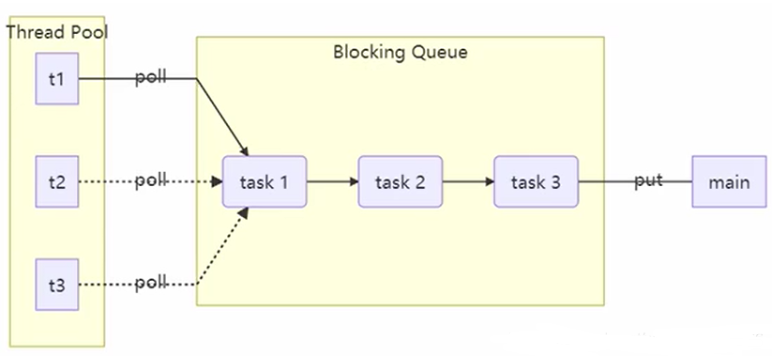
上图就是一个线程池的实现,先初始化线程池、阻塞队列大小,然后开几个线程通过线程池对象调用方法执行任务,如果任务过多,会添加到阻塞队列中,线程执行完任务再从阻塞队列中取值继续执行。当执行的线程数大于线程池和阻塞队列的大小,我们可以定义拒绝策略,类似 jdk 线程池那样。代码实现如下:
1
2
3
4
5
6
7
8
9
10
11
12
13
14
15
16
17
18
19
20
21
22
23
24
25
26
27
28
29
30
31
32
33
34
35
36
37
38
39
40
41
42
43
44
45
46
47
48
49
50
51
52
53
54
55
56
57
58
59
60
61
62
63
64
65
66
67
68
69
70
71
72
73
74
75
76
77
78
79
80
81
82
83
84
85
86
87
88
89
90
91
92
93
94
95
96
97
98
99
100
101
102
103
104
105
106
107
108
109
110
111
112
113
114
115
116
117
118
119
120
121
122
123
124
125
126
127
128
129
130
131
132
133
134
135
136
137
138
139
140
141
142
143
144
145
146
147
148
149
150
151
152
153
154
155
156
157
158
159
160
161
162
163
164
165
166
167
168
169
170
171
172
173
174
175
176
177
178
179
180
181
182
183
184
185
186
187
188
189
190
191
192
193
194
195
196
197
198
199
200
201
202
203
204
205
206
207
208
209
210
211
212
213
214
215
216
217
218
219
220
221
222
223
224
225
226
227
228
229
230
231
232
233
234
235
236
237
238
239
240
241
242
243
244
245
246
@Slf4j public class TestThreadPool public static void main (String[] args) ThreadPool threadPool = new ThreadPool(1 ,1000 ,TimeUnit.SECONDS,4 ,(queue,task)->{ queue.put(task); }); for (int i = 0 ; i < 4 ; i++) { int j = i; threadPool.execute(()->{ try { Thread.sleep(1000 ); } catch (InterruptedException e) { e.printStackTrace(); } log.debug("{}" , j); }); } } } @FunctionalInterface interface RejectPolicy <T > void reject (BlockingQueue<T> queue, T task) } @Slf4j class ThreadPool private BlockingQueue<Runnable> taskQueue; private HashSet<Worker> workers = new HashSet<>(); private int coreSize; private long timeout; private TimeUnit timeUnit; private RejectPolicy<Runnable> rejectPolicy; public ThreadPool (int coreSize, long timeout, TimeUnit timeUnit, int queueCapcity,RejectPolicy<Runnable> rejectPolicy) this .coreSize = coreSize; this .timeout = timeout; this .timeUnit = timeUnit; this .taskQueue = new BlockingQueue<>(queueCapcity); this .rejectPolicy = rejectPolicy; } public void execute (Runnable task) synchronized (workers) { if (workers.size() < coreSize) { Worker worker = new Worker(task); log.debug("新增 worker{}, {}" , worker, task); workers.add(worker); worker.start(); } else { taskQueue.tryPut(rejectPolicy, task); } } } class Worker extends Thread private Runnable task; public Worker (Runnable task) this .task = task; } @Override public void run () while (task != null || (task = taskQueue.poll(timeout, timeUnit)) != null ) { try { log.debug("正在执行...{}" , task); task.run(); } catch (Exception e) { e.printStackTrace(); } finally { task = null ; } } synchronized (workers) { log.debug("worker 被移除{}" , this ); workers.remove(this ); } } } } @Slf4j class BlockingQueue <T > private Deque<T> queue = new ArrayDeque<T>(); private ReentrantLock lock = new ReentrantLock(); private Condition fullWait = lock.newCondition(); private Condition emptyWait = lock.newCondition(); private int capcity; public BlockingQueue (int capcity) this .capcity = capcity; } public T poll (long timeout, TimeUnit unit) lock.lock(); try { long nanos = unit.toNanos(timeout); while (queue.isEmpty()) { if (nanos <= 0 ) { return null ; } try { nanos=emptyWait.awaitNanos(nanos); } catch (InterruptedException e) { e.printStackTrace(); } } T t = queue.removeFirst(); fullWait.signal(); return t; }finally { lock.unlock(); } } public T take () lock.lock(); try { while (queue.isEmpty()) { try { emptyWait.wait(); } catch (InterruptedException e) { e.printStackTrace(); } } T t = queue.removeFirst(); fullWait.signal(); return t; }finally { lock.unlock(); } } public void put (T task) lock.lock(); try { while (queue.size() == capcity) { try { fullWait.wait(); } catch (InterruptedException e) { e.printStackTrace(); } } log.debug("加入任务队列 {}" , task); queue.addLast(task); emptyWait.signal(); }finally { lock.unlock(); } } public boolean offer (T task, long timeout, TimeUnit timeUnit) lock.lock(); try { long nanos = timeUnit.toNanos(timeout); while (queue.size() == capcity) { try { nanos = fullWait.awaitNanos(nanos); } catch (InterruptedException e) { e.printStackTrace(); } } log.debug("加入任务队列 {}" , task); queue.addLast(task); emptyWait.signal(); return true ; }finally { lock.unlock(); } } public int size () lock.lock(); try { return queue.size(); }finally { lock.unlock(); } } public void tryPut (RejectPolicy<T> rejectPolicy,T task) lock.lock(); try { if (queue.size() == capcity) { rejectPolicy.reject(this , task); } else { log.debug("加入任务队列 {}" , task); queue.addLast(task); emptyWait.signal(); } }finally { lock.unlock(); } } }
ThreadPoolExecutor 线程池状态 ThreadPoolExecutor 使用 int 的高 3 位来表示线程池状态,低 29 位表示线程数量,ThreadPoolExecutor 类中的线程状态变量如下:
1 2 3 4 5 6 7 8 private static final int COUNT_BITS = Integer.SIZE - 3 ; private static final int RUNNING = -1 << COUNT_BITS; private static final int SHUTDOWN = 0 << COUNT_BITS; private static final int STOP = 1 << COUNT_BITS; private static final int TIDYING = 2 << COUNT_BITS; private static final int TERMINATED = 3 << COUNT_BITS;
状态名称
高3位的值
描述
RUNNING
111
接收新任务,同时处理任务队列中的任务
SHUTDOWN
000
不接受新任务,但是处理任务队列中的任务
STOP
001
中断正在执行的任务,同时抛弃阻塞队列中的任务
TIDYING
010
任务执行完毕,活动线程为0时,即将进入终结阶段
TERMINATED
011
终结状态
线程池状态和线程池中线程的数量由一个原子整型ctl来共同表示。 使用一个数来表示两个值的主要原因是:可以通过一次CAS同时更改两个属性的值 。
1 2 3 4 5 6 7 8 9 10 11 private final AtomicInteger ctl = new AtomicInteger(ctlOf(RUNNING, 0 ));private static final int COUNT_BITS = Integer.SIZE - 3 ;private static final int CAPACITY = (1 << COUNT_BITS) - 1 ;
获取线程池状态、线程数量以及合并两个值的操作:
1
2
3
4
5
6
7
8
9
10
11
/ Packing and unpacking ctl private static int runStateOf (int c) return c & ~CAPACITY; }private static int workerCountOf (int c) return c & CAPACITY; }private static int ctlOf (int rs, int wc) return rs | wc; }
线程池的属性:
1 2 3 4 5 6 7 8 9 10 11 12 13 14 15 private final class Worker extends AbstractQueuedSynchronizer implements Runnable { ... } private final BlockingQueue<Runnable> workQueue;private final ReentrantLock mainLock = new ReentrantLock();private final HashSet<Worker> workers = new HashSet<Worker>();
构造方法 看一下 ThreadPoolExecutor 类参数最多、最全的有参构造方法:
1
2
3
4
5
6
7
public ThreadPoolExecutor (int corePoolSize, int maximumPoolSize, long keepAliveTime, TimeUnit unit, BlockingQueue<Runnable> workQueue, ThreadFactory threadFactory, RejectedExecutionHandler handler)
构造参数解释:
corePoolSize:核心线程数
maximumPoolSize:最大线程数
maximumPoolSize - corePoolSize = 救急线程数
keepAliveTime:救急线程空闲时的最大生存时间
unit:时间单位
workQueue:阻塞队列(存放任务)
有界阻塞队列:ArrayBlockingQueue
无界阻塞队列:LinkedBlockingQueue
最多只有一个同步元素的队列:SynchronousQueue
PriorityBlockingQueue:优先队列
threadFactory:线程工厂(给线程取名字)
handler:拒绝策略
工作方式:
线程池中刚开始没有线程,当一个任务提交给线程池后,线程池会创建一个新线程来执行任务。
当线程数达到 corePoolSize 没有线程空闲时,这时再加入任务,新加的任务会被加入 workQueue 队列排 队,直到有空闲的线程。
如果队列选择了有界队列,那么任务超过了队列大小时,会创建 maximumPoolSize - corePoolSize 数目的线程来救急。
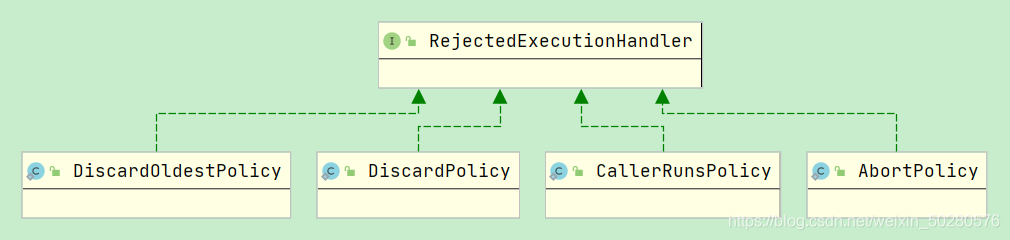
如果线程数达到 maximumPoolSize 仍然有新任务,这时会执行拒绝策略。拒绝策略 jdk 提供了下面的前4 种实现,其它的著名框架也提供了实现:
ThreadPoolExecutor.AbortPolicy:让调用者抛出RejectedExecutionException 异常,这是默认策略。
ThreadPoolExecutor.CallerRunsPolicy:让调用者运行任务。
ThreadPoolExecutor.DiscardPolicy:放弃本次任务。
ThreadPoolExecutor.DiscardOldestPolicy:放弃队列中最早的任务,本任务取而代之。
Dubbo 的实现:在抛出 RejectedExecutionException 异常之前会记录日志,并 dump 线程栈信息,方便定位问题。
Netty 的实现:创建一个新线程来执行任务。
ActiveMQ 的实现:带超时等待(60s)尝试放入队列,类似之前自定义的拒绝策略。
PinPoint 的实现,它使用了一个拒绝策略链,会逐一尝试策略链中每种拒绝策略。
当高峰过去后,超过 corePoolSize 的救急线程如果一段时间没有任务做,需要结束节省资源,这个时间由 keepAliveTime 和 unit 来控制。
jdk 线程池的拒绝策略结构图如下:
据这个构造方法,JDK Executors 类中提供了众多工厂方法来创建各种用途的线程池。
newFixedThreadPool newFixedThreadPool 创建的是固定大小的线程池。实现代码如下:
1 2 3 4 5 6 7 8 9 10 11 12 13 14 15 16 17 18 ExecutorService executorService = Executors.newFixedThreadPool(2 , new ThreadFactory() { private AtomicInteger atomicInteger = new AtomicInteger(1 ); @Override public Thread newThread (Runnable r) return new Thread(r, "my_thread_" + atomicInteger.getAndIncrement()); } }); executorService.execute(() -> { log.info("1" ); }); executorService.execute(() -> { log.info("2" ); }); executorService.execute(() -> { log.info("3" ); });
Executors 类 使用 newFixedThreadPool 创建线程的源码如下:
1
2
3
4
5
6
7
8
9
10
11
12
13
public static ExecutorService newFixedThreadPool (int nThreads) return new ThreadPoolExecutor(nThreads, nThreads, 0L , TimeUnit.MILLISECONDS, new LinkedBlockingQueue<Runnable>()); } public ThreadPoolExecutor (int corePoolSize, int maximumPoolSize, long keepAliveTime, TimeUnit unit, BlockingQueue<Runnable> workQueue) this (corePoolSize, maximumPoolSize, keepAliveTime, unit, workQueue, Executors.defaultThreadFactory(), defaultHandler); }
通过源码可以看到 new ThreadPoolExecutor(xxx) 方法其实是是调用了之前的完整参数的构造方法,创建的是固定的线程数,使用了默认的线程工厂和拒绝策略。
特点:
核心线程数 = 最大线程数(没有救急线程被创建),因此也无需超时时间。
阻塞队列是无界的(LinkedBlockingQueue),可以放任意数量的任务。
适用于任务量已知,相对耗时的任务。
newCachedThreadPool 1 2 3 4 5 6 ExecutorService executorService = Executors.newCachedThreadPool(); public static ExecutorService newCachedThreadPool () return new ThreadPoolExecutor(0 , Integer.MAX_VALUE, 60L , TimeUnit.SECONDS, new SynchronousQueue<Runnable>()); }
特点:
核心线程数是 0,最大线程数是 Integer.MAX_VALUE,救急线程的空闲生存时间是 60s,意味着全部都是救急线程(60s 后没有任务就回收),救急线程可以无限创建。
队列采用了 SynchronousQueue 实现特点是它没有容量,没有线程来取任务是放不进去的(一手交钱、一手交 货)SynchronousQueue。
整个线程池表现为线程数会根据任务量不断增长,没有上限,当任务执行完毕,空闲1分钟后释放线程。
适合任务数比较密集,但每个任务执行时间较短的情况。
示例:
1 2 3 4 5 6 7 8 9 10 11 12 13 14 15 16 17 18 19 20 21 22 23 24 25 26 27 28 29 30 31 32 33 34 SynchronousQueue<Integer> integers = new SynchronousQueue<>(); new Thread(() -> { try { log.debug("putting {} " , 1 ); integers.put(1 ); log.debug("{} putted..." , 1 ); log.debug("putting...{} " , 2 ); integers.put(2 ); log.debug("{} putted..." , 2 ); } catch (InterruptedException e) { e.printStackTrace(); } },"t1" ).start(); Thread.sleep(1000 ); new Thread(() -> { try { log.debug("taking {}" ,1 ); integers.take(); } catch (InterruptedException e) { e.printStackTrace(); } },"t2" ).start(); Thread.sleep(1000 ); new Thread(() -> { try { log.debug("taking {}" ,2 ); integers.take(); } catch (InterruptedException e) { e.printStackTrace(); } },"t3" ).start();
输出:
1 2 3 4 5 6 20 :17 :15.364 [t1] DEBUG com.heu.test.TestPool2 - putting 1 20 :17 :16.372 [t2] DEBUG com.heu.test.TestPool2 - taking 1 20 :17 :16.373 [t1] DEBUG com.heu.test.TestPool2 - 1 putted...20 :17 :16.373 [t1] DEBUG com.heu.test.TestPool2 - putting...2 20 :17 :17.373 [t3] DEBUG com.heu.test.TestPool2 - taking 2 20 :17 :17.374 [t1] DEBUG com.heu.test.TestPool2 - 2 putted...
newSingleThreadExecutor 1 2 3 4 public static ExecutorService newSingleThreadExecutor () return new FinalizableDelegatedExecutorService (new ThreadPoolExecutor(1 , 1 ,0L , TimeUnit.MILLISECONDS,new LinkedBlockingQueue<Runnable>())); }
使用场景:
希望多个任务排队执行。线程数固定为 1,任务数多于 1 时,会放入无界队列排队。任务执行完毕,这唯一的线程也不会被释放。
newSingleThreadExecutor 和 newFixedThreadPool 区别:
自己创建一个单线程串行执行任务,如果任务执行失败而终止,那么没有任何补救措施,而newSingleThreadExecutor 线程池还会新建一个线程,保证池的正常工作。
newSingleThreadExecutor() 线程个数始终为 1,不能修改。FinalizableDelegatedExecutorService 应用的是装饰器模式,只对外暴露了 ExecutorService 接口,不能调用 ThreadPoolExecutor 中特有的方法。
Executors.newFixedThreadPool(1) 初始时为1,以后还可以修改。它对外暴露的是 ThreadPoolExecutor 对象,可以强转后调用 setCorePoolSize 等方法进行修改。
Executors 返回线程池对象的弊端如下:
FixedThreadPool 和 SingleThreadExecutor:允许请求的队列长度为 Integer.MAX_VALUE,可能堆积大量的请求,从而导致 OOM。
CachedThreadPool 和 ScheduledThreadPool:允许创建的线程数量为 Integer.MAX_VALUE ,可能会创建大量线程,从而导致 OOM。
其实就是使用有界队列,控制线程创建数量。
此外,除了避免 OOM 的原因之外,不推荐使用 Executors提供的线程池的原因还有:
实际使用中需要根据自己机器的性能、业务场景来手动配置线程池的参数比如核心线程数、使用的任务队列、饱和策略等等。
我们应该显示地给线程池命名,这样有助于我们定位问题。
提交任务 1 2 3 4 5 6 7 8 9 10 11 12 13 14 15 16 17 18 void execute (Runnable command) <T> Future<T> submit (Callable<T> task) ; <T> List<Future<T>> invokeAll(Collection<? extends Callable<T>> tasks) throws InterruptedException; <T> List<Future<T>> invokeAll(Collection<? extends Callable<T>> tasks, long timeout, TimeUnit unit) throws InterruptedException; <T> T invokeAny (Collection<? extends Callable<T>> tasks) throws InterruptedException, ExecutionException ;<T> T invokeAny (Collection<? extends Callable<T>> tasks, long timeout, TimeUnit unit) throws InterruptedException, ExecutionException, TimeoutException ;
关闭线程池 shutdown:
1 2 3 4 5 6 7 8 9 10 11 12 13 14 15 16 17 18 19 20 21 22 public void shutdown () final ReentrantLock mainLock = this .mainLock; mainLock.lock(); try { checkShutdownAccess(); advanceRunState(SHUTDOWN); interruptIdleWorkers(); onShutdown(); } finally { mainLock.unlock(); } tryTerminate(); }
shutdownNow:
1 2 3 4 5 6 7 8 9 10 11 12 13 14 15 16 17 18 19 20 21 22 23 24 25 26 public List<Runnable> shutdownNow () List<Runnable> tasks; final ReentrantLock mainLock = this .mainLock; mainLock.lock(); try { checkShutdownAccess(); advanceRunState(STOP); interruptWorkers(); tasks = drainQueue(); } finally { mainLock.unlock(); } tryTerminate(); return tasks; }
其它方法:
1 2 3 4 5 6 boolean isShutdown () boolean isTerminated () boolean awaitTermination (long timeout, TimeUnit unit) throws InterruptedException
任务调度线程池 在任务调度线程池功能加入之前,可以使用 java.util.Timer 来实现定时功能,Timer 的优点在于简单易用,但由于所有任务都是由同一个线程来调度,因此所有任务都是串行执行的,同一时间只能有一个任务在执行,前一个任务的延迟或异常都将会影响到之后的任务。
示例:
1 2 3 4 5 6 7 8 9 10 11 12 13 14 15 16 17 18 19 20 21 22 23 24 25 26 27 public static void main (String[] args) Timer timer = new Timer(); TimerTask task1 = new TimerTask() { @Override public void run () log.debug("task 1" ); try { Thread.sleep(2000 ); } catch (InterruptedException e) { e.printStackTrace(); } } }; TimerTask task2 = new TimerTask() { @Override public void run () log.debug("task 2" ); } }; timer.schedule(task1,1000 ); timer.schedule(task2,1000 ); }
输出:
1 2 20 :40 :59.276 [Timer-0 ] DEBUG com.heu.test.TestTimer - task 1 20 :41 :01.296 [Timer-0 ] DEBUG com.heu.test.TestTimer - task 2
使用 ScheduledExecutorService 改写:
1 2 3 4 5 6 7 8 9 10 11 12 13 14 15 public static void main (String[] args) ScheduledExecutorService executorService = Executors.newScheduledThreadPool(2 ); executorService.schedule(() -> { System.out.println("任务1,执行时间:" + new Date()); try { Thread.sleep(2000 ); } catch (InterruptedException e) { e.printStackTrace(); } },1000 , TimeUnit.MILLISECONDS); executorService.schedule(() -> { System.out.println("任务2,执行时间:" + new Date()); },1000 , TimeUnit.MILLISECONDS); }
输出:
1 2 任务1 ,执行时间:Mon Jun 14 20 :46 :29 CST 2021 任务2 ,执行时间:Mon Jun 14 20 :46 :29 CST 2021
整个线程池表现为:线程数固定,任务数多于线程数时,会放入无界队列排队。任务执行完毕,这些线程也不会被释放,用来执行延迟或反复执行的任务。
scheduleAtFixedRate 例子:
1 2 3 4 5 6 ScheduledExecutorService pool = Executors.newScheduledThreadPool(1 ); log.debug("start..." ); pool.scheduleAtFixedRate(() -> { log.debug("running..." ); sleep(2 ); }, 1 , 1 , TimeUnit.SECONDS);
输出:
1 2 3 4 5 21 :44 :30.311 TestTimer [main] - start... 21 :44 :31.360 TestTimer [pool-1 -thread-1 ] - running... 21 :44 :33.361 TestTimer [pool-1 -thread-1 ] - running... 21 :44 :35.362 TestTimer [pool-1 -thread-1 ] - running... 21 :44 :37.362 TestTimer [pool-1 -thread-1 ] - running...
输出分析:一开始,延时 1s,接下来,由于任务执行时间 > 间隔时间,间隔被『撑』到了 2s。
scheduleWithFixedDelay 例子:
1 2 3 4 5 6 ScheduledExecutorService pool = Executors.newScheduledThreadPool(1 ); log.debug("start..." ); pool.scheduleWithFixedDelay(()-> { log.debug("running..." ); sleep(2 ); }, 1 , 1 , TimeUnit.SECONDS);
输出:
1 2 3 4 5 21 :40 :55.078 TestTimer [main] - start... 21 :40 :56.140 TestTimer [pool-1 -thread-1 ] - running... 21 :40 :59.143 TestTimer [pool-1 -thread-1 ] - running... 21 :41 :02.145 TestTimer [pool-1 -thread-1 ] - running... 21 :41 :05.147 TestTimer [pool-1 -thread-1 ] - running...
输出分析:一开始,延时 1s,scheduleWithFixedDelay 的间隔是 上一个任务结束 <-> 延时 <-> 下一个任务开始 所以间隔都是 3s。
正确处理执行任务异常 如果线程池中的线程执行任务时,如果任务抛出了异常,默认是中断执行该任务而不是抛出异常或者打印异常信息。
方法1:主动捉异常:
1 2 3 4 5 6 7 8 9 ExecutorService pool = Executors.newFixedThreadPool(1 ); pool.submit(() -> { try { log.debug("task1" ); int i = 1 / 0 ; } catch (Exception e) { log.error("error:" , e); } });
方法2:使用 Future,错误信息都被封装进submit方法的返回方法中。
1 2 3 4 5 6 7 ExecutorService pool = Executors.newFixedThreadPool(1 ); Future<Boolean> f = pool.submit(() -> { log.debug("task1" ); int i = 1 / 0 ; return true ; }); log.debug("result:{}" , f.get());
Tomcat 线程池
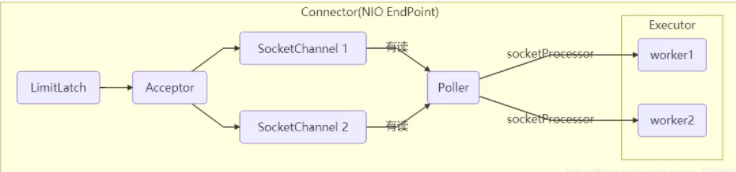
LimitLatch 用来限流,可以控制最大连接个数,类似 J.U.C 中的 Semaphore 后面再讲。
Acceptor 只负责【接收新的 socket 连接】。
Poller 只负责监听 socket channel 是否有【可读的 I/O 事件】。
一旦可读,封装一个任务对象(socketProcessor),提交给 Executor 线程池处理。
Executor 线程池中的工作线程最终负责【处理请求】。
Tomcat 线程池扩展了 ThreadPoolExecutor,行为稍有不同,如果总线程数达到 maximumPoolSize,这时不会立刻抛 RejectedExecutionException 异常,而是再次尝试将任务放入队列,如果还失败,才抛出 RejectedExecutionException 异常。
tomcat部分源码:
1 2 3 4 5 6 7 8 9 10 11 12 13 14 15 16 17 18 19 20 21 22 23 24 25 26 27 28 29 30 31 32 33 public void execute (Runnable command, long timeout, TimeUnit unit) submittedCount.incrementAndGet(); try { super .execute(command); } catch (RejectedExecutionException rx) { if (super .getQueue() instanceof TaskQueue) { final TaskQueue queue = (TaskQueue)super .getQueue(); try { if (!queue.force(command, timeout, unit)) { submittedCount.decrementAndGet(); throw new RejectedExecutionException("Queue capacity is full." ); } } catch (InterruptedException x) { submittedCount.decrementAndGet(); Thread.interrupted(); throw new RejectedExecutionException(x); } } else { submittedCount.decrementAndGet(); throw rx; } } } public boolean force (Runnable o, long timeout, TimeUnit unit) throws InterruptedException if ( parent.isShutdown() ) throw new RejectedExecutionException( "Executor not running, can't force a command into the queue" ); return super .offer(o,timeout,unit); is rejected }
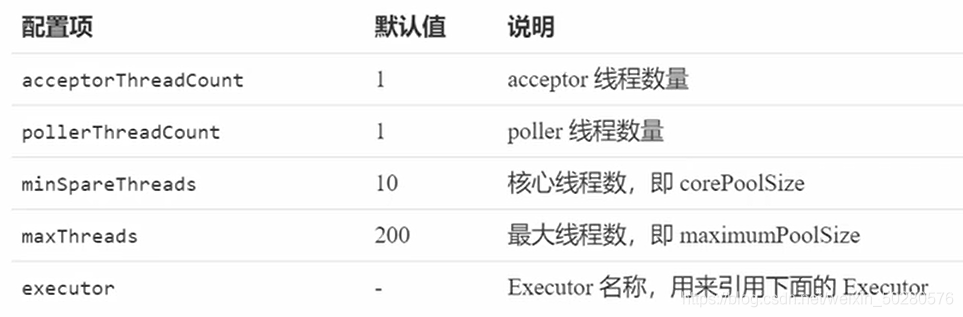
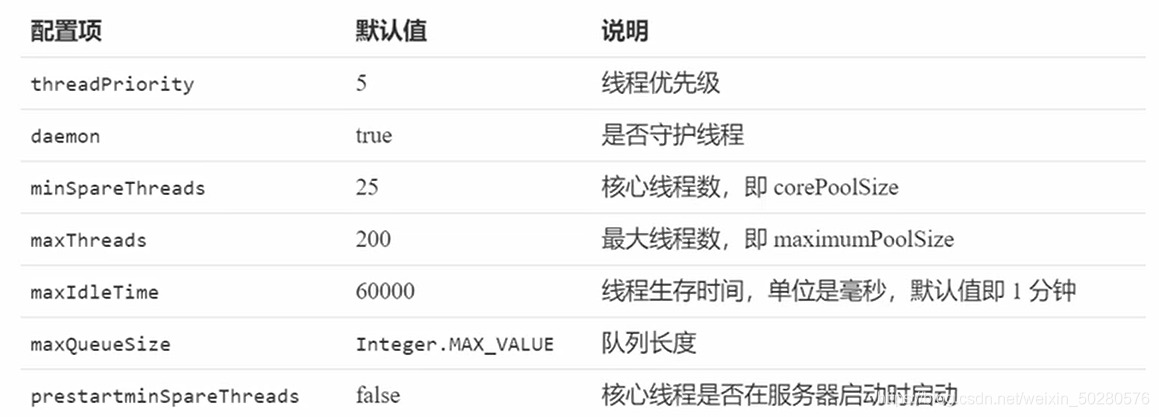
Connector 配置如下:
Executor 线程池配置如下:
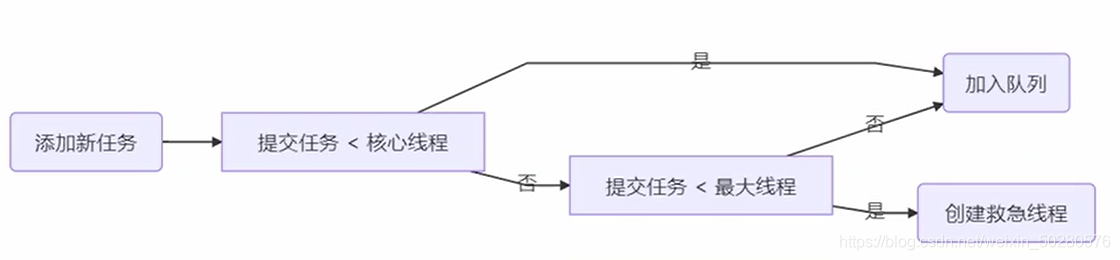
可以看到该线程池实现的是一个无界的队列,所以说是不是执行任务的线程数大于了核心线程数,都会添加到阻塞队列中,那么救急线程是不是就不会用到呢,其实不是,分析如下图:
如图所示,当添加新的任务时,如果提交的任务大于核心线程数小于最大线程数就创建救急线程,否则就加入任务队列中。
异步模式之工作线程 定义:
让有限的工作线程(Worker Thread)来轮流异步处理无限多的任务。也可以将其归类为分工模式,它的典型实现就是线程池,也体现了经典设计模式中的享元模式。
例如 :
海底捞的服务员(线程),轮流处理每位客人的点餐(任务),如果为每位客人都配一名专属的服务员,那 么成本就太高了(对比另一种多线程设计模式:Thread-Per-Message) 注意,不同任务类型应该使用不同的线程池,这样能够避免饥饿,并能提升效率 例如,如果一个餐馆的工人既要招呼客人(任务类型A),又要到后厨做菜(任务类型B)显然效率不咋地,分成 服务员(线程池A)与厨师(线程池B)更为合理,当然你能想到更细致的分工。
饥饿:
固定大小线程池会有饥饿现象,解决方法可以增加线程池的大小,不过不是根本解决方案,还是前面提到的,不同的任务类型,采用不同的线程池。实现代码如下:
1 2 3 4 5 6 7 8 9 10 11 12 13 14 15 16 17 18 19 20 21 22 23 24 25 26 27 28 29 30 31 32 33 34 35 36 37 38 39 40 41 42 43 44 45 46 47 48 49 50 51 52 53 54 55 56 57 58 59 60 61 62 63 64 65 66 67 68 69 70 71 72 73 74 75 76 77 78 79 80 81 82 83 84 85 @Slf4j(topic = "c.Code_07_StarvationTest") public class Code_07_StarvationTest public static List<String> list = new ArrayList<>(Arrays.asList("宫保鸡丁" , "青椒肉丝" , "千张肉丝" )); public static Random random = new Random(); public static String cooking () return list.get(random.nextInt(list.size())); } public static void main (String[] args) ExecutorService cookPool = Executors.newFixedThreadPool(1 ); ExecutorService waiterPool = Executors.newFixedThreadPool(1 ); waiterPool.execute(() -> { log.info("处理点餐" ); Future<String> f = cookPool.submit(() -> { log.info("做菜" ); return cooking(); }); try { log.info("上菜 {} " , f.get()); } catch (InterruptedException e) { e.printStackTrace(); } catch (ExecutionException e) { e.printStackTrace(); } }); waiterPool.execute(() -> { log.info("处理点餐" ); Future<String> f2 = cookPool.submit(() -> { log.info("做菜" ); return cooking(); }); try { log.info("上菜 {} " , f2.get()); } catch (InterruptedException e) { e.printStackTrace(); } catch (ExecutionException e) { e.printStackTrace(); } }); } public static void test1 ( ExecutorService executorService) executorService.execute(() -> { log.info("处理点餐" ); Future<String> f = executorService.submit(() -> { log.info("做菜" ); return cooking(); }); try { log.info("上菜 {} " , f.get()); } catch (InterruptedException e) { e.printStackTrace(); } catch (ExecutionException e) { e.printStackTrace(); } }); executorService.execute(() -> { log.info("处理点餐" ); Future<String> f2 = executorService.submit(() -> { log.info("做菜" ); return cooking(); }); try { log.info("上菜 {} " , f2.get()); } catch (InterruptedException e) { e.printStackTrace(); } catch (ExecutionException e) { e.printStackTrace(); } }); } }
创建多大的线程池合适?
过小会导致程序不能充分地利用系统资源、容易导致饥饿,过大会导致更多的线程上下文切换,占用更多内存。
CPU 密集型运算 通常采用 cpu 核数 + 1 能够实现最优的 CPU 利用率,+1 是保证当线程由于页缺失故障(操作系统)或其它原因导致暂停时,额外的这个线程就能顶上去,保证 CPU 时钟周期不被浪费。
I/O 密集型运算 CPU 不总是处于繁忙状态,例如,当你执行业务计算时,这时候会使用 CPU 资源,但当你执行 I/O 操作时、远程 RPC 调用时,包括进行数据库操作时,这时候 CPU 就闲下来了,你可以利用多线程提高它的利用率。
经验公式如下:
线程数 = 核数 * 期望 CPU 利用率 * 总时间(CPU计算时间+等待时间) / CPU 计算时间。
例如 4 核 CPU 计算时间是 50% ,其它等待时间是 50%,期望 cpu 被 100% 利用,套用公式 4 * 100% * 100% / 50% = 8。
例如 4 核 CPU 计算时间是 10% ,其它等待时间是 90%,期望 cpu 被 100% 利用,套用公式 4 * 100% * 100% / 10% = 40。
应用之定时任务 使用 newScheduledThreadPool 中的 scheduleAtFixedRate 这个方法可以执行定时任务。代码如下:
1 2 3 4 5 6 7 8 9 10 11 12 13 14 15 16 17 18 19 20 public static void main (String[] args) LocalDateTime now = LocalDateTime.now(); System.out.println(now); LocalDateTime time = now.withHour(18 ).withMinute(0 ).withSecond(0 ).withNano(0 ).with(DayOfWeek.THURSDAY); if (now.compareTo(time) > 0 ) { time = time.plusWeeks(1 ); } long initalDelay = Duration.between(now, time).toMillis(); long period = 1000 * 60 * 60 * 24 * 7 ; ScheduledExecutorService executorService = Executors.newScheduledThreadPool(1 ); executorService.scheduleAtFixedRate(() -> { System.out.println("running" ); }, initalDelay, period, TimeUnit.MILLISECONDS); }
 微信
微信 支付宝
支付宝