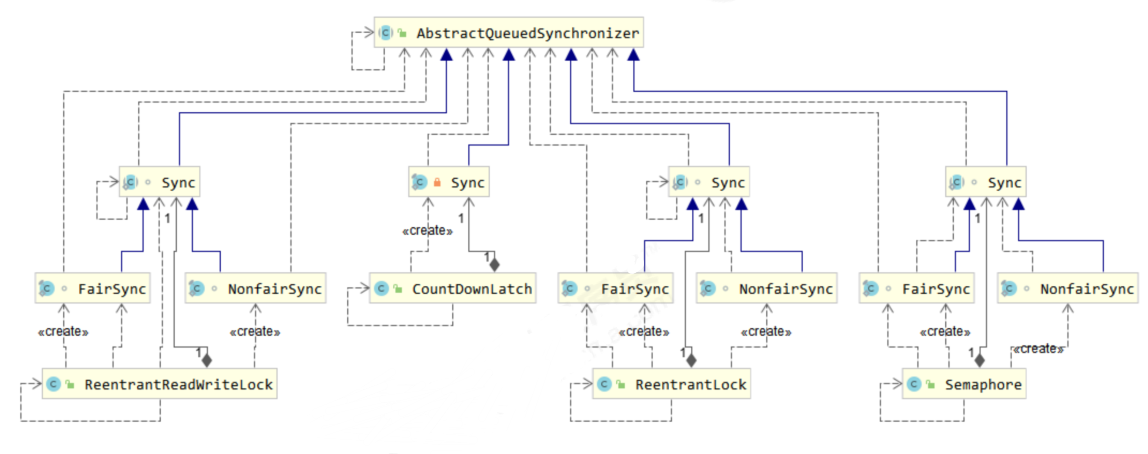
AQS 概述 全称是 AbstractQueuedSynchronizer,是阻塞式锁和相关的同步器工具的框架。
特点
用 state 属性来表示资源的状态(分独占模式和共享模式),子类需要定义如何维护这个状态,控制如何获取锁和释放锁:
getState:获取 state 状态。
setState:设置 state 状态。
compareAndSetState:cas 机制设置 state 状态。
独占模式只有一个线程能够访问资源,而共享模式可以允许多个线程访问资源。
提供了基于 FIFO 的等待队列,类似于 Monitor 的 EntryList。
条件变量来实现等待、唤醒机制,支持多个条件变量,类似于 Monitor 的 WaitSet。
子类主要实现这样一些方法(默认抛出 UnsupportedOperationException):
tryAcquire
tryRelease
tryAcquireShared
tryReleaseShared
isHeldExclusively
1 2 3 4 5 6 7 8 9 10 11 if (!tryAcquire(arg)) { } if (tryRelease(arg)) { }
自定义同步器 下面实现一个不可重入的阻塞式锁:使用 AbstractQueuedSynchronizer 自定义一个同步器来实现自定义锁,代码如下:
1
2
3
4
5
6
7
8
9
10
11
12
13
14
15
16
17
18
19
20
21
22
23
24
25
26
27
28
29
30
31
32
33
34
35
36
37
38
39
40
41
42
43
44
45
46
47
48
49
50
51
52
53
54
55
56
57
58
59
60
61
62
63
64
65
66
67
68
69
70
71
72
73
74
75
76
77
78
79
80
81
82
83
84
85
86
87
88
89
90
public class UnRepeatLock public static void main (String[] args) MyLock myLock = new MyLock(); new Thread(() -> { myLock.lock(); log.info("lock ... " ); myLock.lock(); try { log.info("starting..." ); Thread.sleep(1000 ); } catch (InterruptedException e) { e.printStackTrace(); } finally { log.info("unlock ... " ); myLock.unlock(); } },"t1" ).start(); } } class MyLock implements Lock class MySync extends AbstractQueuedSynchronizer @Override protected boolean tryAcquire (int arg) if (compareAndSetState(0 , 1 )) { setExclusiveOwnerThread(Thread.currentThread()); return true ; } return false ; } @Override protected boolean tryRelease (int arg) if (compareAndSetState(1 , 0 )) { setExclusiveOwnerThread(null ); setState(0 ); return true ; } return false ; } @Override protected boolean isHeldExclusively () return getState() == 1 ; } public Condition newCondition () return new ConditionObject(); } } private MySync mySync = new MySync(); @Override public void lock () mySync.acquire(1 ); } @Override public void lockInterruptibly () throws InterruptedException mySync.acquireInterruptibly(1 ); } @Override public boolean tryLock () return mySync.tryAcquire(1 ); } @Override public boolean tryLock (long time, TimeUnit unit) throws InterruptedException return mySync.tryAcquireNanos(1 ,unit.toNanos(time)); } @Override public void unlock () mySync.release(1 ); } @Override public Condition newCondition () return mySync.newCondition(); } }
输出:
1
2
19 :35 :34.374 [t1] INFO com.heu.test.UnRepeatLock - lock ... 一直等待。。。
AQS 目标 AQS 要实现的功能目标
要实现的性能目标
Instead, the primary performance goal here is scalability: to predictably maintain effiffifficiency even, orespecially, when synchronizers are contended.
AQS设计 获取锁的逻辑:
1
2
3
4
5
6
while (state 状态不允许获取) { if (队列中还没有此线程) { 入队并阻塞 } } 当前线程出队
释放锁的逻辑:
1
2
3
if(state 状态允许了) { 恢复阻塞的线程(s) }
要点:
原子维护 state 状态
阻塞及恢复线程
维护队列
state 设计
state 使用 volatile 配合 cas 保证其修改时的原子性。
state 使用了 32bit int 来维护同步状态,因为当时使用 long 在很多平台下测试的结果并不理想。
阻塞恢复设计
早期的控制线程暂停和恢复的 api 有 suspend 和 resume,但它们是不可用的,因为如果先调用的 resume ,那么 suspend 将感知不到。
解决方法是使用 park & unpark 来实现线程的暂停和恢复,具体原理在之前讲过了,先 unpark 再 park 也没问题。
park & unpark 是针对线程的,而不是针对同步器的,因此控制粒度更为精细。
park 线程还可以通过 interrupt 打断。
**** 队列设计
队列中有 head 和 tail 两个指针节点,都用 volatile 修饰配合 cas 使用,每个节点有 state 维护节点状态。
主要用到 AQS的并发工具类
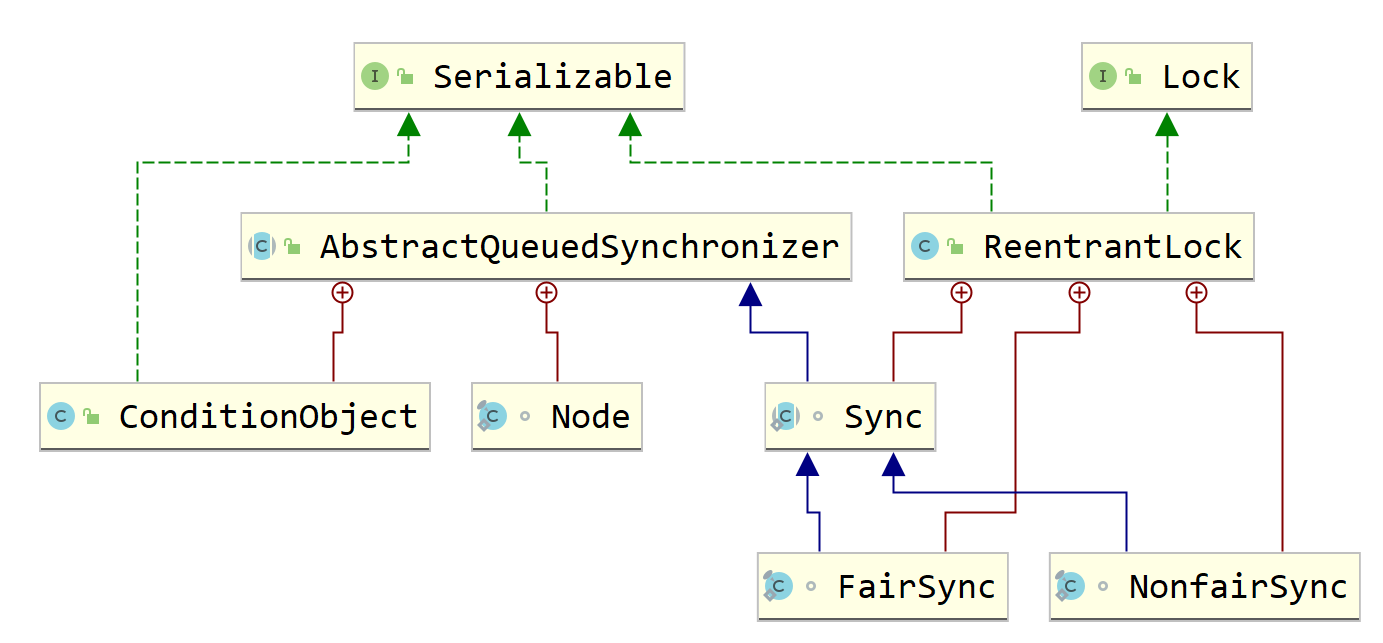
ReentrantLock 原理 可以看到 ReentrantLock 提供了两个同步器,实现公平锁和非公平锁,默认是非公平锁!
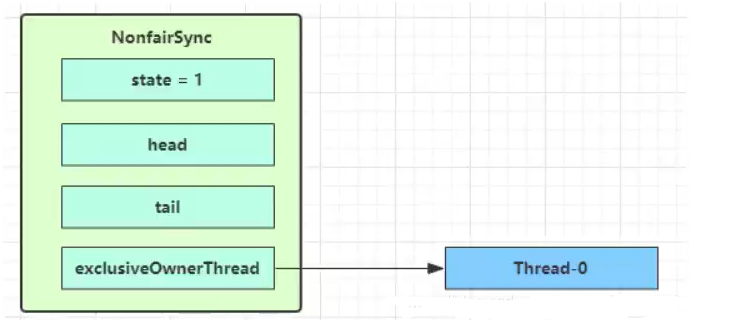
非公平锁实现原理 加锁流程 先从构造器开始看,默认为非公平锁实现。
1
2
3
public ReentrantLock () sync = new NonfairSync(); }
NonfairSync 继承自 AQS,在没有线程竞争时:
1
2
3
4
5
6
7
8
9
final void lock () if (compareAndSetState(0 , 1 )) setExclusiveOwnerThread(Thread.currentThread()); else acquire(1 ); }
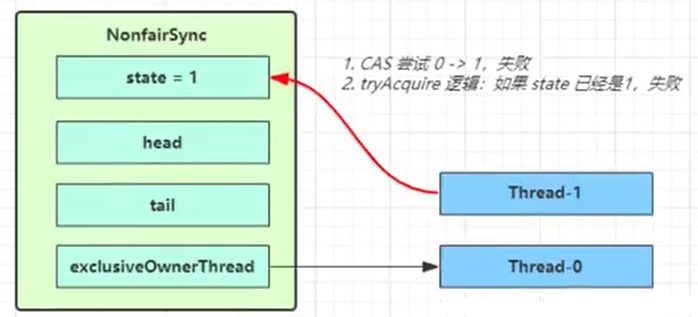
第一个竞争出现时:
1
2
3
4
5
6
public final void acquire (int arg) if (!tryAcquire(arg) && acquireQueued(addWaiter(Node.EXCLUSIVE), arg)) selfInterrupt(); }
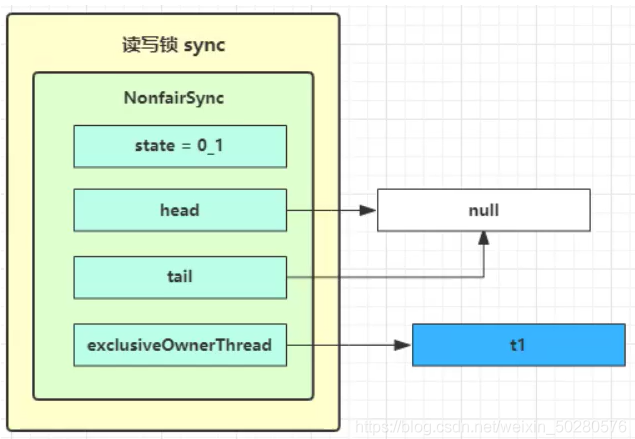
Thread-1 执行了:
lock方法中CAS,尝试将 state 由 0 改为 1,结果失败;
lock方法中进一步调用acquire方法,进入 tryAcquire 逻辑,这里认为此时 state 已经是1,结果仍然失败;
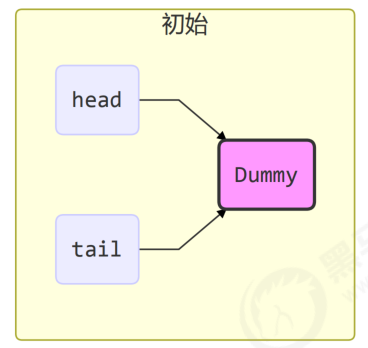
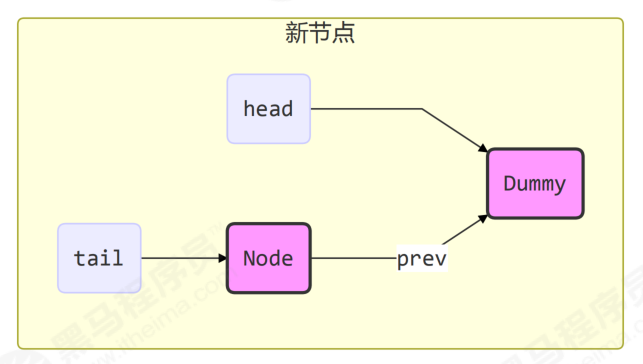
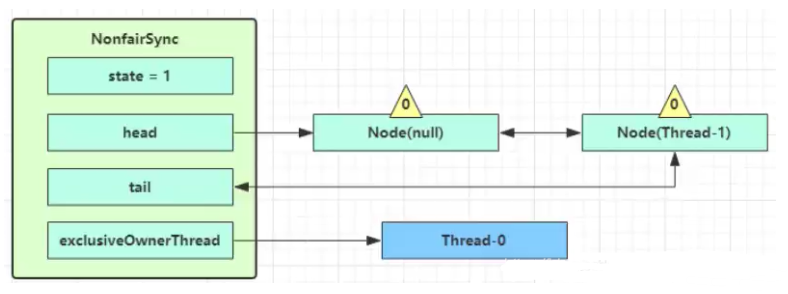
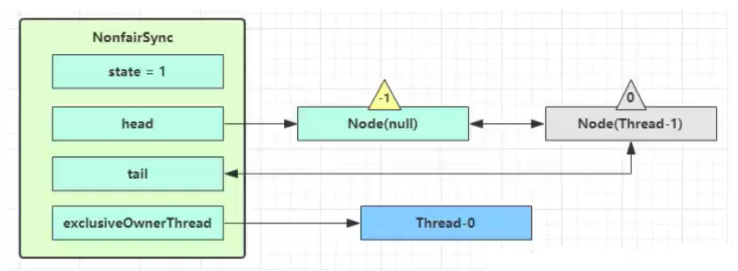
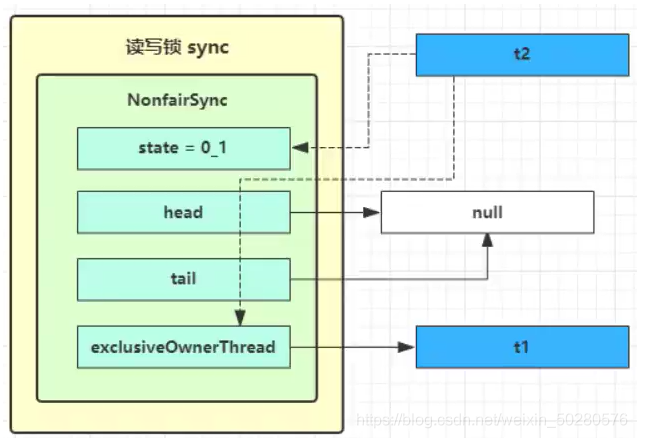
接下来进入 acquire方法的addWaiter 逻辑,构造 Node 队列:
图中黄色三角表示该 Node 的 waitStatus 状态,其中 0 为默认正常状态;
Node 的创建是懒惰的;
其中第一个 Node 称为 Dummy(哑元)或哨兵,用来占位,并不关联线程。
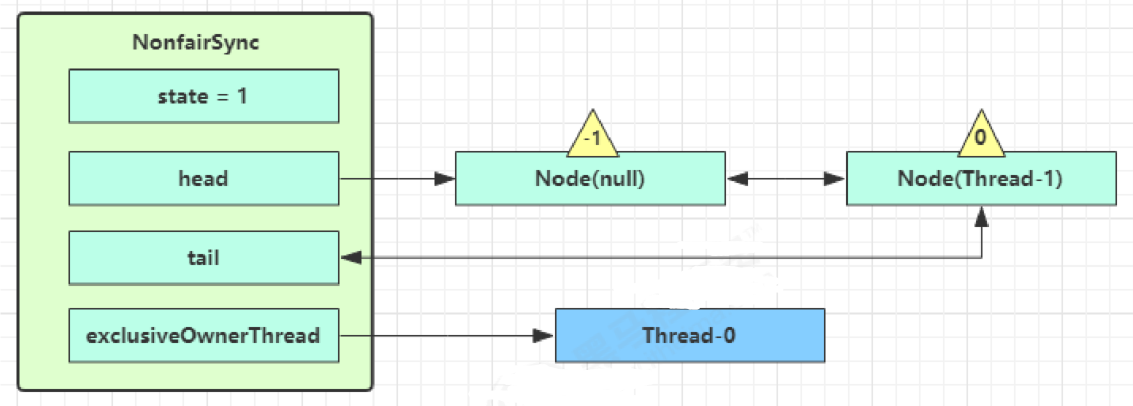
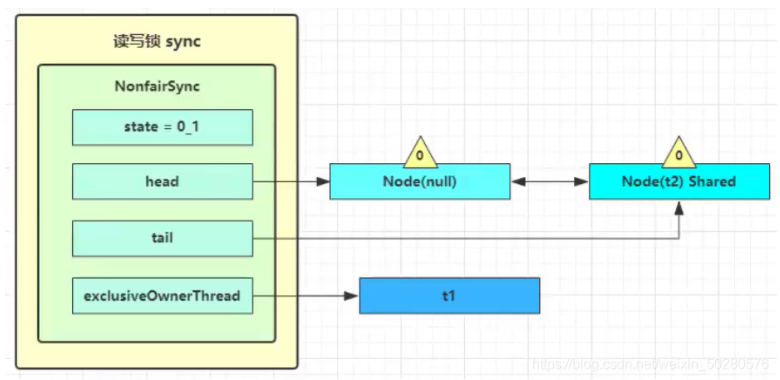
之后当前线程进入acquire方法的 acquireQueued 逻辑:
acquireQueued 会在一个死循环中不断尝试获得锁,失败后进入 park 阻塞;
如果自己是紧邻着 head(排第二位),那么再次 tryAcquire 尝试获取锁,这里设置此时 state 仍为 1,失败;
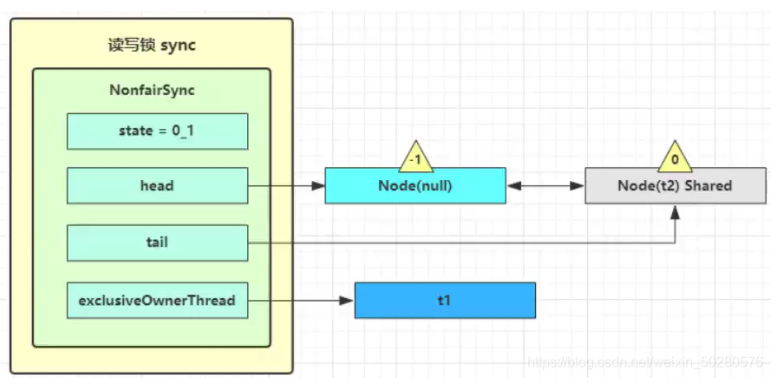
进入 shouldParkAfterFailedAcquire 逻辑,将前驱 node,即 head 的 waitStatus 改为 -1,这次返回 false;
shouldParkAfterFailedAcquire 执行完毕回到 acquireQueued ,再次 tryAcquire 尝试获取锁,当然这时 state 仍为 1,失败;
当再次进入 shouldParkAfterFailedAcquire 时,这时因为其前驱 node 的 waitStatus 已经是 -1,这次返回 true;
进入 parkAndCheckInterrupt, Thread-1 park(灰色表示已经阻塞)。
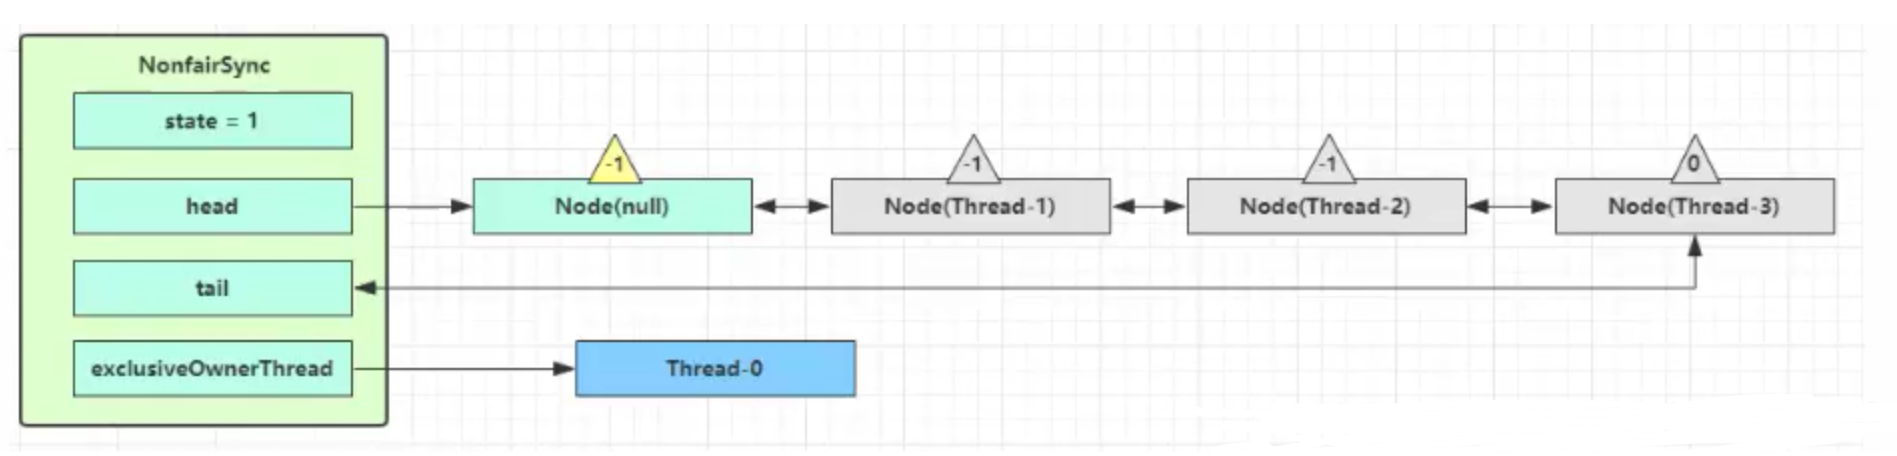
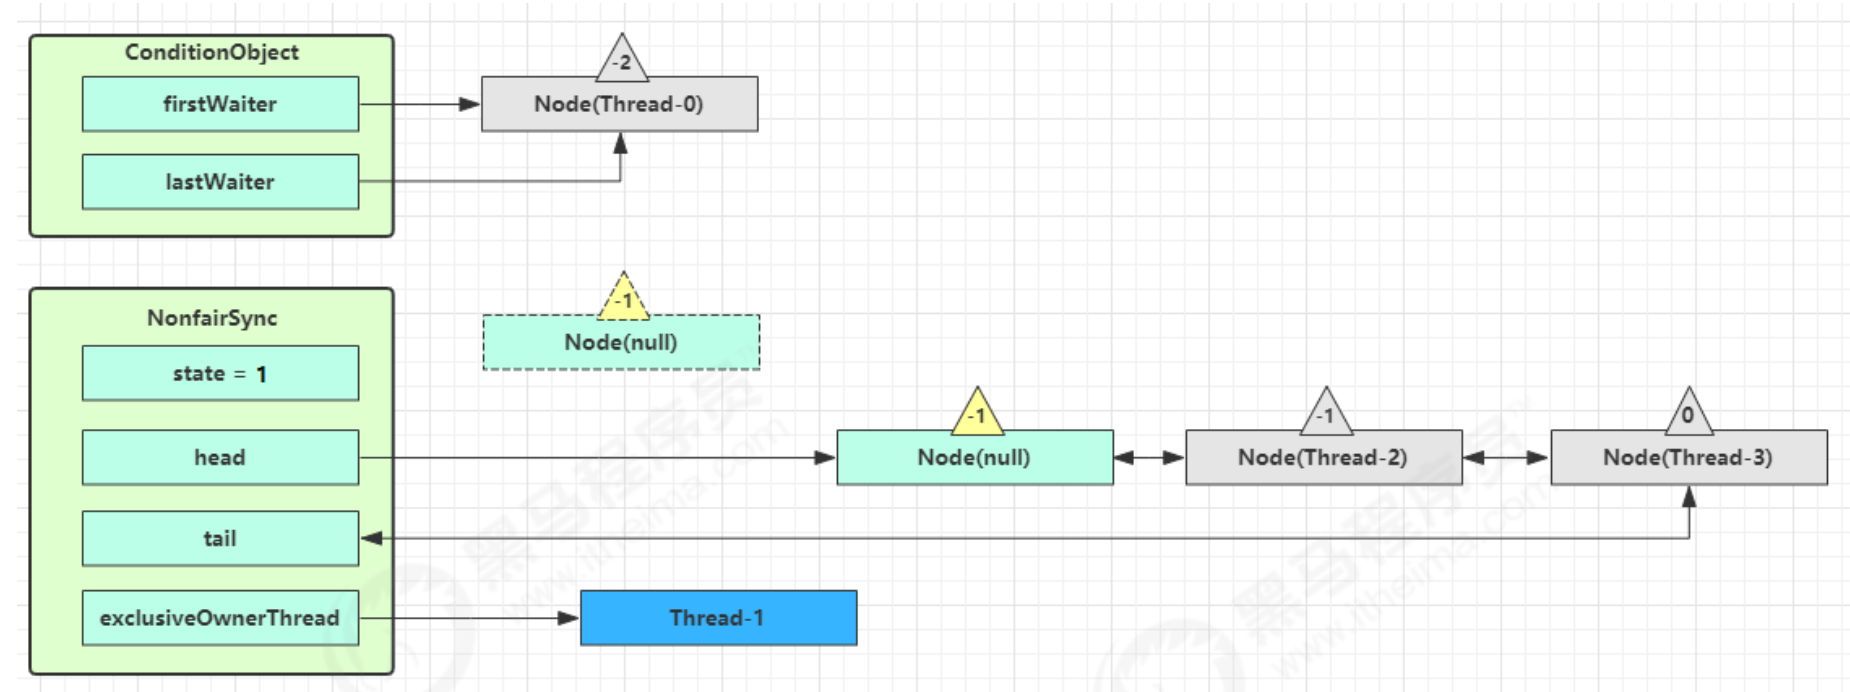
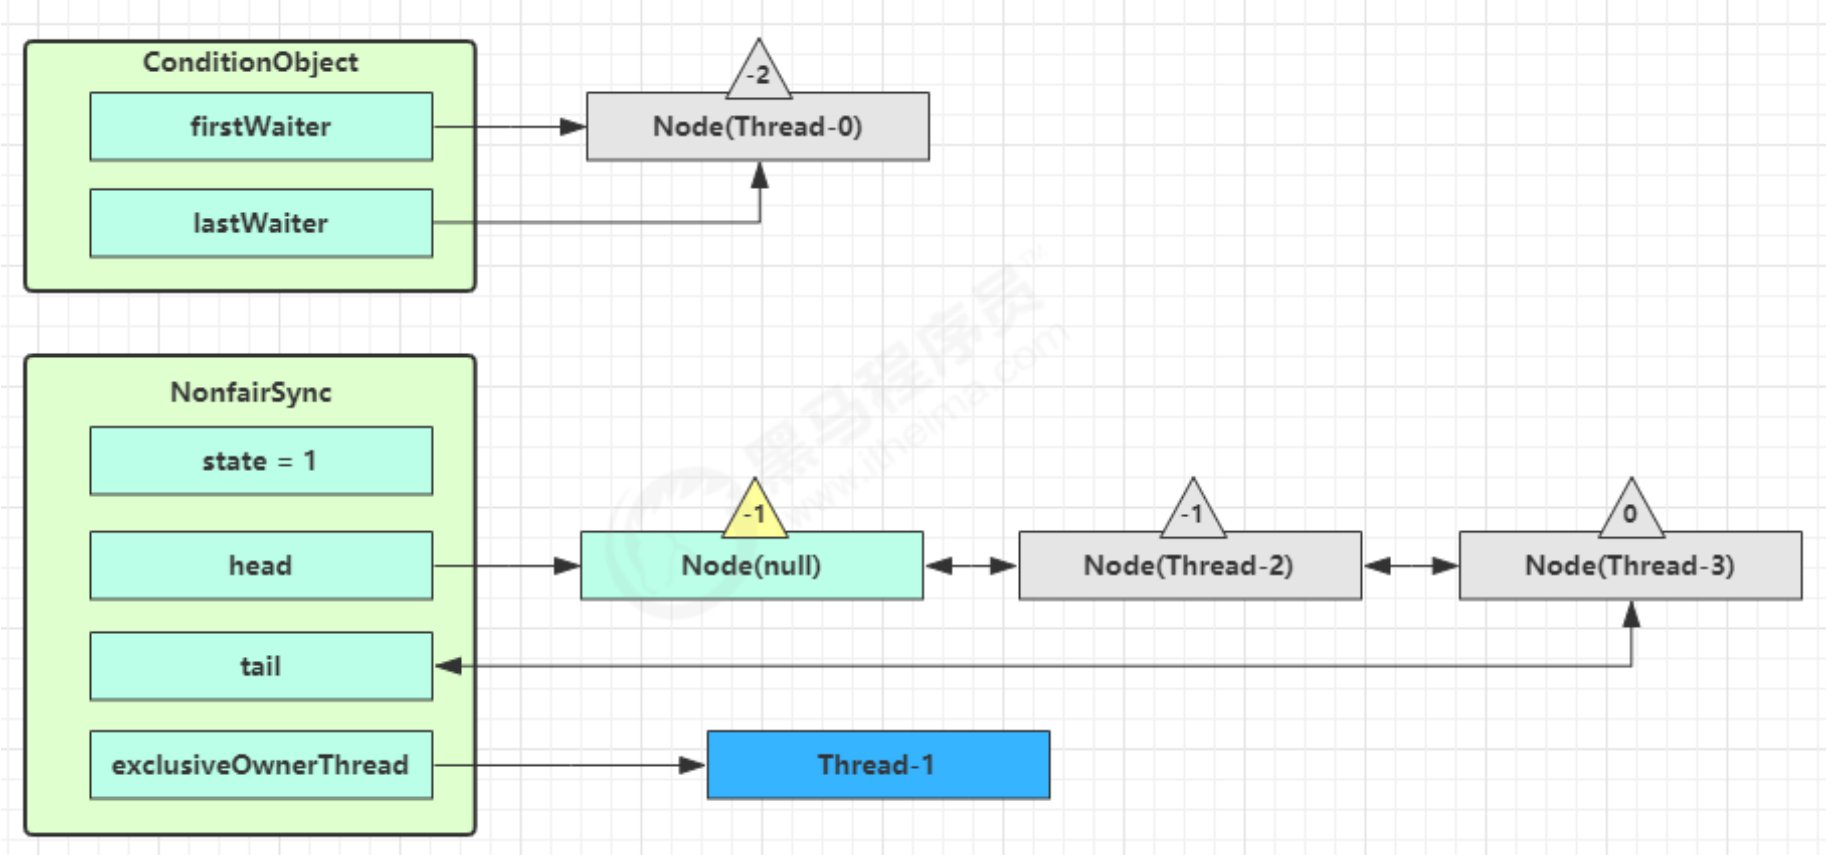
如果再次有多个线程经历上述过程竞争失败,变成这个样子:
加锁源码:
1 2 3 4 5 6 7 8 9 10 11 12 13 14 15 16 17 18 19 20 21 22 23 24 25 26 27 28 29 30 31 32 33 34 35 36 37 38 39 40 41 42 43 44 45 46 47 48 49 50 51 52 53 54 55 56 57 58 59 60 61 62 63 64 65 66 67 68 69 70 71 72 73 74 75 76 77 78 79 80 81 82 83 84 85 86 87 88 89 90 91 92 93 94 95 96 97 98 99 100 101 102 103 104 105 106 107 108 109 110 111 112 113 114 115 116 117 118 119 120 121 122 123 124 125 126 127 128 129 130 131 132 133 134 135 136 137 138 139 140 141 142 143 144 145 146 147 148 149 150 151 152 153 154 155 156 static final class NonfairSync extends Sync private static final long serialVersionUID = 7316153563782823691L ; final void lock () if (compareAndSetState(0 , 1 )) setExclusiveOwnerThread(Thread.currentThread()); else acquire(1 ); } public final void acquire (int arg) if ( !tryAcquire(arg) && acquireQueued(addWaiter(Node.EXCLUSIVE), arg) ) { selfInterrupt(); } } protected final boolean tryAcquire (int acquires) return nonfairTryAcquire(acquires); } final boolean nonfairTryAcquire (int acquires) final Thread current = Thread.currentThread(); int c = getState(); if (c == 0 ) { if (compareAndSetState(0 , acquires)) { setExclusiveOwnerThread(current); return true ; } } else if (current == getExclusiveOwnerThread()) { int nextc = c + acquires; if (nextc < 0 ) throw new Error("Maximum lock count exceeded" ); setState(nextc); return true ; } return false ; } private Node addWaiter (Node mode) Node node = new Node(Thread.currentThread(), mode); Node pred = tail; if (pred != null ) { node.prev = pred; if (compareAndSetTail(pred, node)) { pred.next = node; return node; } } enq(node); return node; } private Node enq (final Node node) for (;;) { Node t = tail; if (t == null ) { if (compareAndSetHead(new Node())) { tail = head; } } else { node.prev = t; if (compareAndSetTail(t, node)) { t.next = node; return t; } } } } final boolean acquireQueued (final Node node, int arg) boolean failed = true ; try { boolean interrupted = false ; for (;;) { final Node p = node.predecessor(); if (p == head && tryAcquire(arg)) { setHead(node); p.next = null ; failed = false ; return interrupted; } if ( shouldParkAfterFailedAcquire(p, node) && parkAndCheckInterrupt() ) { interrupted = true ; } } } finally { if (failed) cancelAcquire(node); } } private static boolean shouldParkAfterFailedAcquire (Node pred, Node node) int ws = pred.waitStatus; if (ws == Node.SIGNAL) { return true ; } if (ws > 0 ) { do { node.prev = pred = pred.prev; } while (pred.waitStatus > 0 ); pred.next = node; } else { compareAndSetWaitStatus(pred, ws, Node.SIGNAL); } return false ; } private final boolean parkAndCheckInterrupt () LockSupport.park(this ); return Thread.interrupted(); } }
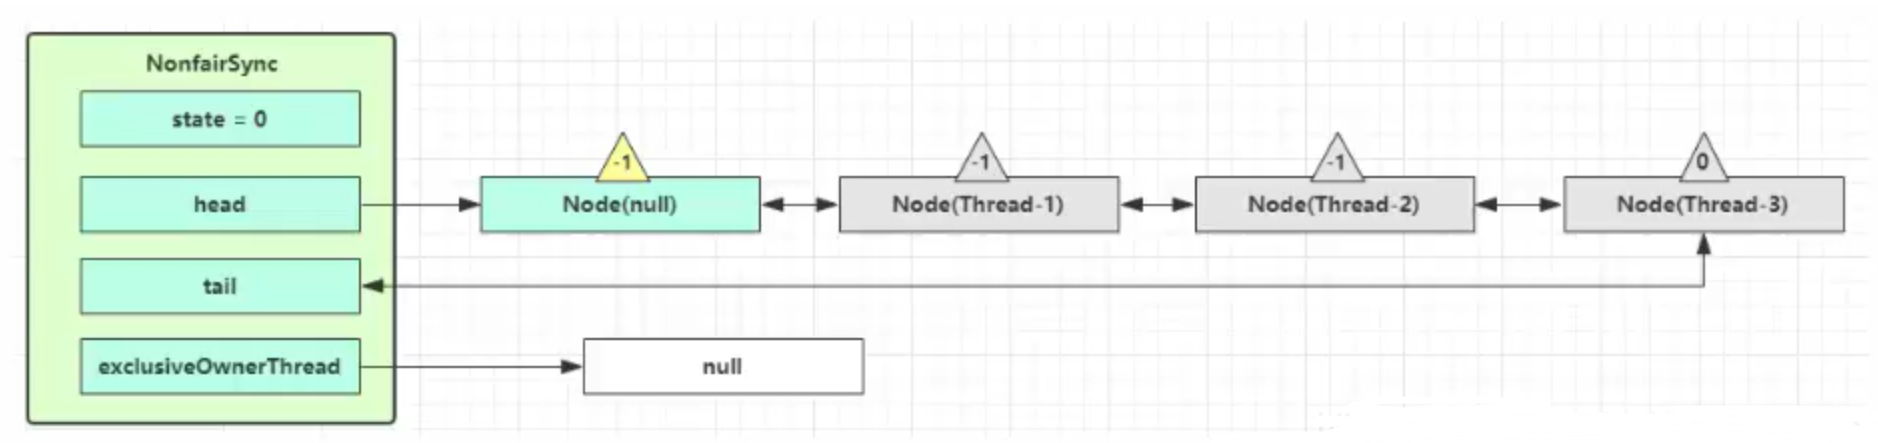
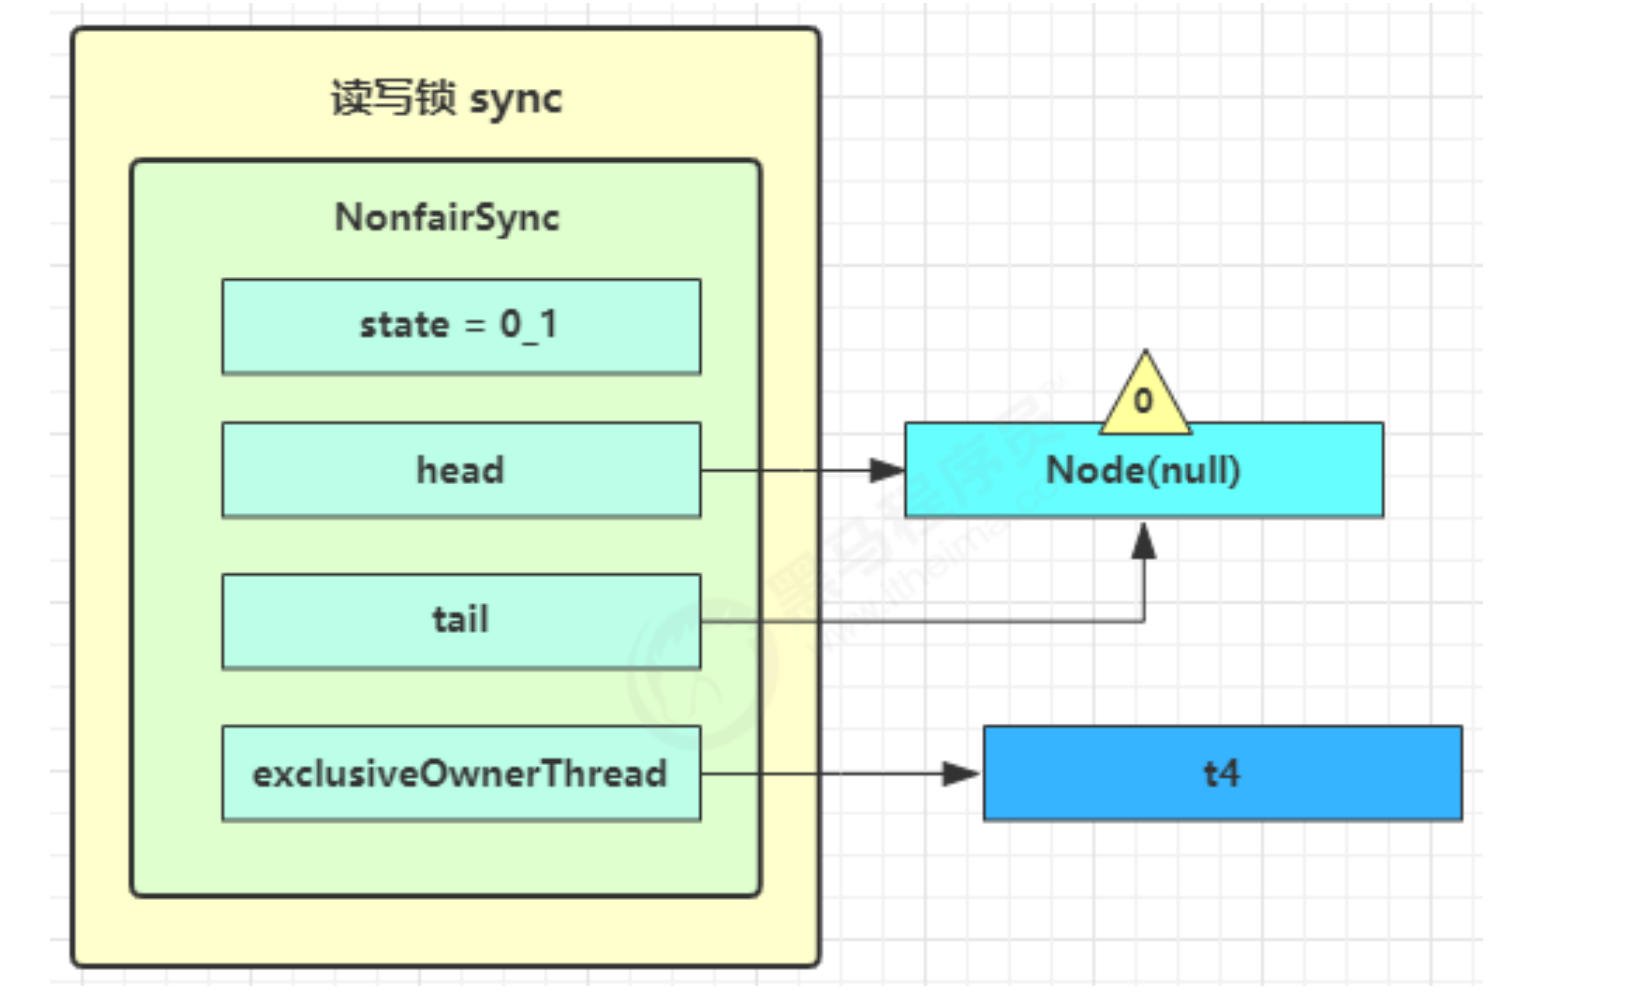
解锁流程 Thread-0 释放锁,进入 tryRelease 流程,如果成功:
设置 exclusiveOwnerThread 为 null
state = 0
如果当前队列不为 null,并且 head 的 waitStatus = -1,进入 unparkSuccessor 流程:
unparkSuccessor 中会找到队列中离 head 最近的一个 Node(没取消的),unpark 恢复其运行,本例中即为 Thread-1.
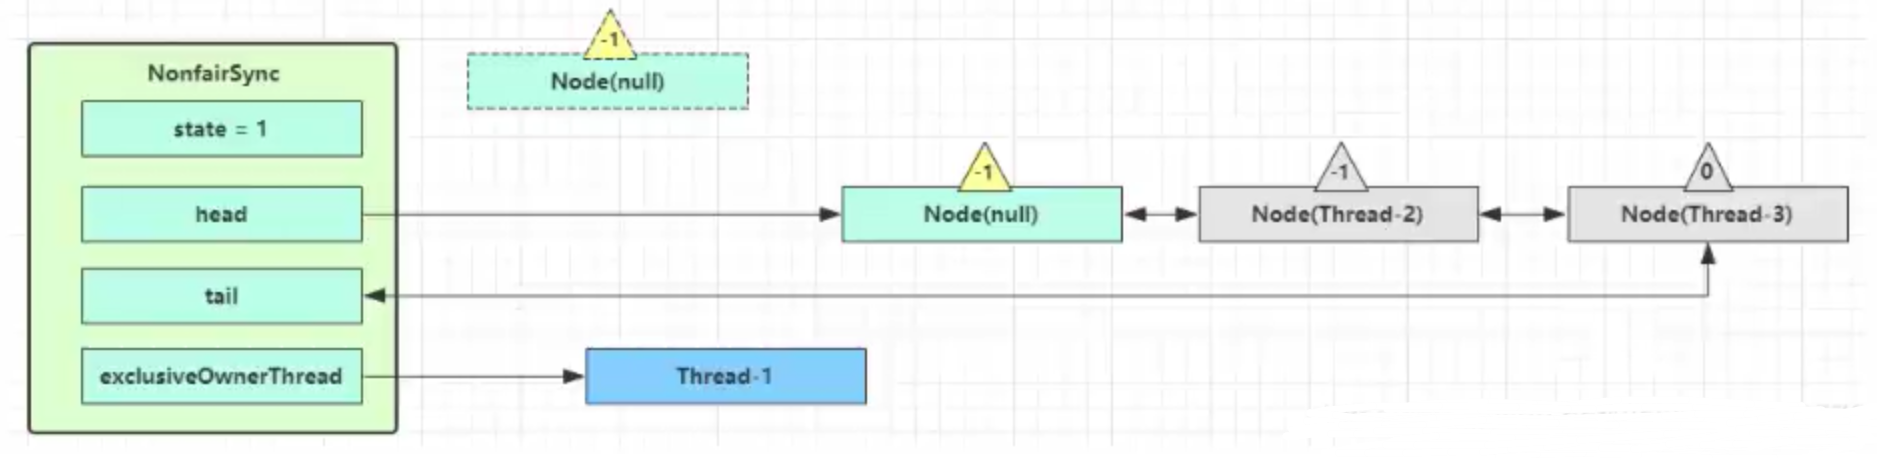
回到 Thread-1 的 acquireQueued 流程:
如果加锁成功(没有竞争),会设置 (acquireQueued 方法中):
exclusiveOwnerThread 为 Thread-1,state = 1;
head 指向刚刚 Thread-1 所在的 Node,该 Node 清空 Thread;
原本的 head 因为从链表断开,而可被垃圾回收。
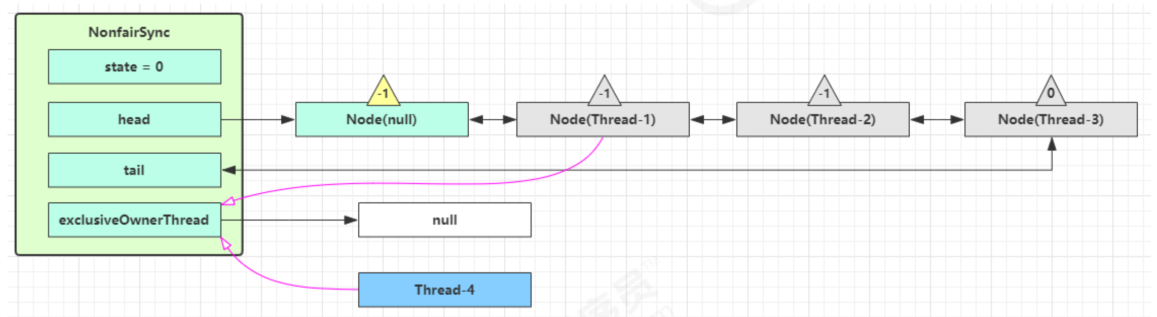
如果这时候有其它线程来竞争(非公平的体现),例如这时有 Thread-4 来了:
如果不巧又被 Thread-4 占了先:
Thread-4 被设置为 exclusiveOwnerThread,state = 1;
Thread-1 再次进入 acquireQueued 流程,获取锁失败,重新进入 park 阻塞。
解锁源码:
1 2 3 4 5 6 7 8 9 10 11 12 13 14 15 16 17 18 19 20 21 22 23 24 25 26 27 28 29 30 31 32 33 34 35 36 37 38 39 40 41 42 43 44 45 46 47 48 49 50 51 52 53 54 55 56 57 58 59 60 61 62 63 64 static final class NonfairSync extends Sync public void unlock () sync.release(1 ); } public final boolean release (int arg) if (tryRelease(arg)) { Node h = head; if ( h != null && h.waitStatus != 0 ) { unparkSuccessor(h); } return true ; } return false ; } protected final boolean tryRelease (int releases) int c = getState() - releases; if (Thread.currentThread() != getExclusiveOwnerThread()) throw new IllegalMonitorStateException(); boolean free = false ; if (c == 0 ) { free = true ; setExclusiveOwnerThread(null ); } setState(c); return free; } private void unparkSuccessor (Node node) int ws = node.waitStatus; if (ws < 0 ) { compareAndSetWaitStatus(node, ws, 0 ); } Node s = node.next; if (s == null || s.waitStatus > 0 ) { s = null ; for (Node t = tail; t != null && t != node; t = t.prev) if (t.waitStatus <= 0 ) s = t; } if (s != null ) LockSupport.unpark(s.thread); } }
锁重入原理 1 2 3 4 5 6 7 8 9 10 11 12 13 14 15 16 17 18 19 20 21 22 23 24 25 26 27 28 29 30 31 32 33 34 35 36 37 38 39 40 41 static final class NonfairSync extends Sync final boolean nonfairTryAcquire (int acquires) final Thread current = Thread.currentThread(); int c = getState(); if (c == 0 ) { if (compareAndSetState(0 , acquires)) { setExclusiveOwnerThread(current); return true ; } } else if (current == getExclusiveOwnerThread()) { int nextc = c + acquires; if (nextc < 0 ) throw new Error("Maximum lock count exceeded" ); setState(nextc); return true ; } return false ; } protected final boolean tryRelease (int releases) int c = getState() - releases; if (Thread.currentThread() != getExclusiveOwnerThread()) throw new IllegalMonitorStateException(); boolean free = false ; if (c == 0 ) { free = true ; setExclusiveOwnerThread(null ); } setState(c); return free; } }
可打断原理 不可打断模式: 在此模式下,即使它被打断,仍会驻留在 AQS 队列中,一直要等到获得锁后方能得知自己被打断了。
1 2 3 4 5 6 7 8 9 10 11 12 13 14 15 16 17 18 19 20 21 22 23 24 25 26 27 28 29 30 31 32 33 34 35 36 37 38 39 40 41 42 43 44 45 46 47 48 49 50 51 52 static final class NonfairSync extends Sync private final boolean parkAndCheckInterrupt () LockSupport.park(this ); return Thread.interrupted(); } final boolean acquireQueued (final Node node, int arg) boolean failed = true ; try { boolean interrupted = false ; for (;;) { final Node p = node.predecessor(); if (p == head && tryAcquire(arg)) { setHead(node); p.next = null ; failed = false ; return interrupted; } if (shouldParkAfterFailedAcquire(p, node) && parkAndCheckInterrupt() ) { interrupted = true ; } } } finally { if (failed) cancelAcquire(node); } } public final void acquire (int arg) if (!tryAcquire(arg) && acquireQueued(addWaiter(Node.EXCLUSIVE), arg) ) { selfInterrupt(); } } static void selfInterrupt () Thread.currentThread().interrupt(); } }
可打断模式:
1 2 3 4 5 6 7 8 9 10 11 12 13 14 15 16 17 18 19 20 21 22 23 24 25 26 27 28 29 30 31 32 33 34 35 static final class NonfairSync extends Sync public final void acquireInterruptibly (int arg) throws InterruptedException if (Thread.interrupted()) throw new InterruptedException(); if (!tryAcquire(arg)) doAcquireInterruptibly(arg); } private void doAcquireInterruptibly (int arg) throws InterruptedException final Node node = addWaiter(Node.EXCLUSIVE); boolean failed = true ; try { for (;;) { final Node p = node.predecessor(); if (p == head && tryAcquire(arg)) { setHead(node); p.next = null ; failed = false ; return ; } if (shouldParkAfterFailedAcquire(p, node) && parkAndCheckInterrupt()) { throw new InterruptedException(); } } } finally { if (failed) cancelAcquire(node); } } }
公平锁原理 1 2 3 4 5 6 7 8 9 10 11 12 13 14 15 16 17 18 19 20 21 22 23 24 25 26 27 28 29 30 31 32 33 34 35 36 37 38 39 40 41 42 43 44 45 46 47 48 49 50 static final class FairSync extends Sync private static final long serialVersionUID = -3000897897090466540L ; final void lock () acquire(1 ); } public final void acquire (int arg) if ( !tryAcquire(arg) && acquireQueued(addWaiter(Node.EXCLUSIVE), arg) ) { selfInterrupt(); } } protected final boolean tryAcquire (int acquires) final Thread current = Thread.currentThread(); int c = getState(); if (c == 0 ) { if (!hasQueuedPredecessors() && compareAndSetState(0 , acquires)) { setExclusiveOwnerThread(current); return true ; } } else if (current == getExclusiveOwnerThread()) { int nextc = c + acquires; if (nextc < 0 ) throw new Error("Maximum lock count exceeded" ); setState(nextc); return true ; } return false ; } public final boolean hasQueuedPredecessors () Node t = tail; Node h = head; Node s; return h != t &&( (s = h.next) == null || s.thread != Thread.currentThread() ); } }
条件变量实现原理 每个条件变量其实就对应着一个等待队列,其实现类是 ConditionObject。
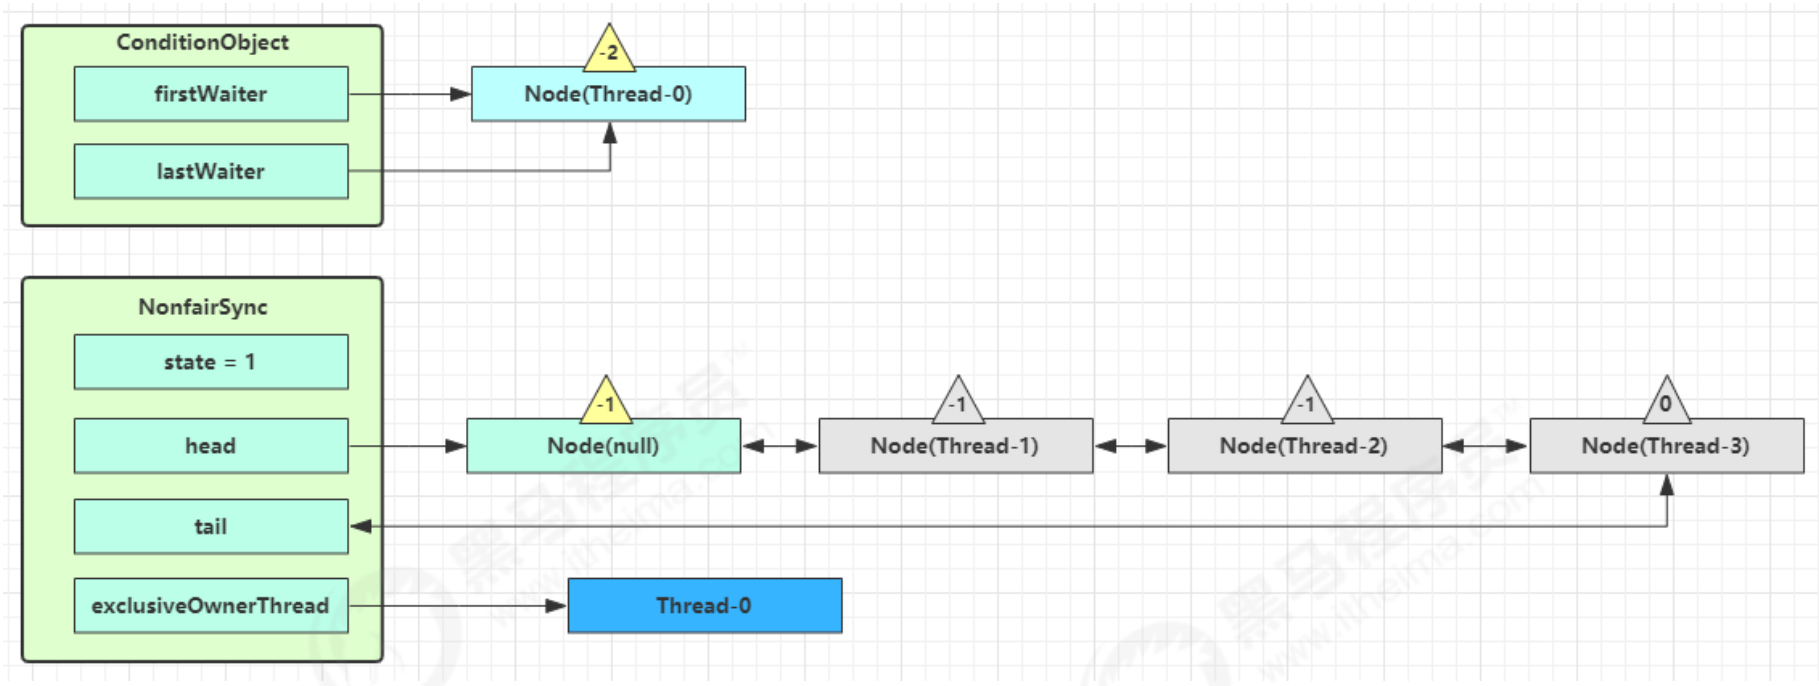
await流程 开始时 Thread-0 持有锁,调用 await方法,进入 ConditionObject 的 addConditionWaiter 流程,创建新的 Node 节点,状态为-2(Node.CONDITION),关联 Thread-0,加入等待队列尾部。
接下来进入 AQS 的 fullyRelease 流程,释放同步器上的锁:
unpark AQS 队列中的下一个节点,竞争锁,假设没有其他竞争线程竞争,那么 Thread-1 竞争成功:
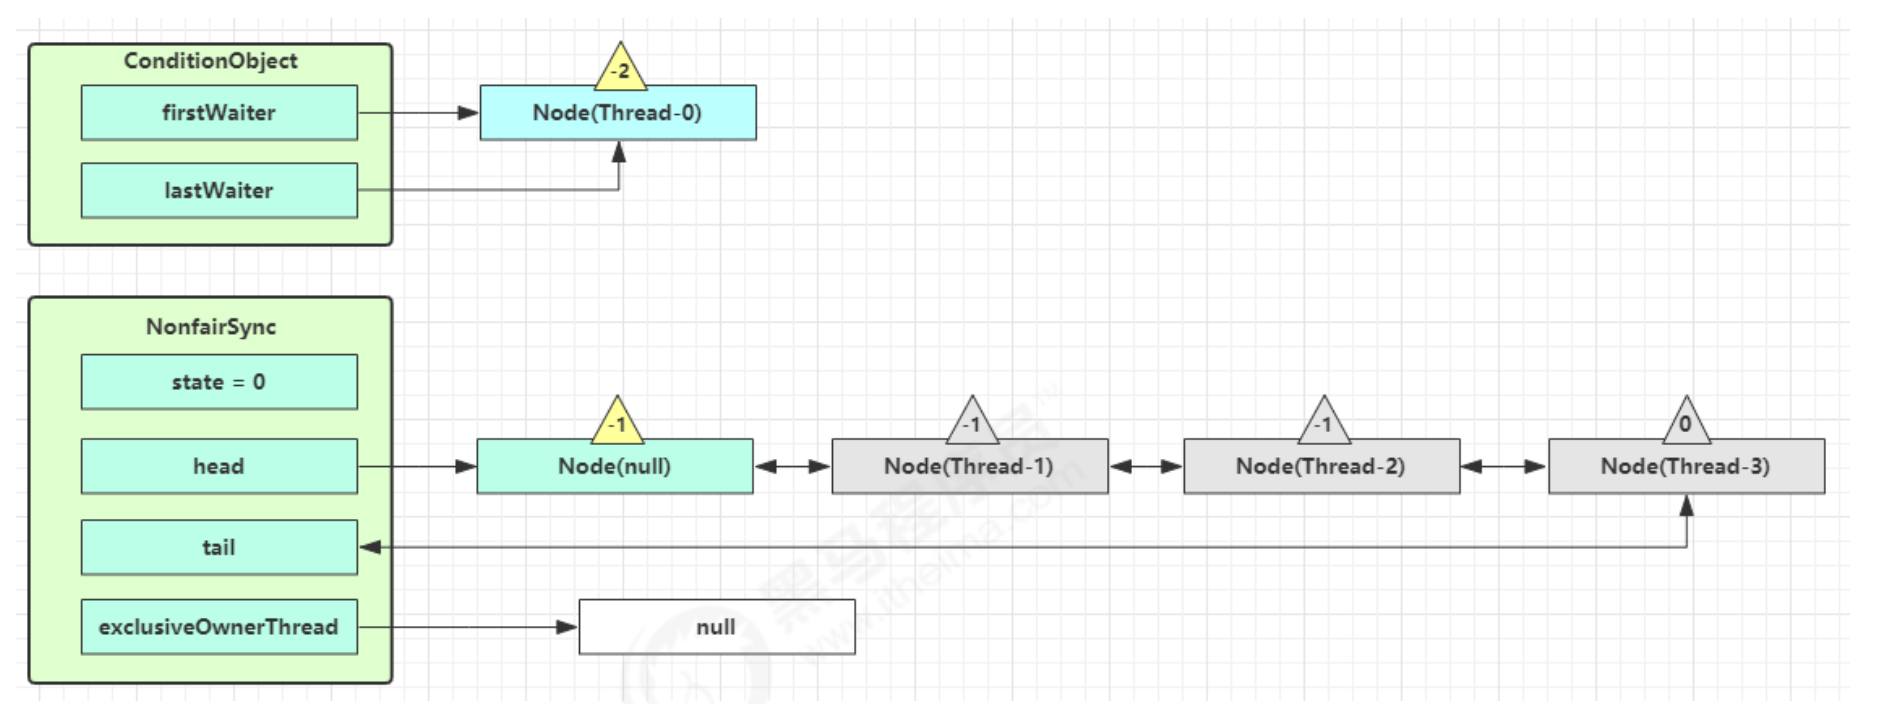
park 阻塞 Thread-0:
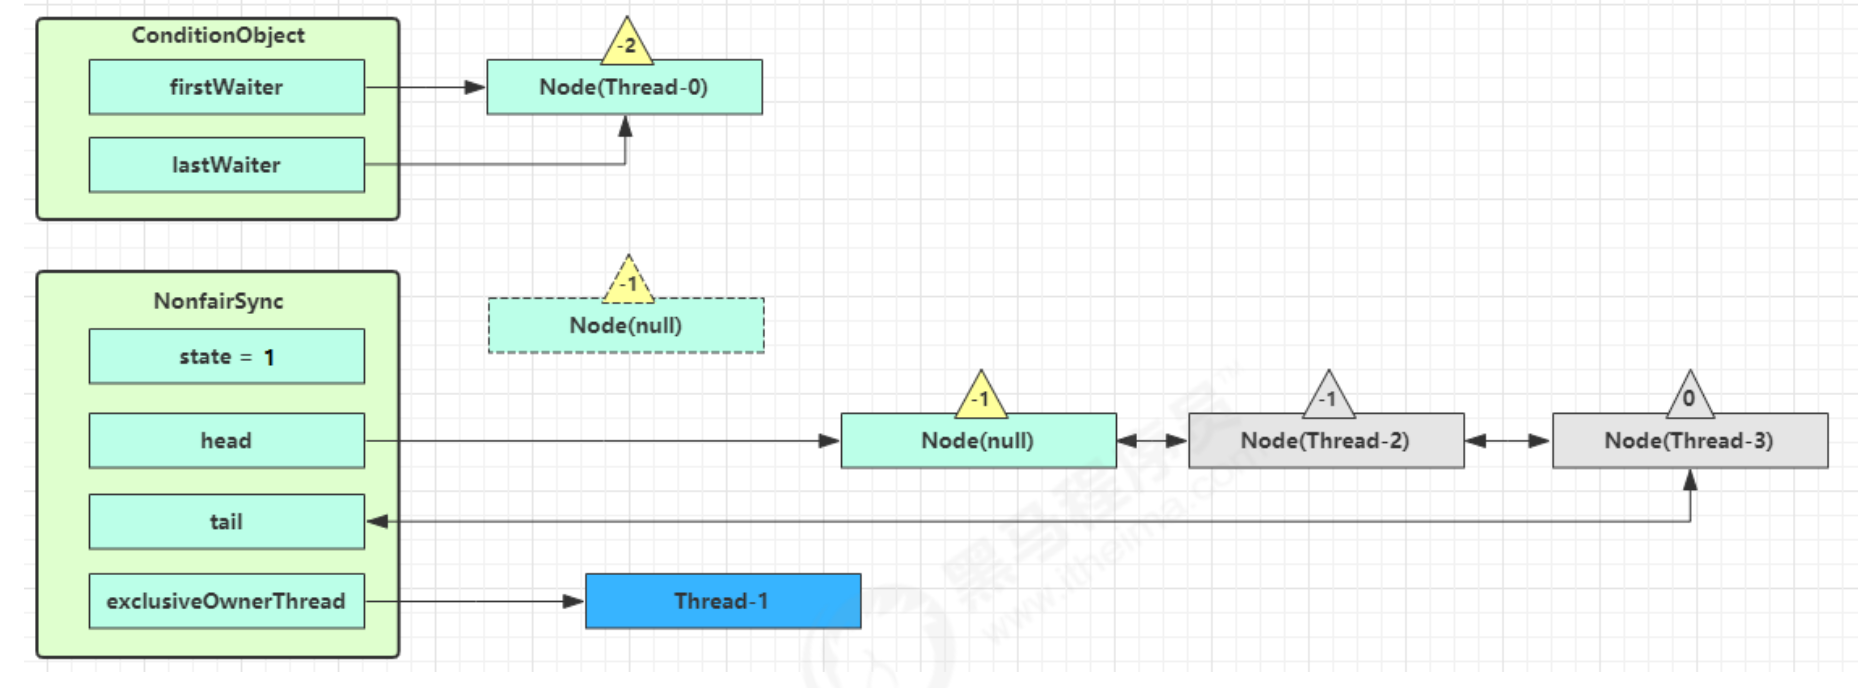
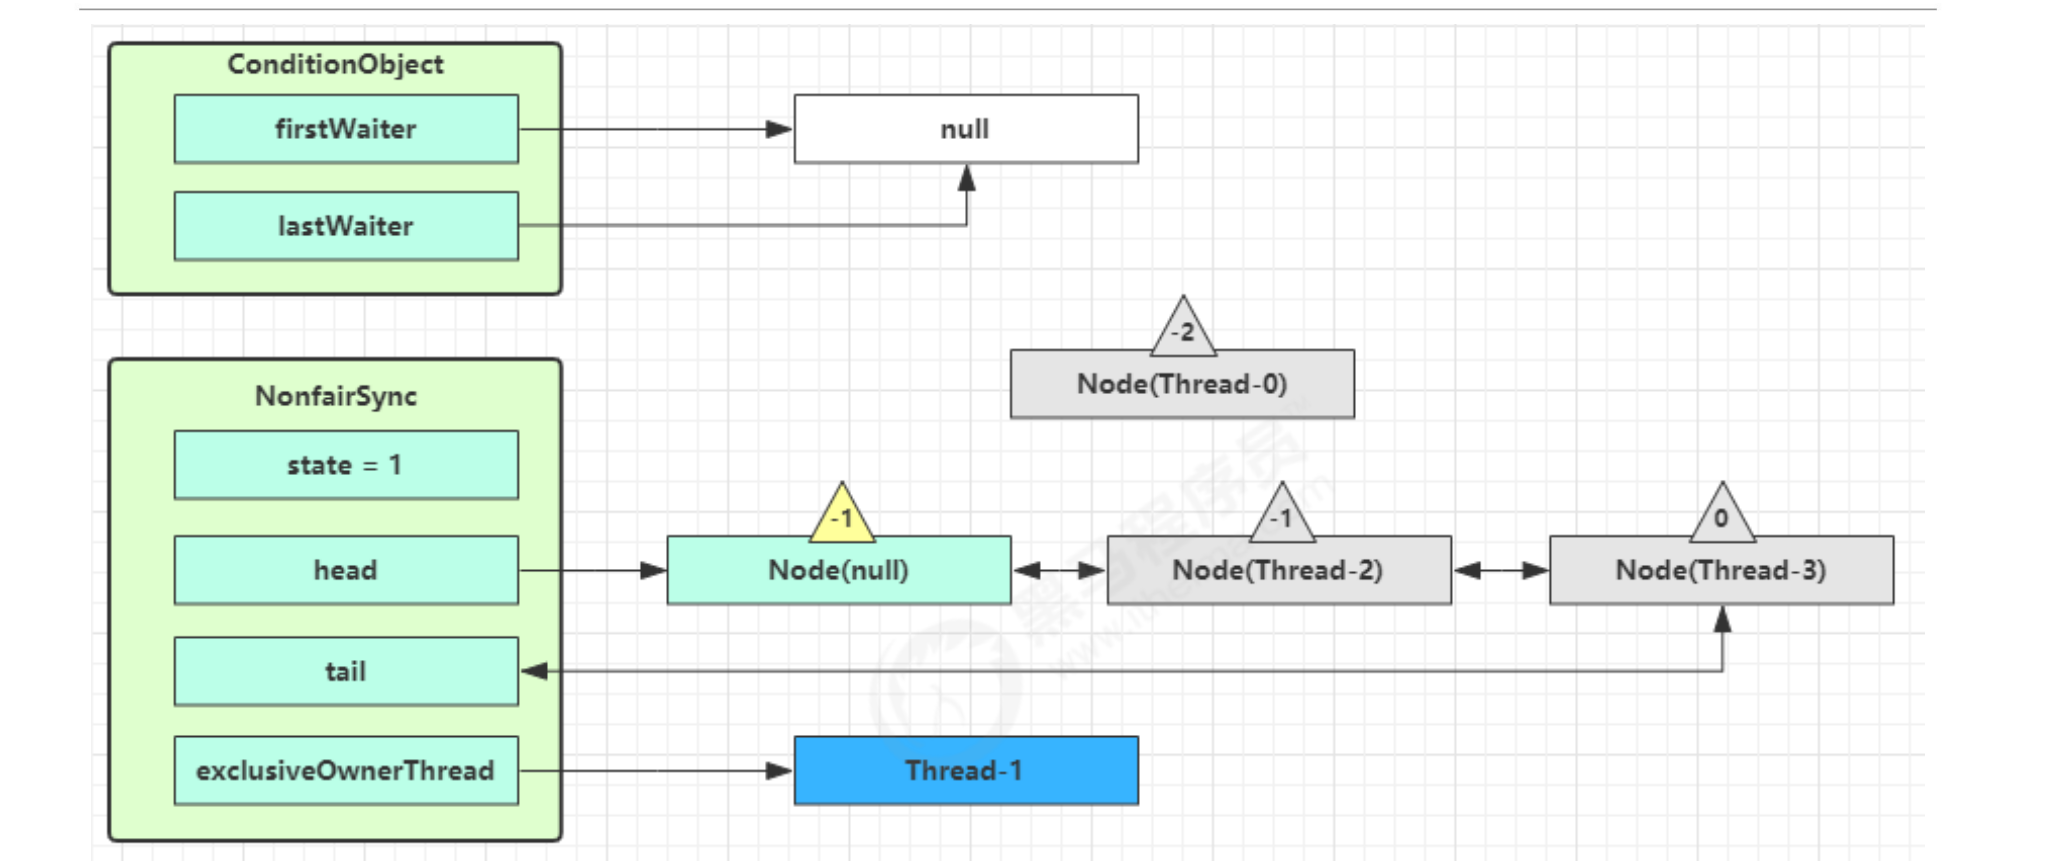
signal 流程 假设 Thread-1 要来唤醒 Thread-0:
进入 ConditionObject 的 doSignal 流程,取得等待队列中第一个 Node,即 Thread-0 所在 Node:
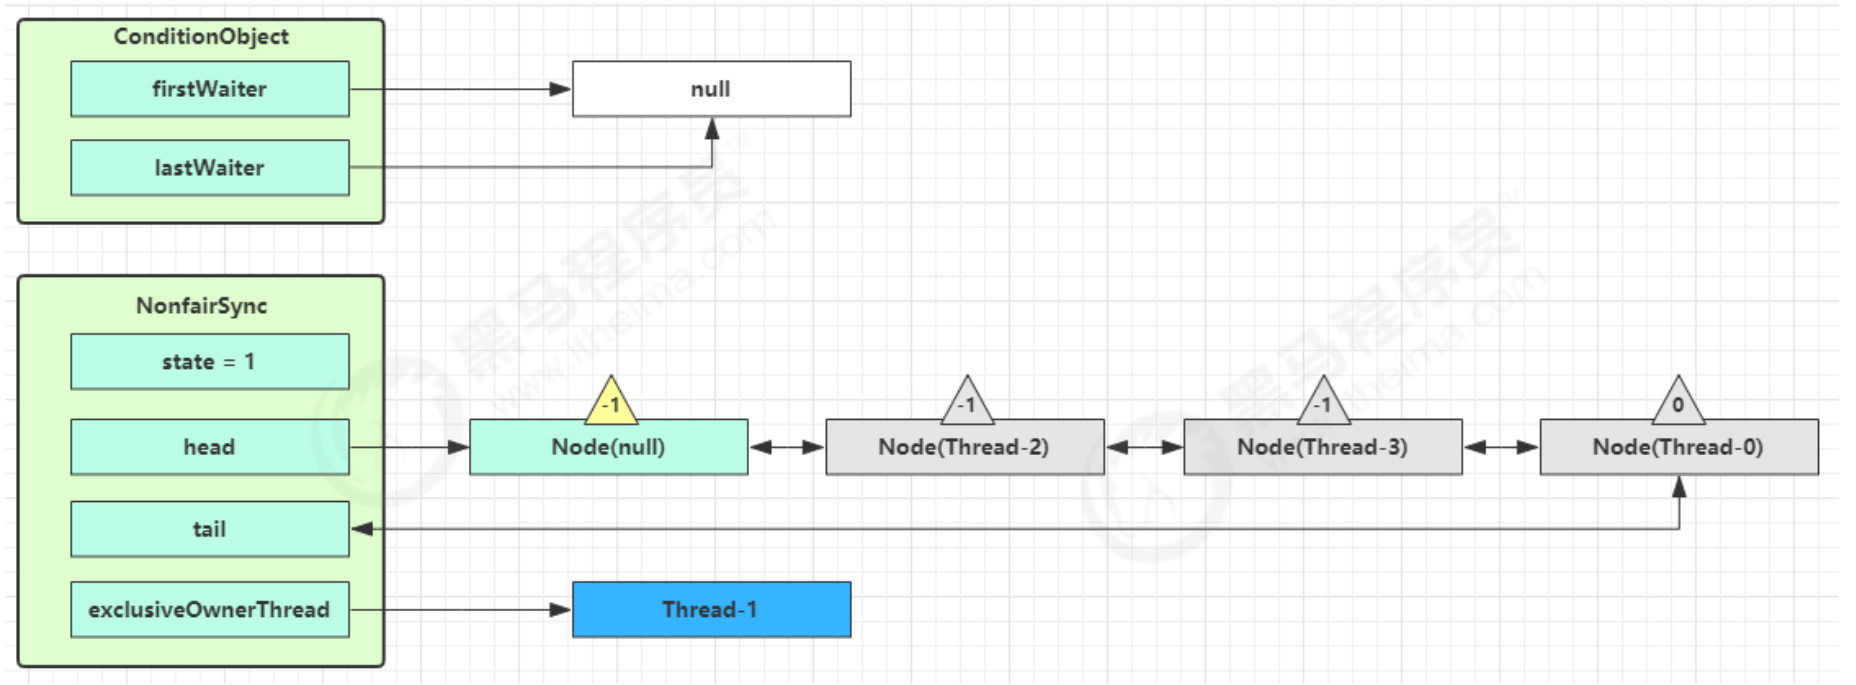
执行 transferForSignal 流程,将该 Node 加入 AQS 队列尾部,将 Thread-0 的 waitStatus 改为 0,Thread-3 的waitStatus 改为 -1:
之后Thread-1 释放锁,进入 unlock 流程。
源码分析 1 2 3 4 5 6 7 8 9 10 11 12 13 14 15 16 17 18 19 20 21 22 23 24 25 26 27 28 29 30 31 32 33 34 35 36 37 38 39 40 41 42 43 44 45 46 47 48 49 50 51 52 53 54 55 56 57 58 59 60 61 62 63 64 65 66 67 68 69 70 71 72 73 74 75 76 77 78 79 80 81 82 83 84 85 86 87 88 89 90 91 92 93 94 95 96 97 98 99 100 101 102 103 104 105 106 107 108 109 110 111 112 113 114 115 116 117 118 119 120 121 122 123 124 125 126 127 128 129 130 131 132 133 134 135 136 137 138 139 140 141 142 143 144 145 146 147 148 149 150 151 152 153 154 155 156 157 158 159 160 161 162 163 164 165 166 167 168 169 170 171 172 173 174 175 176 177 178 179 180 181 182 183 184 185 186 187 188 189 190 191 192 193 194 195 196 197 198 199 200 201 202 203 204 205 206 207 208 209 210 211 212 213 214 215 216 217 218 219 220 221 222 223 224 225 public class ConditionObject implements Condition , java .io .Serializable private static final long serialVersionUID = 1173984872572414699L ; private transient Node firstWaiter; private transient Node lastWaiter; public ConditionObject () private Node addConditionWaiter () Node t = lastWaiter; if (t != null && t.waitStatus != Node.CONDITION) { unlinkCancelledWaiters(); t = lastWaiter; } Node node = new Node(Thread.currentThread(), Node.CONDITION); if (t == null ) firstWaiter = node; else t.nextWaiter = node; lastWaiter = node; return node; } private void doSignal (Node first) do { if ( (firstWaiter = first.nextWaiter) == null ) { lastWaiter = null ; } first.nextWaiter = null ; } while ( !transferForSignal(first) && (first = firstWaiter) != null ); } final boolean transferForSignal (Node node) if (!compareAndSetWaitStatus(node, Node.CONDITION, 0 )) return false ; Node p = enq(node); int ws = p.waitStatus; if ( ws > 0 || !compareAndSetWaitStatus(p, ws, Node.SIGNAL) ) { LockSupport.unpark(node.thread); } return true ; } private void doSignalAll (Node first) lastWaiter = firstWaiter = null ; do { Node next = first.nextWaiter; first.nextWaiter = null ; transferForSignal(first); first = next; } while (first != null ); } private void unlinkCancelledWaiters () } public final void signal () if (!isHeldExclusively()) throw new IllegalMonitorStateException(); Node first = firstWaiter; if (first != null ) doSignal(first); } public final void signalAll () if (!isHeldExclusively()) throw new IllegalMonitorStateException(); Node first = firstWaiter; if (first != null ) doSignalAll(first); } public final void awaitUninterruptibly () Node node = addConditionWaiter(); int savedState = fullyRelease(node); boolean interrupted = false ; while (!isOnSyncQueue(node)) { LockSupport.park(this ); if (Thread.interrupted()) interrupted = true ; } if (acquireQueued(node, savedState) || interrupted) selfInterrupt(); } final int fullyRelease (Node node) boolean failed = true ; try { int savedState = getState(); if (release(savedState)) { failed = false ; return savedState; } else { throw new IllegalMonitorStateException(); } } finally { if (failed) node.waitStatus = Node.CANCELLED; } } private static final int REINTERRUPT = 1 ; private static final int THROW_IE = -1 ; private int checkInterruptWhileWaiting (Node node) return Thread.interrupted() ? (transferAfterCancelledWait(node) ? THROW_IE : REINTERRUPT) : 0 ; } private void reportInterruptAfterWait (int interruptMode) throws InterruptedException { if (interruptMode == THROW_IE) throw new InterruptedException(); else if (interruptMode == REINTERRUPT) selfInterrupt(); } public final void await () throws InterruptedException if (Thread.interrupted()) { throw new InterruptedException(); } Node node = addConditionWaiter(); int savedState = fullyRelease(node); int interruptMode = 0 ; while (!isOnSyncQueue(node)) { LockSupport.park(this ); if ((interruptMode = checkInterruptWhileWaiting(node)) != 0 ) break ; } if (acquireQueued(node, savedState) && interruptMode != THROW_IE) interruptMode = REINTERRUPT; if (node.nextWaiter != null ) unlinkCancelledWaiters(); if (interruptMode != 0 ) reportInterruptAfterWait(interruptMode); } public final long awaitNanos (long nanosTimeout) throws InterruptedException if (Thread.interrupted()) { throw new InterruptedException(); } Node node = addConditionWaiter(); int savedState = fullyRelease(node); final long deadline = System.nanoTime() + nanosTimeout; int interruptMode = 0 ; while (!isOnSyncQueue(node)) { if (nanosTimeout <= 0L ) { transferAfterCancelledWait(node); break ; } if (nanosTimeout >= spinForTimeoutThreshold) LockSupport.parkNanos(this , nanosTimeout); if ((interruptMode = checkInterruptWhileWaiting(node)) != 0 ) break ; nanosTimeout = deadline - System.nanoTime(); } if (acquireQueued(node, savedState) && interruptMode != THROW_IE) interruptMode = REINTERRUPT; if (node.nextWaiter != null ) unlinkCancelledWaiters(); if (interruptMode != 0 ) reportInterruptAfterWait(interruptMode); return deadline - System.nanoTime(); } public final boolean awaitUntil (Date deadline) throws InterruptedException } public final boolean await (long time, TimeUnit unit) throws InterruptedException } }
读写锁原理 ReentrantReadWriteLock 当读操作远远高于写操作时,这时候使用读写锁让读-读可以并发,提高性能。读-写,写-写都是相互互斥的!提供一个数据容器类,内部分别使用读锁保护数据的read()方法,写锁保护数据的write()方法 。实现代码如下:
1 2 3 4 5 6 7 8 9 10 11 12 13 14 15 16 17 18 19 20 21 22 23 24 25 26 27 28 29 30 31 32 33 34 35 36 37 38 39 40 41 42 43 44 45 46 47 48 @Slf4j public class ReadWriteLockTest public static void main (String[] args) DataContainer dataContainer = new DataContainer(); new Thread(() -> { dataContainer.read(); dataContainer.write(); },"t1" ).start(); new Thread(() -> { dataContainer.write(); },"t2" ).start(); } } @Slf4j class DataContainer private Object object = new Object(); private ReentrantReadWriteLock readWriteLock = new ReentrantReadWriteLock(); private ReentrantReadWriteLock.ReadLock readLock = readWriteLock.readLock(); private ReentrantReadWriteLock.WriteLock writeLock = readWriteLock.writeLock(); public Object read () readLock.lock(); log.info("拿到读锁" ); try { log.info("读取操作" ); TimeUnit.SECONDS.sleep(1 ); } catch (InterruptedException e) { e.printStackTrace(); } finally { readLock.unlock(); log.info("释放读锁" ); } return object; } public void write () writeLock.lock(); log.info("拿到写锁" ); try { log.info("写操作" ); }finally { writeLock.unlock(); log.info("释放写锁" ); } } }
输出:读读并发,读写阻塞
1 2 3 4 5 6 7 8 9 11 :01 :47.856 [t1] INFO com.heu.test.DataContainer - 拿到读锁11 :01 :47.865 [t1] INFO com.heu.test.DataContainer - 读取操作11 :01 :47.856 [t2] INFO com.heu.test.DataContainer - 拿到读锁11 :01 :47.867 [t2] INFO com.heu.test.DataContainer - 读取操作11 :01 :48.872 [t1] INFO com.heu.test.DataContainer - 释放读锁11 :01 :48.872 [t2] INFO com.heu.test.DataContainer - 释放读锁11 :01 :48.872 [t1] INFO com.heu.test.DataContainer - 拿到写锁11 :01 :48.872 [t1] INFO com.heu.test.DataContainer - 写操作11 :01 :48.872 [t1] INFO com.heu.test.DataContainer - 释放写锁
注意事项:
读锁不支持条件变量。
重入时升级不支持:即持有读锁的情况下去获取写锁,会导致获取写锁永久等待。
1 2 3 4 5 6 7 8 9 10 11 12 13 r.lock(); try { w.lock(); try { } finally { w.unlock(); } } finally { r.unlock(); }
重入时降级支持:即持有写锁的情况下去获取读锁:
1 2 3 4 5 6 7 8 9 10 11 12 13 14 15 16 17 18 19 20 21 22 23 24 25 26 27 28 29 30 31 32 class CachedData Object data; volatile boolean cacheValid; final ReentrantReadWriteLock rwl = new ReentrantReadWriteLock(); void processCachedData () rwl.readLock().lock(); if (!cacheValid) { rwl.readLock().unlock(); rwl.writeLock().lock(); try { if (!cacheValid) { data = ... cacheValid = true ; } rwl.readLock().lock(); } finally { rwl.writeLock().unlock(); } } try { use(data); } finally { rwl.readLock().unlock(); } } }
读写锁原理 读写锁用的是同一个 Sync 同步器,因此等待队列、state 等也是同一个。
下面执行:t1 w.lock,t2 r.lock 情况 :
t1 成功上锁,流程与 ReentrantLock 加锁相比没有特殊之处,不同是写锁状态占了 state 的低 16 位,读锁使用的是 state 的高 16 位。
t2 执行 r.lock,这时进入读锁的 sync.acquireShared(1) 流程,首先会进入 tryAcquireShared 流程。如果有写锁占据,那么 tryAcquireShared 返回 -1 表示失败。tryAcquireShared 返回值表示:
-1 表示失败。
0 表示成功,但后继节点不会继续唤醒。
正数表示成功,而且数值是还有几个后继节点需要唤醒,这里的读写锁返回 1。
这时会进入 sync.doAcquireShared(1) 流程,首先也是调用 addWaiter 添加节点,不同之处在于节点被设置为 Node.SHARED 模式而非 Node.EXCLUSIVE 模式,注意此时 t2 仍处于活跃状态。
t2 会看看自己的节点是不是老二,如果是,还会再次调用 tryAcquireShared(1) 来尝试获取锁。
如果没有成功,在 doAcquireShared 内 for 循环一次,把前驱节点的 waitStatus 改为 -1,再 for 循环一 次尝试 tryAcquireShared(1) 如果还不成功,那么在 parkAndCheckInterrupt() 处 park。
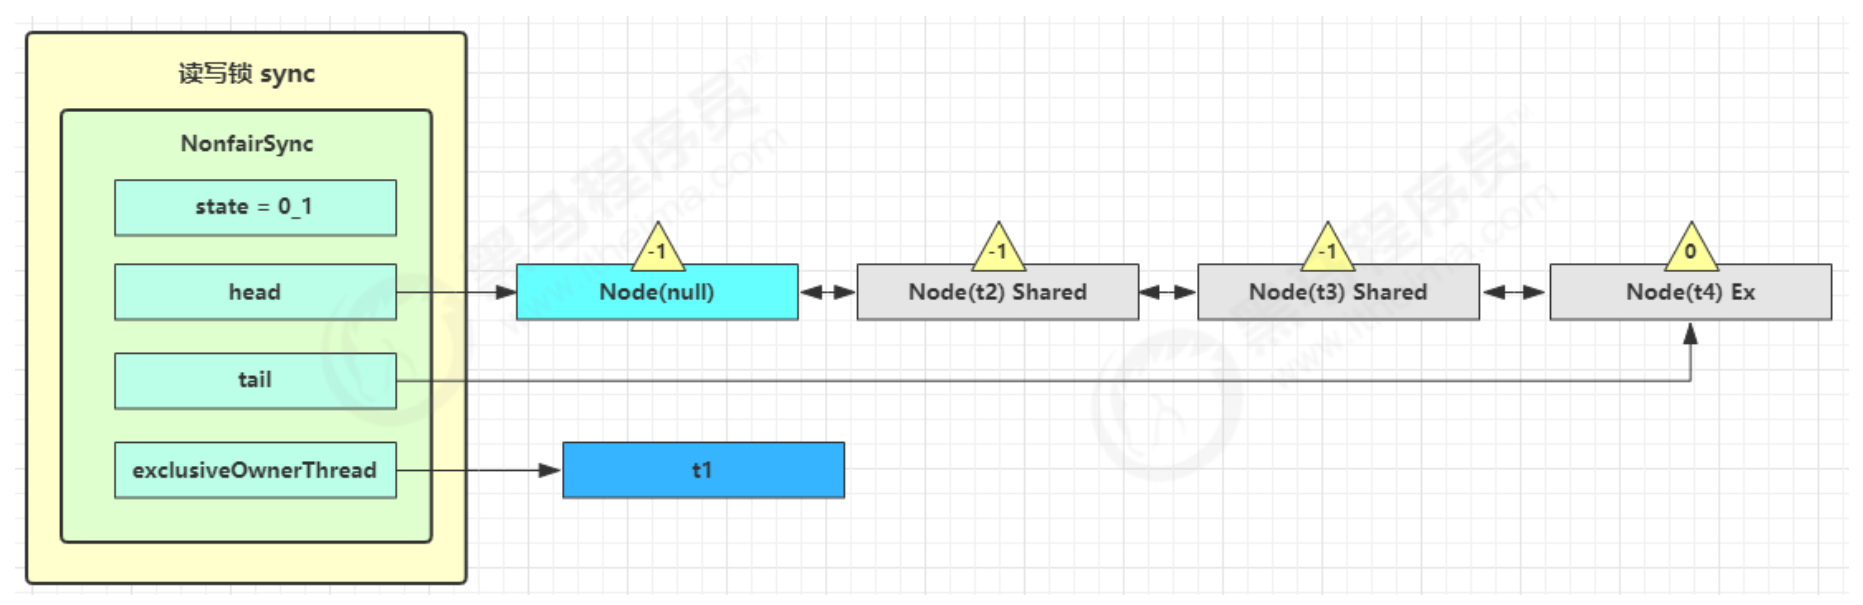
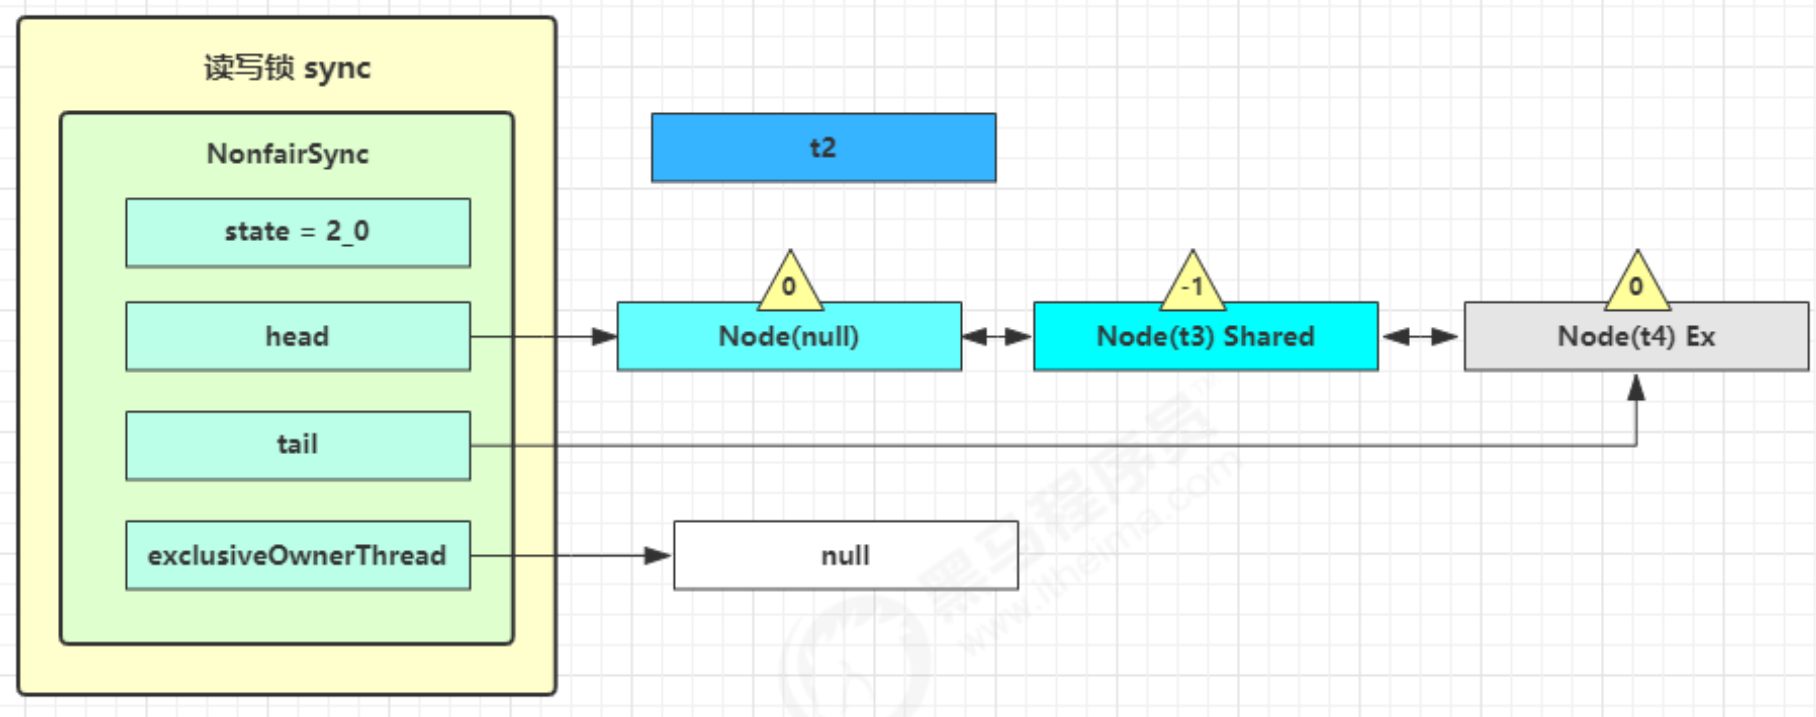
又继续执行 :t3 r.lock,t4 w.lock。 在这种状态下,假设又有 t3 加读锁和 t4 加写锁,这期间 t1 仍然持有锁,就变成了下面的样子:
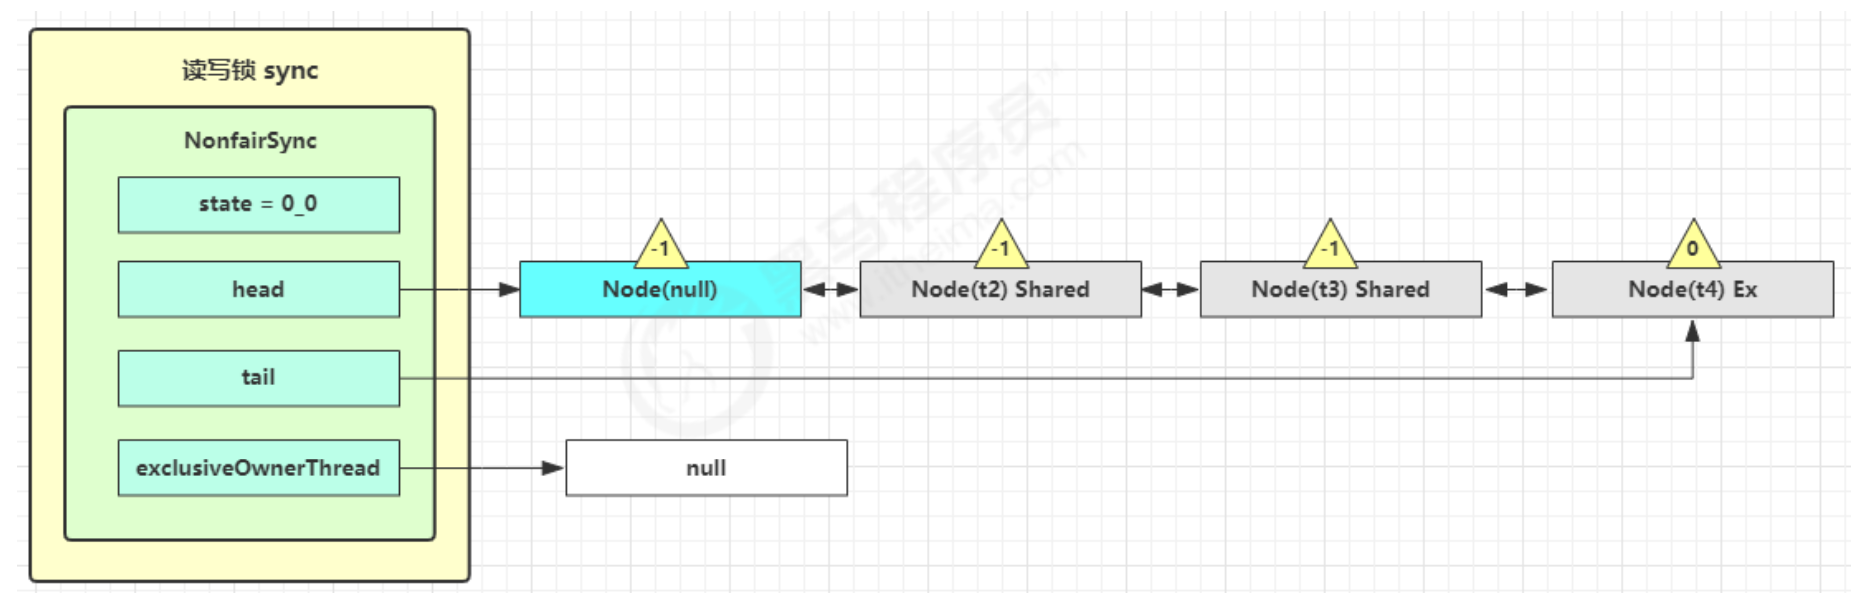
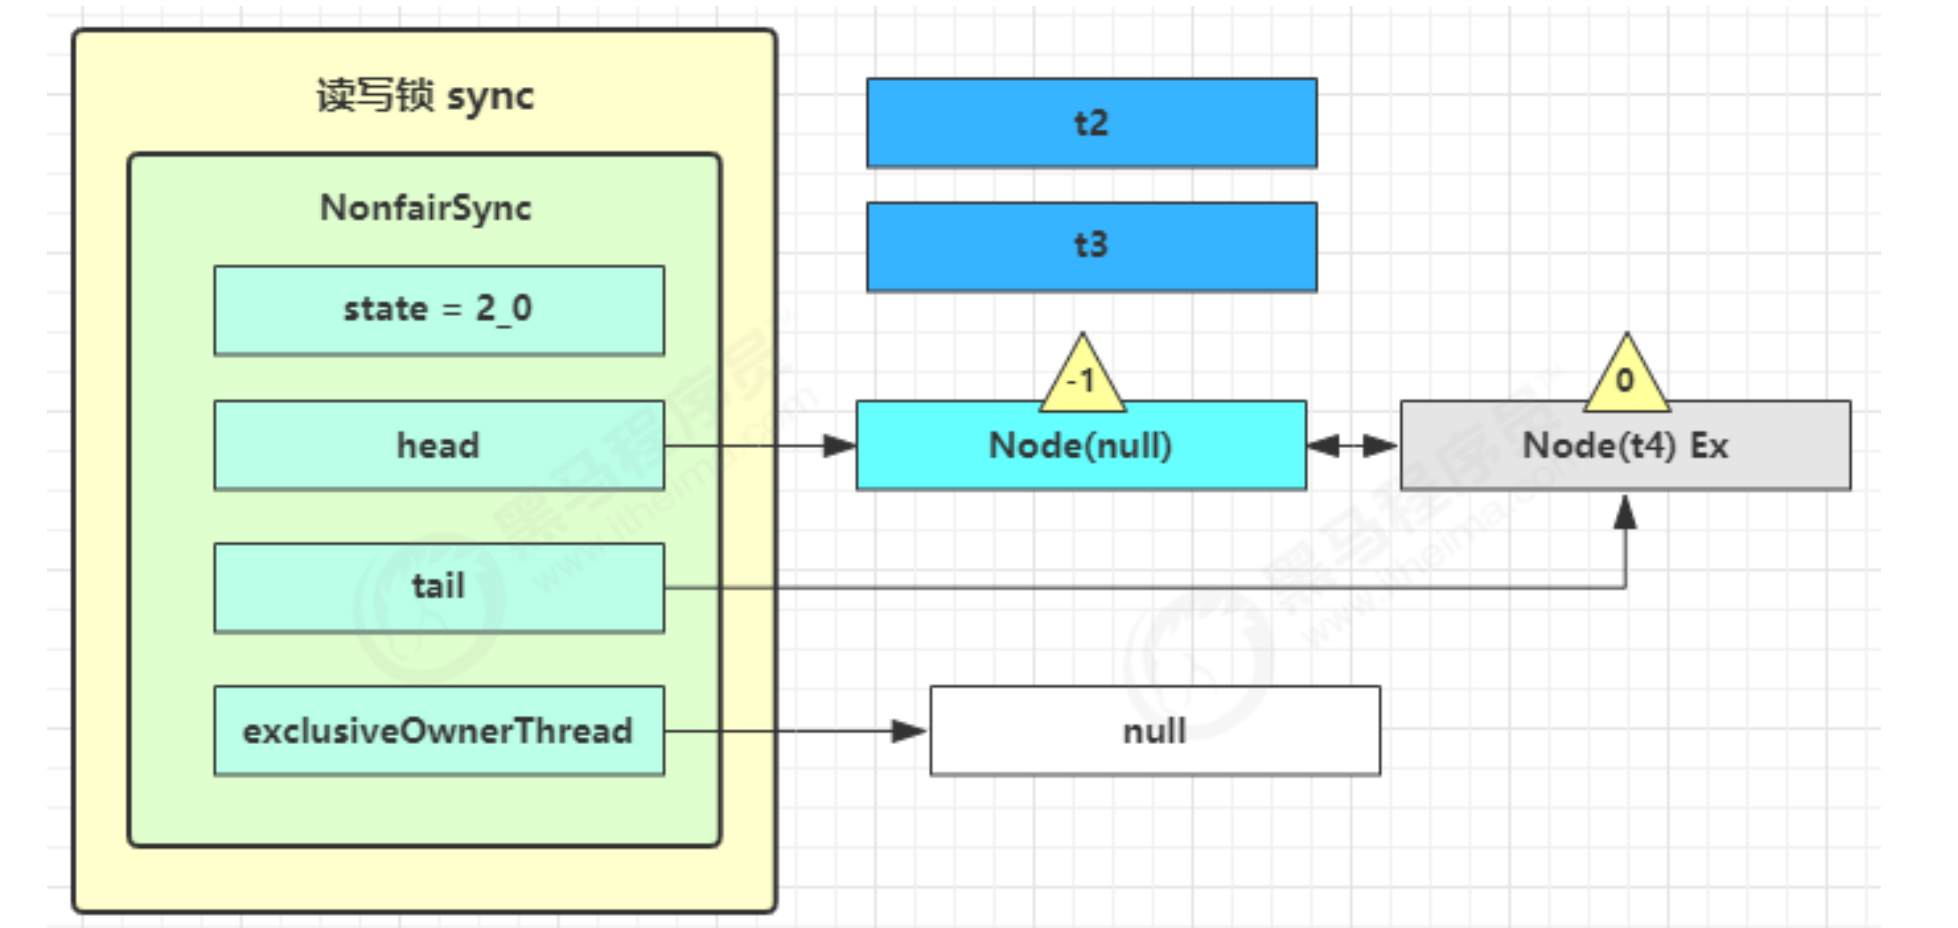
继续执行 t1 w.unlock, 这时会走到写锁的 sync.release(1) 流程,调用 sync.tryRelease(1) 成功,变成下面的样子:
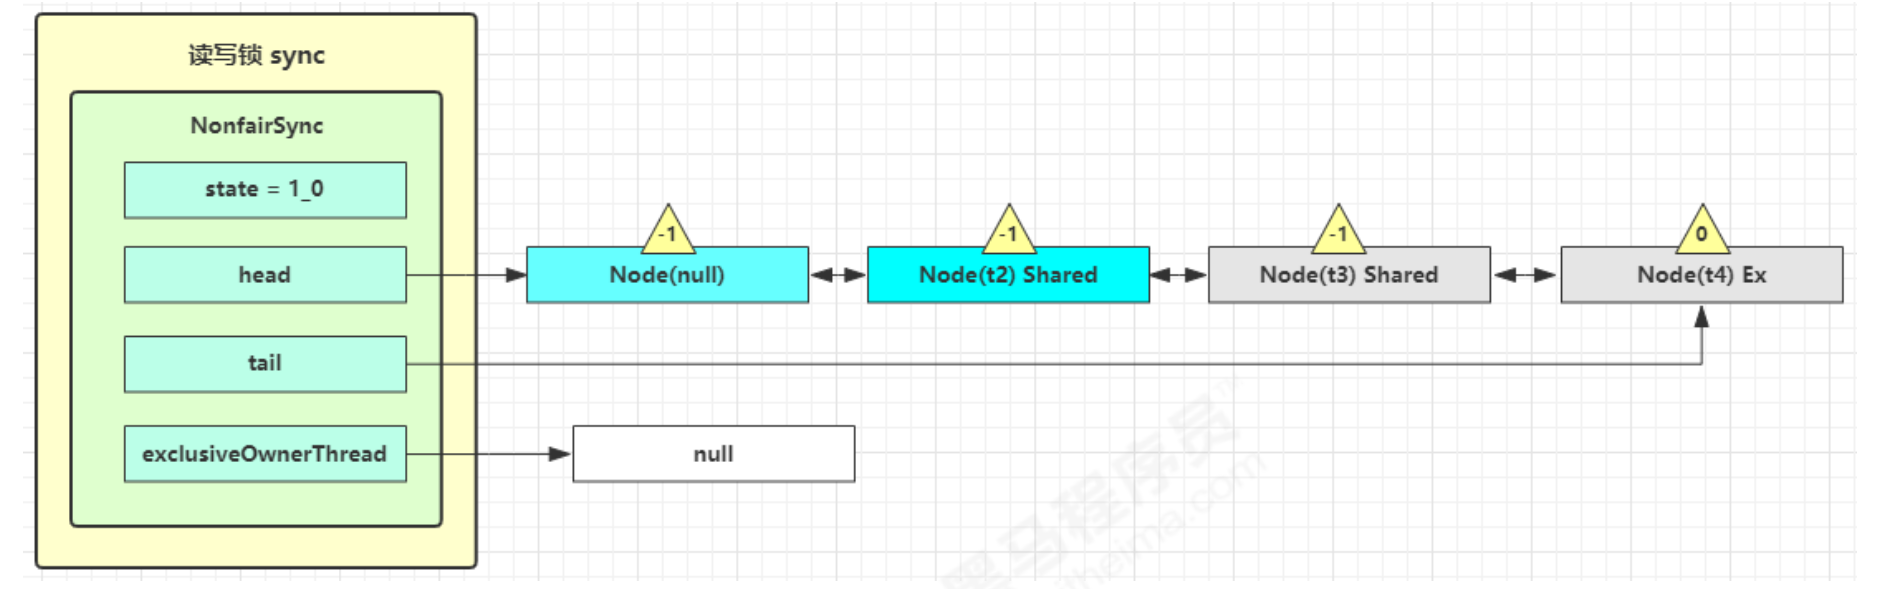
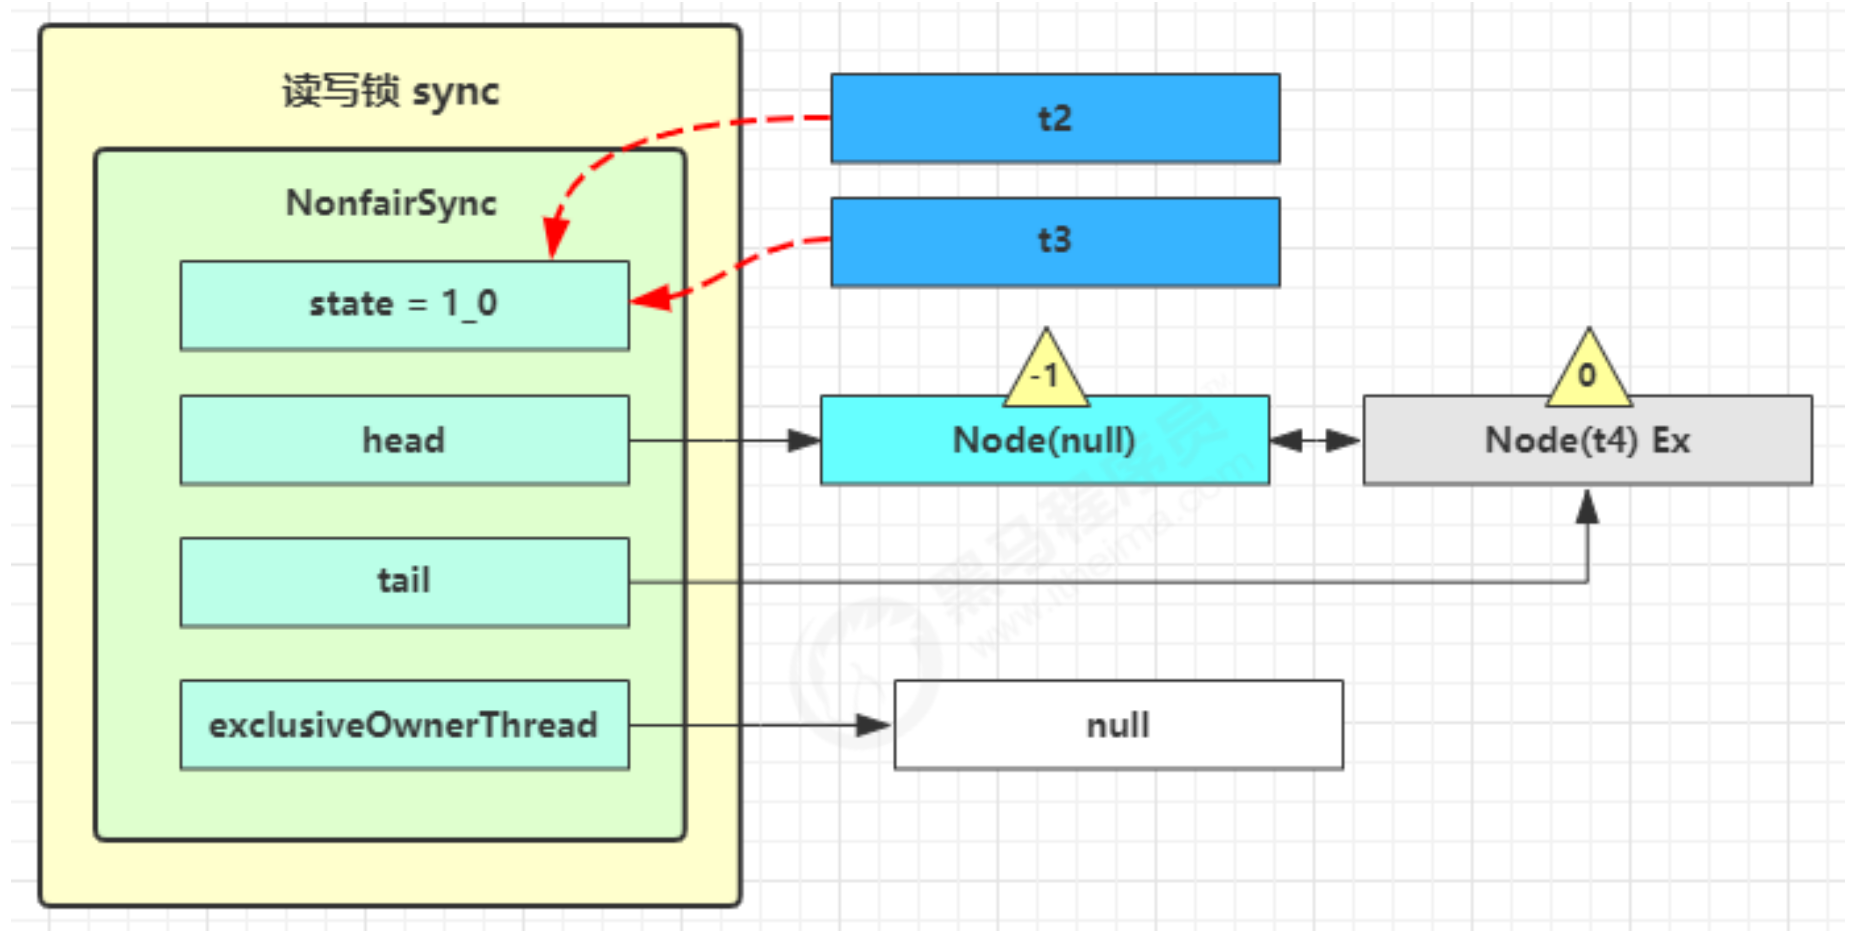
接下来执行唤醒流程 sync.unparkSuccessor,即让老二恢复运行。这时 t2 在 doAcquireShared 内 parkAndCheckInterrupt() 处恢复运行,图中的t2从黑色变成了蓝色(注意这里只是恢复运行而已,并没有获取到锁!) 这回再来一次 for (;; ) 执行 tryAcquireShared 成功,让读锁计数加一。
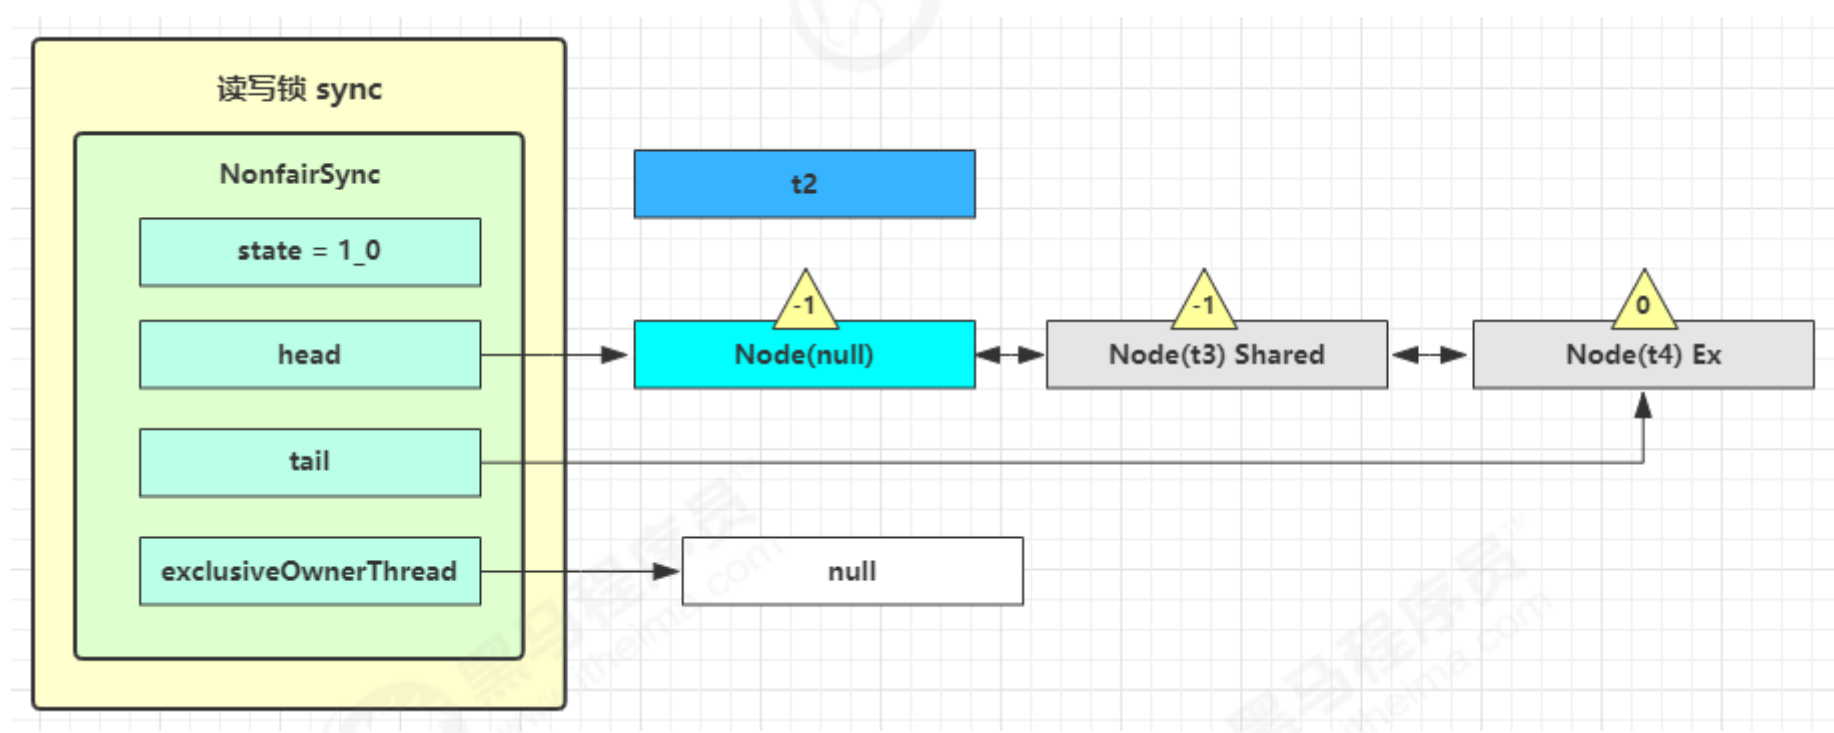
这时 t2 已经恢复运行,接下来 t2 调用 setHeadAndPropagate(node, 1),它原本所在节点被置为头节点。
事情还没完,在 setHeadAndPropagate 方法内还会检查下一个节点是否是 shared,如果是,则调用 doReleaseShared() 将 head 的状态从 -1 改为 0 并唤醒老二,这时 t3 在 doAcquireShared 内 parkAndCheckInterrupt() 处恢复运行。
这回再来一次 for (;; ) ,执行 tryAcquireShared 成功则让读锁计数加一。
这时 t3 已经恢复运行,接下来 t3 调用 setHeadAndPropagate(node, 1),它原本所在节点被置为头节点。
再继续执行t2 r.unlock,t3 r.unlock t2, 进入 sync.releaseShared(1) 中,调用 tryReleaseShared(1) 让计数减一。
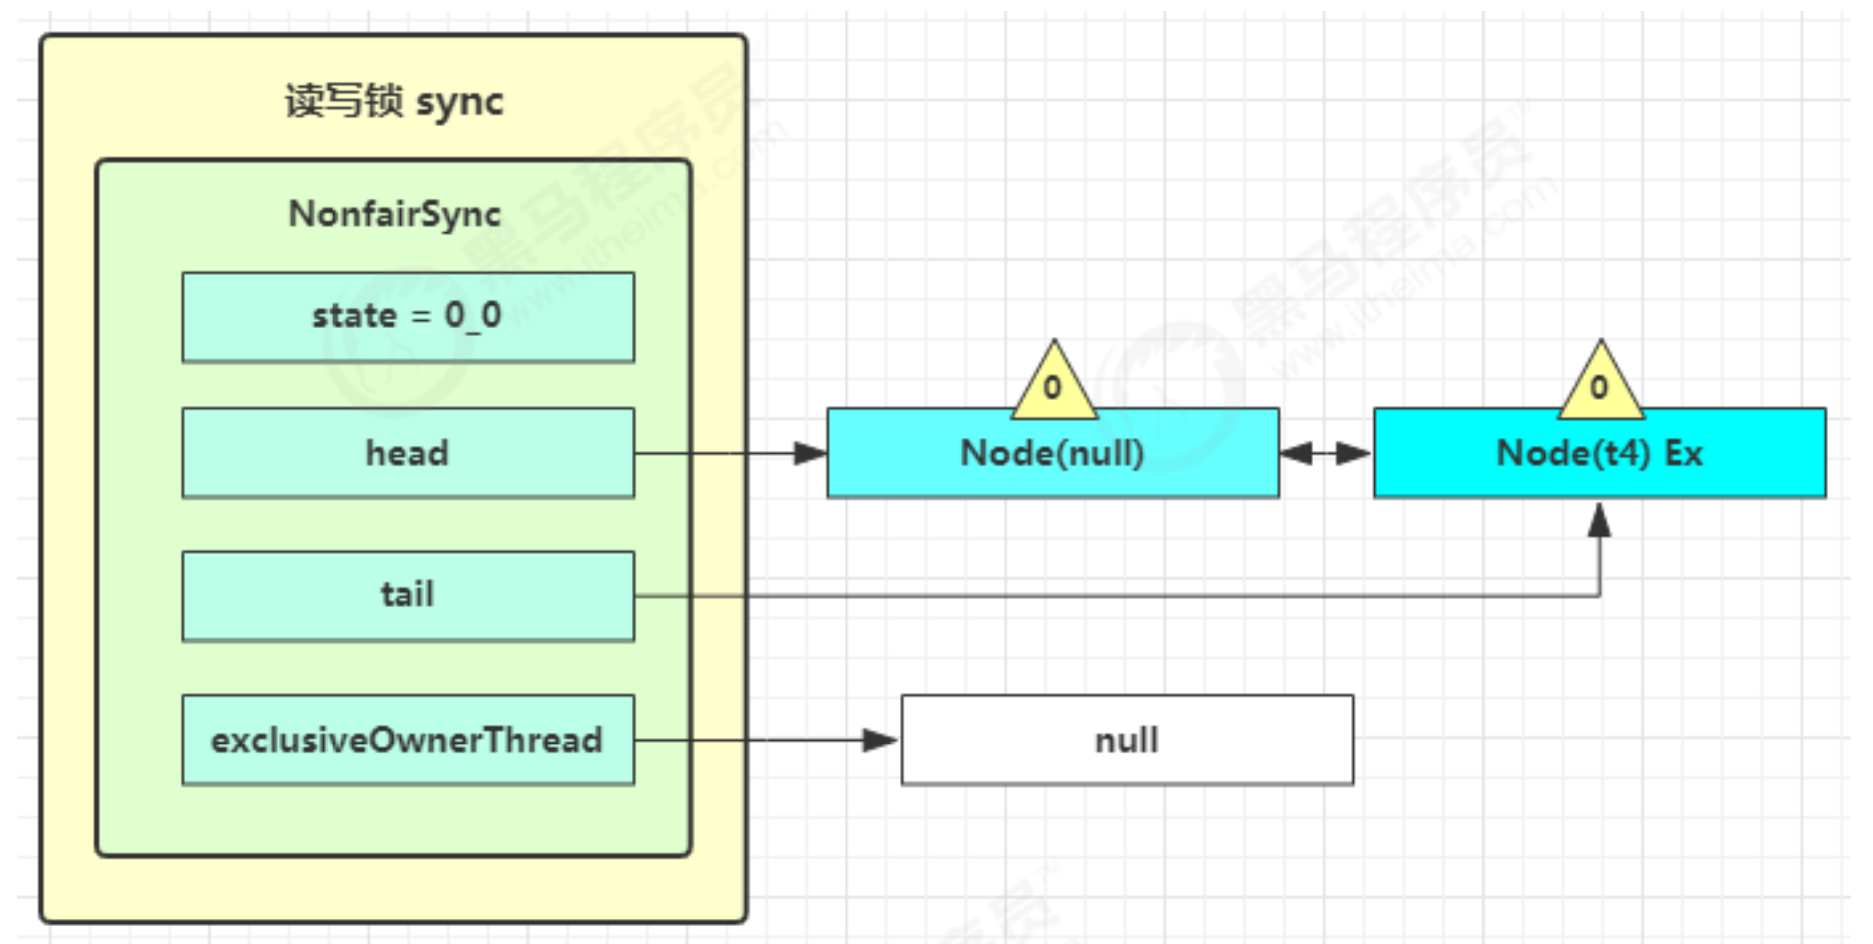
但由于计数还不为零,t3 进入 sync.releaseShared(1) 中,调用 tryReleaseShared(1) 让计数减一,这回计数为零了,进入 doReleaseShared() 将头节点从 -1 改为 0 并唤醒老二,即:
之后 t4线程 在 acquireQueued 中 parkAndCheckInterrupt 处恢复运行,再次 执行for (;; )循环, 这次自己是老二,并且没有其他线程竞争,tryAcquire(1) 成功,修改头结点,流程结束。
源码分析 写锁源码分析 写锁上锁流程:
1 2 3 4 5 6 7 8 9 10 11 12 13 14 15 16 17 18 19 20 21 22 23 24 25 26 27 28 29 30 31 32 33 34 35 36 37 38 39 40 41 42 43 44 45 46 47 48 49 50 51 52 53 54 55 56 57 58 59 60 61 62 63 64 static final class NonfairSync extends Sync public void lock () sync.acquire(1 ); } public final void acquire (int arg) if ( !tryAcquire(arg) && acquireQueued(addWaiter(Node.EXCLUSIVE), arg) ) { selfInterrupt(); } } protected final boolean tryAcquire (int acquires) Thread current = Thread.currentThread(); int c = getState(); int w = exclusiveCount(c); if (c != 0 ) { if ( w == 0 || current != getExclusiveOwnerThread() ) { return false ; } if (w + exclusiveCount(acquires) > MAX_COUNT) throw new Error("Maximum lock count exceeded" ); setState(c + acquires); return true ; } if ( writerShouldBlock() || !compareAndSetState(c, c + acquires) ) { return false ; } setExclusiveOwnerThread(current); return true ; } final boolean writerShouldBlock () return false ; } }
写锁释放流程:
1
2
3
4
5
6
7
8
9
10
11
12
13
14
15
16
17
18
19
20
21
22
23
24
25
26
27
28
29
30
31
32
33
34
35
static final class NonfairSync extends Sync public void unlock () sync.release(1 ); } public final boolean release (int arg) if (tryRelease(arg)) { Node h = head; if (h != null && h.waitStatus != 0 ) unparkSuccessor(h); return true ; } return false ; } protected final boolean tryRelease (int releases) if (!isHeldExclusively()) throw new IllegalMonitorStateException(); int nextc = getState() - releases; boolean free = exclusiveCount(nextc) == 0 ; if (free) { setExclusiveOwnerThread(null ); } setState(nextc); return free; } }
读锁源码分析 读锁上锁流程:
1 2 3 4 5 6 7 8 9 10 11 12 13 14 15 16 17 18 19 20 21 22 23 24 25 26 27 28 29 30 31 32 33 34 35 36 37 38 39 40 41 42 43 44 45 46 47 48 49 50 51 52 53 54 55 56 57 58 59 60 61 62 63 64 65 66 67 68 69 70 71 72 73 74 75 76 77 78 79 80 81 82 83 84 85 86 87 88 89 90 91 92 93 94 95 96 97 98 99 100 101 102 103 104 105 106 107 108 109 110 111 112 113 114 115 116 117 118 119 120 121 122 123 124 125 126 127 128 129 130 131 132 133 134 135 136 137 138 139 140 141 142 143 144 145 146 147 148 149 150 151 152 153 static final class NonfairSync extends Sync public void lock () sync.acquireShared(1 ); } public final void acquireShared (int arg) if (tryAcquireShared(arg) < 0 ) { doAcquireShared(arg); } } protected final int tryAcquireShared (int unused) Thread current = Thread.currentThread(); int c = getState(); if ( exclusiveCount(c) != 0 && getExclusiveOwnerThread() != current ) { return -1 ; } int r = sharedCount(c); if ( !readerShouldBlock() && r < MAX_COUNT && compareAndSetState(c, c + SHARED_UNIT) ) { return 1 ; } return fullTryAcquireShared(current); } final boolean readerShouldBlock () return apparentlyFirstQueuedIsExclusive(); } final int fullTryAcquireShared (Thread current) HoldCounter rh = null ; for (;;) { int c = getState(); if (exclusiveCount(c) != 0 ) { if (getExclusiveOwnerThread() != current) return -1 ; } else if (readerShouldBlock()) { } if (sharedCount(c) == MAX_COUNT) throw new Error("Maximum lock count exceeded" ); if (compareAndSetState(c, c + SHARED_UNIT)) { return 1 ; } } } private void doAcquireShared (int arg) final Node node = addWaiter(Node.SHARED); boolean failed = true ; try { boolean interrupted = false ; for (;;) { final Node p = node.predecessor(); if (p == head) { int r = tryAcquireShared(arg); if (r >= 0 ) { setHeadAndPropagate(node, r); p.next = null ; if (interrupted) selfInterrupt(); failed = false ; return ; } } if ( shouldParkAfterFailedAcquire(p, node) && parkAndCheckInterrupt() ) { interrupted = true ; } } } finally { if (failed) cancelAcquire(node); } } private void setHeadAndPropagate (Node node, int propagate) Node h = head; setHead(node); if (propagate > 0 || h == null || h.waitStatus < 0 || (h = head) == null || h.waitStatus < 0 ) { Node s = node.next; if (s == null || s.isShared()) { doReleaseShared(); } } } private void doReleaseShared () for (;;) { Node h = head; if (h != null && h != tail) { int ws = h.waitStatus; if (ws == Node.SIGNAL) { if (!compareAndSetWaitStatus(h, Node.SIGNAL, 0 )) continue ; unparkSuccessor(h); } else if (ws == 0 && !compareAndSetWaitStatus(h, 0 , Node.PROPAGATE)) continue ; } if (h == head) break ; } } }
读锁释放流程:
1 2 3 4 5 6 7 8 9 10 11 12 13 14 15 16 17 18 19 20 21 22 23 24 25 26 27 28 29 30 31 32 33 34 35 36 37 38 39 40 41 42 43 44 45 46 47 48 49 50 51 52 53 54 55 static final class NonfairSync extends Sync public void unlock () sync.releaseShared(1 ); } public final boolean releaseShared (int arg) if (tryReleaseShared(arg)) { doReleaseShared(); return true ; } return false ; } protected final boolean tryReleaseShared (int unused) for (;;) { int c = getState(); int nextc = c - SHARED_UNIT; if (compareAndSetState(c, nextc)) { return nextc == 0 ; } } } private void doReleaseShared () for (;;) { Node h = head; if (h != null && h != tail) { int ws = h.waitStatus; if (ws == Node.SIGNAL) { if (!compareAndSetWaitStatus(h, Node.SIGNAL, 0 )) continue ; unparkSuccessor(h); } else if (ws == 0 && !compareAndSetWaitStatus(h, 0 , Node.PROPAGATE)) continue ; } if (h == head) break ; } } }
StampedLock 该类自 JDK 8 加入,是为了进一步优化读性能,它的特点是在使用读锁、写锁时都必须配合【戳】使用。
加解读锁
1 2 long stamp = lock.readLock();lock.unlockRead(stamp);
加解写锁
1 2 long stamp = lock.writeLock();lock.unlockWrite(stamp);
StampedLock 支持 tryOptimisticRead() 方法(乐观读),读取完毕后需要做一次戳校验,如果校验通过,表示这期间确实没有写操作,数据可以安全使用,如果校验没通过,需要重新获取读锁,保证数据安全。
1 2 3 4 5 long stamp = lock.tryOptimisticRead();if (!lock.validate(stamp)){ }
示例:提供一个数据容器类内部分别使用读锁保护数据的 read() 方法,写锁保护数据的 write() 方法。代码实现:
1 2 3 4 5 6 7 8 9 10 11 12 13 14 15 16 17 18 19 20 21 22 23 24 25 26 27 28 29 30 31 32 33 34 35 36 37 38 39 40 41 42 43 44 45 46 47 48 49 50 51 52 53 54 55 56 57 58 59 60 61 62 63 64 65 66 67 68 69 70 71 @Slf4j public class StampedLockTest public static void main (String[] args) throws InterruptedException StampedLockDataContainer dataContainer = new StampedLockDataContainer(1 ); Thread t1 = new Thread(() -> { try { System.out.println(dataContainer.read(1 )); } catch (InterruptedException e) { e.printStackTrace(); } }, "t1" ); t1.start(); TimeUnit.MILLISECONDS.sleep(500 ); Thread t2 = new Thread(() -> { dataContainer.write(10 ); }, "t2" ); t2.start(); } } @Slf4j class StampedLockDataContainer private int data; private StampedLock stampedLock = new StampedLock(); public StampedLockDataContainer (int data) this .data = data; } public int read (int readTime) throws InterruptedException long stamp = stampedLock.tryOptimisticRead(); log.info("optimistic read locking ...{}" , stamp); Thread.sleep(readTime * 1000 ); if (stampedLock.validate(stamp)) { log.info("read finish... {}" , stamp); return data; } log.info("update to read lock ..." ); try { stamp = stampedLock.readLock(); log.info("read lock {}" , stamp); Thread.sleep(readTime * 1000 ); log.info("read finish ... {}" , stamp); return data; }finally { stampedLock.unlockRead(stamp); } } public void write (int newData) long stamp = stampedLock.writeLock(); try { log.info("write lock {}" , stamp); this .data = newData; try { TimeUnit.SECONDS.sleep(1 ); } catch (InterruptedException e) { e.printStackTrace(); } log.info("write finish ... {}" , stamp); log.info("write newData ... {}" , this .data); } finally { stampedLock.unlockWrite(stamp); } } }
输出:
1 2 3 4 5 6 7 8 16 :30 :13.011 [t1] INFO com.heu.test.StampedLockDataContainer - optimistic read locking ...256 16 :30 :13.519 [t2] INFO com.heu.test.StampedLockDataContainer - write lock 384 16 :30 :14.031 [t1] INFO com.heu.test.StampedLockDataContainer - update to read lock ...16 :30 :14.523 [t2] INFO com.heu.test.StampedLockDataContainer - write finish ... 384 16 :30 :14.524 [t2] INFO com.heu.test.StampedLockDataContainer - write newData ... 10 16 :30 :14.525 [t1] INFO com.heu.test.StampedLockDataContainer - read lock 513 16 :30 :15.533 [t1] INFO com.heu.test.StampedLockDataContainer - read finish ... 513 10
注意:
StampedLock 不支持条件变量
StampedLock 不支持可重入
Semaphore 基本使用 信号量,用来限制能同时访问共享资源的线程上限。示例:
1 2 3 4 5 6 7 8 9 10 11 12 13 14 15 16 17 18 19 20 21 22 23 24 25 26 27 28 29 30 @Slf4j public class SemaphoreTest public static void main (String[] args) Semaphore semaphore = new Semaphore(3 ); for (int i = 0 ; i < 10 ; i++) { new Thread(() -> { try { semaphore.acquire(); } catch (InterruptedException e) { e.printStackTrace(); } try { log.info("start..." ); Thread.sleep(1000 ); log.info("end..." ); } catch (InterruptedException e) { e.printStackTrace(); }finally { semaphore.release(); } },"t" +(i+1 )).start(); } } }
输出:
1 2 3 4 5 6 7 8 9 10 11 12 13 14 15 16 17 18 19 20 16 :43 :36.143 [t2] INFO com.heu.test.SemaphoreTest - start...16 :43 :36.143 [t3] INFO com.heu.test.SemaphoreTest - start...16 :43 :36.143 [t1] INFO com.heu.test.SemaphoreTest - start...16 :43 :37.154 [t1] INFO com.heu.test.SemaphoreTest - end...16 :43 :37.154 [t3] INFO com.heu.test.SemaphoreTest - end...16 :43 :37.155 [t2] INFO com.heu.test.SemaphoreTest - end...16 :43 :37.156 [t4] INFO com.heu.test.SemaphoreTest - start...16 :43 :37.155 [t10] INFO com.heu.test.SemaphoreTest - start...16 :43 :37.156 [t6] INFO com.heu.test.SemaphoreTest - start...16 :43 :38.162 [t4] INFO com.heu.test.SemaphoreTest - end...16 :43 :38.162 [t6] INFO com.heu.test.SemaphoreTest - end...16 :43 :38.162 [t10] INFO com.heu.test.SemaphoreTest - end...16 :43 :38.162 [t9] INFO com.heu.test.SemaphoreTest - start...16 :43 :38.163 [t7] INFO com.heu.test.SemaphoreTest - start...16 :43 :38.163 [t8] INFO com.heu.test.SemaphoreTest - start...16 :43 :39.174 [t9] INFO com.heu.test.SemaphoreTest - end...16 :43 :39.174 [t7] INFO com.heu.test.SemaphoreTest - end...16 :43 :39.174 [t5] INFO com.heu.test.SemaphoreTest - start...16 :43 :39.174 [t8] INFO com.heu.test.SemaphoreTest - end...16 :43 :40.181 [t5] INFO com.heu.test.SemaphoreTest - end...
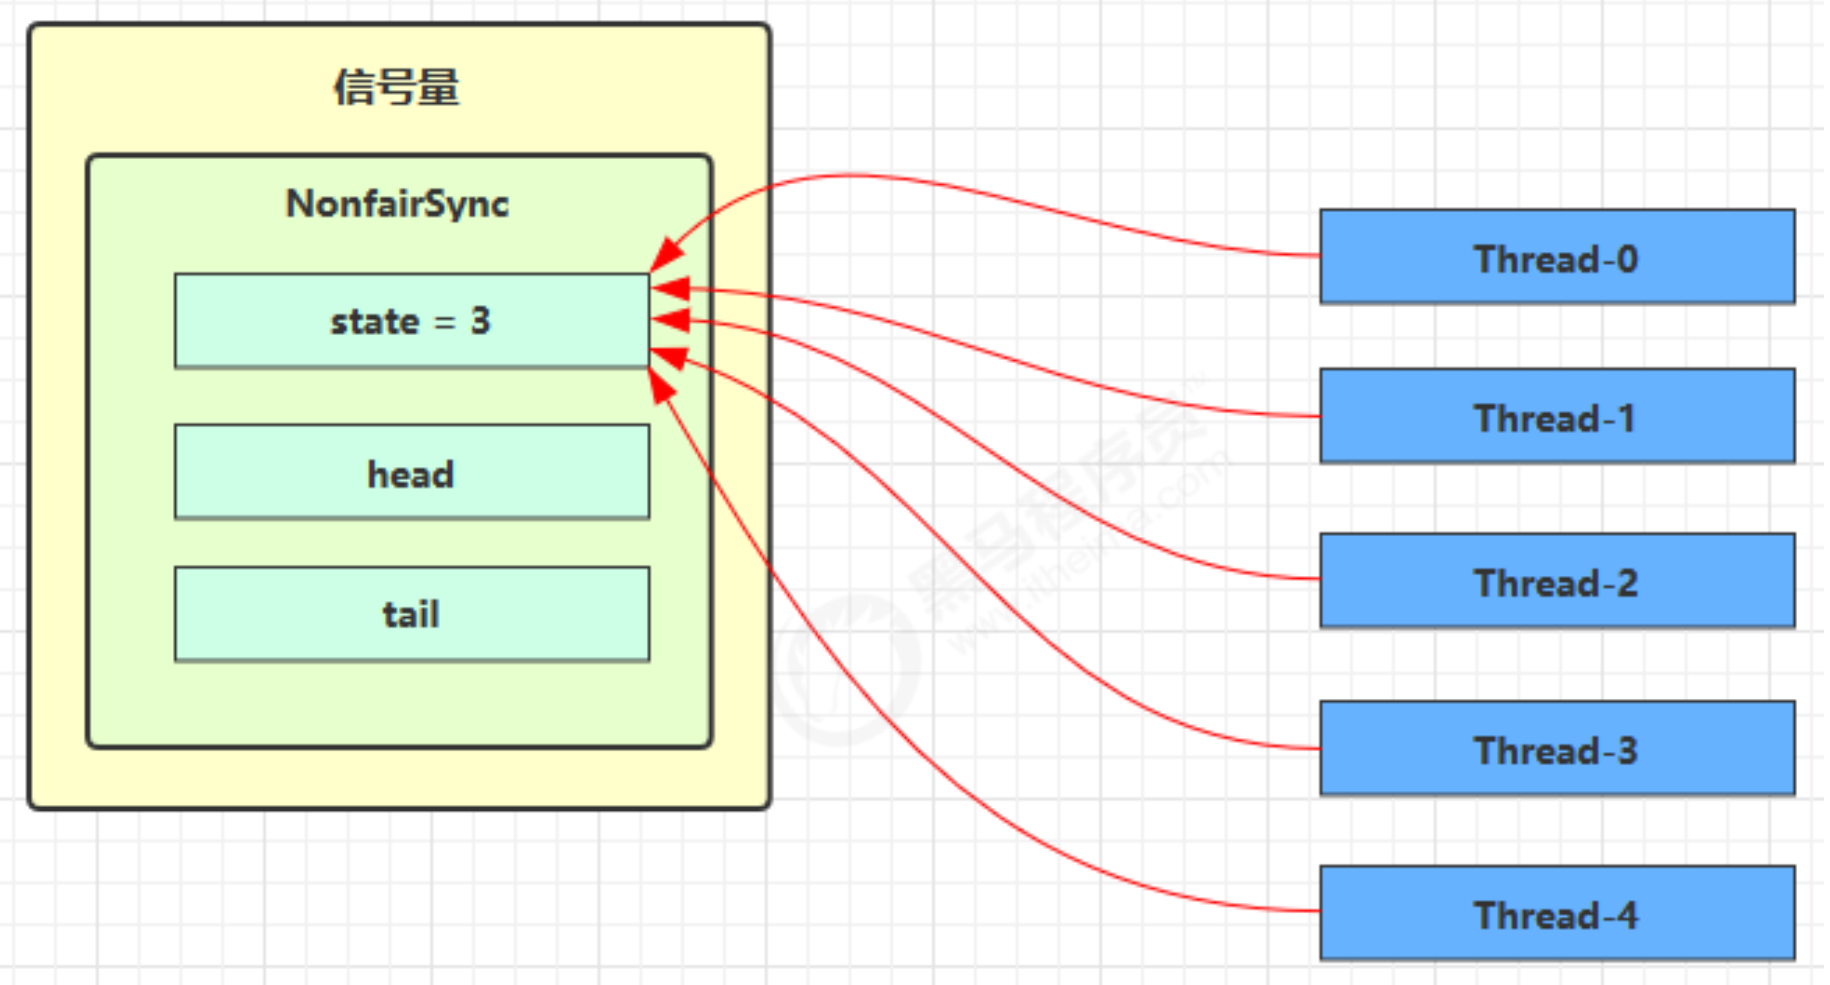
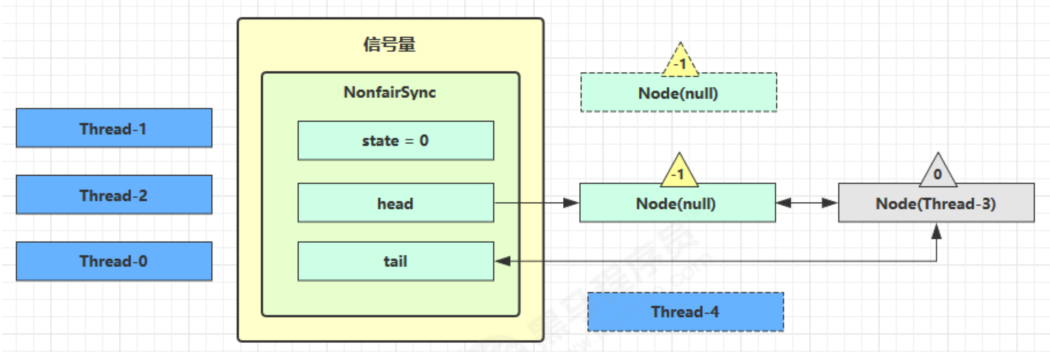
Semaphore原理 Semaphore 有点像一个停车场,permits 就好像停车位数量,当线程获得了 permits 就像是获得了停车位,然后停车场显示空余车位减一。如下示例:刚开始 permits(state)为 3,这时 5 个线程来获取资源:
假设其中 Thread-1,Thread-2,Thread-4 cas 竞争成功,而 Thread-0 和 Thread-3 竞争失败,进入 AQS 队列park 阻塞。
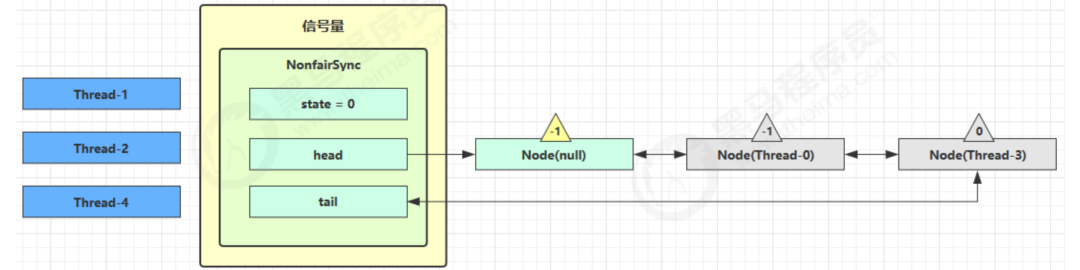
这时 Thread-4 释放了 permits,状态如下:
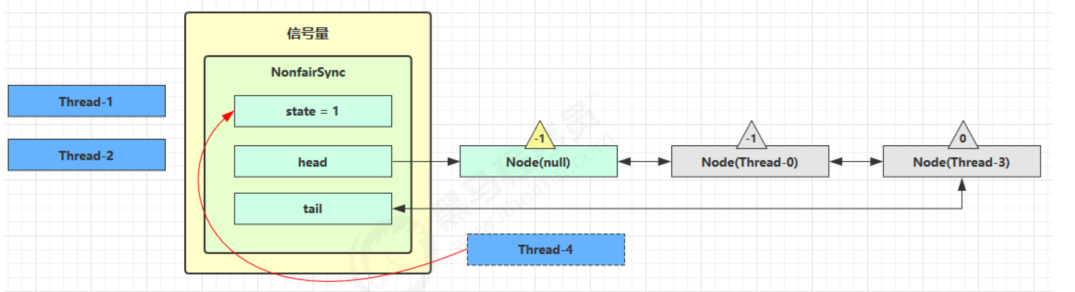
接下来 Thread-0 竞争成功,permits 再次设置为 0,设置自己为 head 节点,断开原来的 head 节点,unpark 接下来的 Thread-3 节点,但由于 permits 是 0,因此 Thread-3 在尝试不成功后再次进入 park 状态。
源码分析 1 2 3 4 5 6 7 8 9 10 11 12 13 14 15 16 17 18 19 20 21 22 23 24 25 26 27 28 29 30 31 32 33 34 35 36 37 38 39 40 41 42 43 44 45 46 47 48 49 50 51 52 53 54 55 56 57 58 59 60 61 62 63 64 65 66 67 68 69 70 71 72 73 74 75 76 77 78 79 80 81 82 83 84 85 86 87 88 89 90 91 92 93 94 95 96 97 98 99 static final class NonfairSync extends Sync private static final long serialVersionUID = -2694183684443567898L ; NonfairSync(int permits) { super (permits); } public void acquire () throws InterruptedException sync.acquireSharedInterruptibly(1 ); } public final void acquireSharedInterruptibly (int arg) throws InterruptedException { if (Thread.interrupted()) throw new InterruptedException(); if (tryAcquireShared(arg) < 0 ) doAcquireSharedInterruptibly(arg); } protected int tryAcquireShared (int acquires) return nonfairTryAcquireShared(acquires); } final int nonfairTryAcquireShared (int acquires) for (;;) { int available = getState(); int remaining = available - acquires; if ( remaining < 0 || compareAndSetState(available, remaining) ) { return remaining; } } } private void doAcquireSharedInterruptibly (int arg) throws InterruptedException final Node node = addWaiter(Node.SHARED); boolean failed = true ; try { for (;;) { final Node p = node.predecessor(); if (p == head) { int r = tryAcquireShared(arg); if (r >= 0 ) { setHeadAndPropagate(node, r); p.next = null ; failed = false ; return ; } } if (shouldParkAfterFailedAcquire(p, node) && parkAndCheckInterrupt()) throw new InterruptedException(); } } finally { if (failed) cancelAcquire(node); } } public void release () sync.releaseShared(1 ); } public final boolean releaseShared (int arg) if (tryReleaseShared(arg)) { doReleaseShared(); return true ; } return false ; } protected final boolean tryReleaseShared (int releases) for (;;) { int current = getState(); int next = current + releases; if (next < current) throw new Error("Maximum permit count exceeded" ); if (compareAndSetState(current, next)) return true ; } } }
CountdownLatch CountDownLatch 允许多线程阻塞在一个地方,直至所有线程的任务都执行完毕。在 Java 并发中,countdownlatch 的概念是一个常见的面试题,所以一定要确保很好的理解了它。
CountDownLatch 是共享锁的一种实现,它默认构造 AQS 的 state 值为 count。当线程使用 countDown方法时,其实使用了 tryReleaseShared 方法以CAS 的操作来减少 state,当 state 为 0, 就代表所有的线程都调用了countDown方法。
当调用 await 方法的时候,如果 state 不为0,就代表仍然有线程没有调用 countDown0 方法,那么就把已经调用过 countDown 的线程都放入阻塞队列 Park ,并自旋 CAS 判断 state == 0,直至最后一个线程调用了 countDown ,使得 state == 0,于是阻塞的线程便判断成功,全部往下执行。
用来进行线程同步协作,等待所有线程完成倒计时。 其中构造参数用来初始化等待计数值,await() 用来等待计数归零,countDown() 用来让计数减一。
1 2 3 4 5 6 7 8 9 10 11 12 13 14 15 16 17 18 19 20 21 22 23 24 25 26 27 28 29 30 31 32 33 34 35 36 37 38 39 40 41 42 43 44 45 46 47 48 49 50 51 52 53 54 55 56 57 58 59 60 61 62 63 64 65 66 67 68 69 70 71 72 73 74 75 76 77 78 79 80 81 82 83 84 85 86 87 88 89 90 91 92 93 94 95 96 97 98 99 100 101 102 103 104 105 106 107 108 109 110 111 112 113 114 115 116 117 118 119 120 121 122 123 124 125 @Slf4j @SuppressWarnings("all") public class CountDownLatchTest public static void main (String[] args) throws InterruptedException method3(); } public static void method1 () throws InterruptedException CountDownLatch countDownLatch = new CountDownLatch(3 ); new Thread(() -> { log.info("t1 start ..." ); try { Thread.sleep(1000 ); } catch (InterruptedException e) { e.printStackTrace(); } log.info("t1 end ..." ); countDownLatch.countDown(); },"t1" ).start(); new Thread(() -> { log.info("t2 start ..." ); try { Thread.sleep(2000 ); } catch (InterruptedException e) { e.printStackTrace(); } log.info("t2 end ..." ); countDownLatch.countDown(); }, "t2" ).start(); new Thread(() -> { log.info("t3 start ..." ); try { Thread.sleep(1500 ); } catch (InterruptedException e) { e.printStackTrace(); } log.info("t3 end ..." ); countDownLatch.countDown(); }, "t3" ).start(); log.info("main wait ..." ); countDownLatch.await(); log.info("main wait end ..." ); } public static void method2 () CountDownLatch countDownLatch = new CountDownLatch(3 ); ExecutorService executorService = Executors.newFixedThreadPool(4 ); executorService.submit(() -> { log.info("t1 start ..." ); try { Thread.sleep(1000 ); } catch (InterruptedException e) { e.printStackTrace(); } countDownLatch.countDown(); log.info("t1 end ...{}" , countDownLatch.getCount()); }); executorService.submit(() -> { log.info("t2 start ..." ); try { Thread.sleep(2000 ); } catch (InterruptedException e) { e.printStackTrace(); } log.info("t2 end ...{}" , countDownLatch.getCount()); countDownLatch.countDown(); }); executorService.submit(() -> { log.info("t3 start ..." ); try { Thread.sleep(1500 ); } catch (InterruptedException e) { e.printStackTrace(); } log.info("t3 end ...{}" , countDownLatch.getCount()); countDownLatch.countDown(); }); executorService.submit(() -> { log.info("main wait..." ); try { countDownLatch.await(); } catch (InterruptedException e) { e.printStackTrace(); } log.info("main wait end ..." ); executorService.shutdown(); }); } public static void method3 () throws InterruptedException CountDownLatch countDownLatch = new CountDownLatch(10 ); ExecutorService executorService = Executors.newFixedThreadPool(10 ); String[] all = new String[10 ]; Random random = new Random(); for (int i = 0 ; i < 10 ; i++) { int id = i; executorService.submit(() -> { for (int j = 0 ; j <= 100 ; j++) { try { Thread.sleep(random.nextInt(100 )); } catch (InterruptedException e) { e.printStackTrace(); } all[id] = j + "%" ; System.out.print("\r" + Arrays.toString(all)); } countDownLatch.countDown(); }); } countDownLatch.await(); System.out.println(); System.out.println("游戏开始" ); executorService.shutdown(); } }
method1 输出:
1 2 3 4 5 6 7 8 17 :18 :12.575 [main] INFO com.heu.test.CountDownLatchTest - main wait ...17 :18 :12.575 [t2] INFO com.heu.test.CountDownLatchTest - t2 start ...17 :18 :12.575 [t1] INFO com.heu.test.CountDownLatchTest - t1 start ...17 :18 :12.575 [t3] INFO com.heu.test.CountDownLatchTest - t3 start ...17 :18 :13.592 [t1] INFO com.heu.test.CountDownLatchTest - t1 end ...17 :18 :14.098 [t3] INFO com.heu.test.CountDownLatchTest - t3 end ...17 :18 :14.590 [t2] INFO com.heu.test.CountDownLatchTest - t2 end ...17 :18 :14.590 [main] INFO com.heu.test.CountDownLatchTest - main wait end ...
method2 输出:
1 2 3 4 5 6 7 8 17 :23 :07.829 [pool-1 -thread-4 ] INFO com.heu.test.CountDownLatchTest - main wait...17 :23 :07.829 [pool-1 -thread-2 ] INFO com.heu.test.CountDownLatchTest - t2 start ...17 :23 :07.829 [pool-1 -thread-3 ] INFO com.heu.test.CountDownLatchTest - t3 start ...17 :23 :07.829 [pool-1 -thread-1 ] INFO com.heu.test.CountDownLatchTest - t1 start ...17 :23 :08.854 [pool-1 -thread-1 ] INFO com.heu.test.CountDownLatchTest - t1 end ...2 17 :23 :09.344 [pool-1 -thread-3 ] INFO com.heu.test.CountDownLatchTest - t3 end ...2 17 :23 :09.851 [pool-1 -thread-2 ] INFO com.heu.test.CountDownLatchTest - t2 end ...1 17 :23 :09.851 [pool-1 -thread-4 ] INFO com.heu.test.CountDownLatchTest - main wait end ...
method3 输出:当所有线程全部加载完毕,输出游戏开始,类似王者荣耀!
1 2 [100%, 100%, 100%, 100%, 100%, 100%, 100%, 100%, 100%, 100%] 游戏开始
CyclicBarrier CyclicBarri[ˈsaɪklɪk ˈbæriɚ]:循环栅栏,用来进行线程协作,等待线程满足某个计数。构造时设置『计数个数』,每个线程执行到某个需要“同步”的时刻调用 await() 方法进行等待,当等待的线程数满足『计数个数』时,继续执行。跟 CountdownLatch 一样,但这个可以重用。
1 2 3 4 5 6 7 8 9 10 11 12 13 14 15 16 17 18 19 20 21 22 23 24 25 26 27 28 29 public static void main (String[] args) ExecutorService executorService = Executors.newFixedThreadPool(2 ); CyclicBarrier cyclicBarrier = new CyclicBarrier(2 , () -> { log.info("task2 finish ..." ); }); for (int i = 0 ; i < 3 ; i++) { executorService.submit(() -> { log.info("task1 begin ..." ); try { Thread.sleep(1000 ); cyclicBarrier.await(); } catch (InterruptedException | BrokenBarrierException e) { e.printStackTrace(); } }); executorService.submit(() -> { log.info("task2 begin ..." ); try { Thread.sleep(2000 ); cyclicBarrier.await(); } catch (InterruptedException | BrokenBarrierException e) { e.printStackTrace(); } }); } executorService.shutdown(); }

 微信
微信 支付宝
支付宝