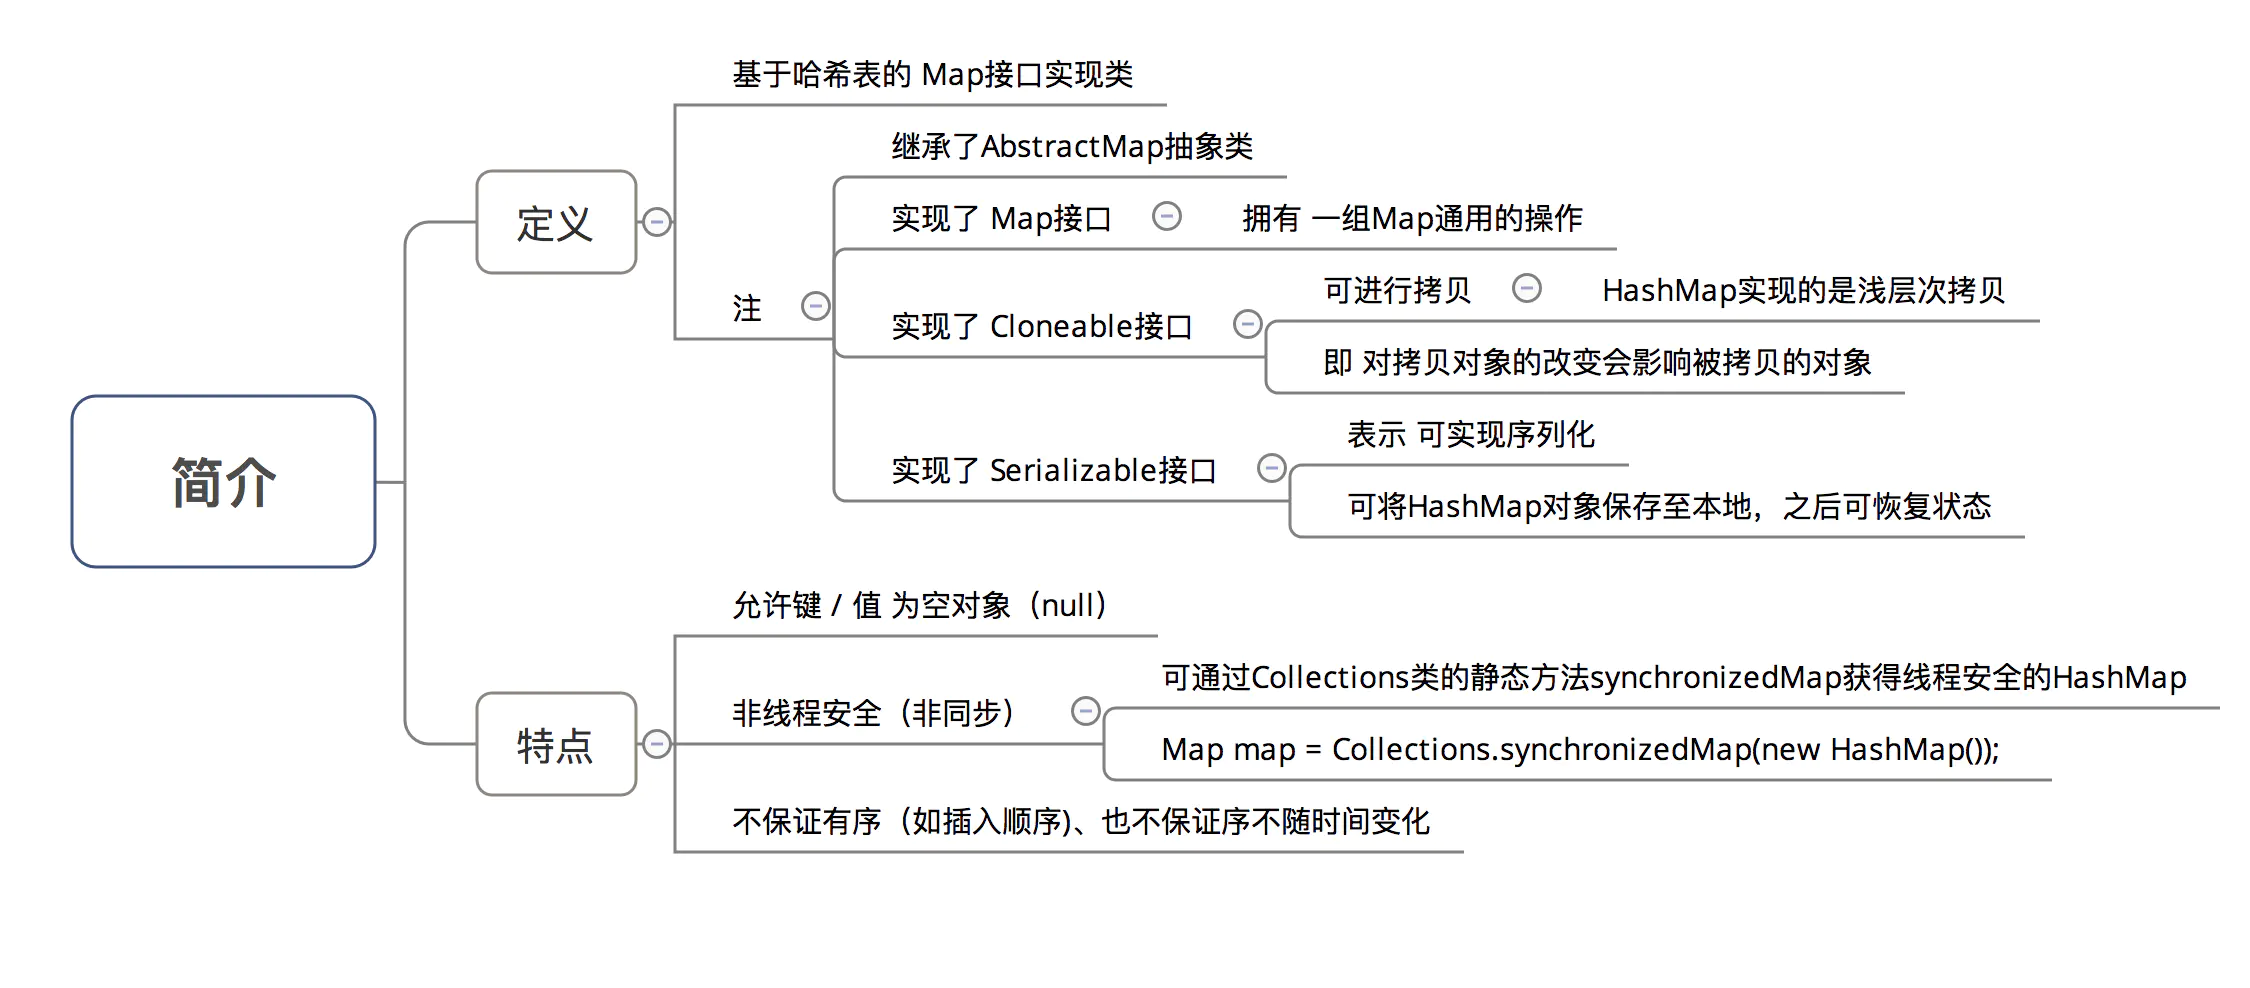
简介 类定义 1 2 3 public class HashMap <K ,V > extends AbstractMap <K ,V > implements Map <K ,V >, Cloneable , Serializable
主要简介
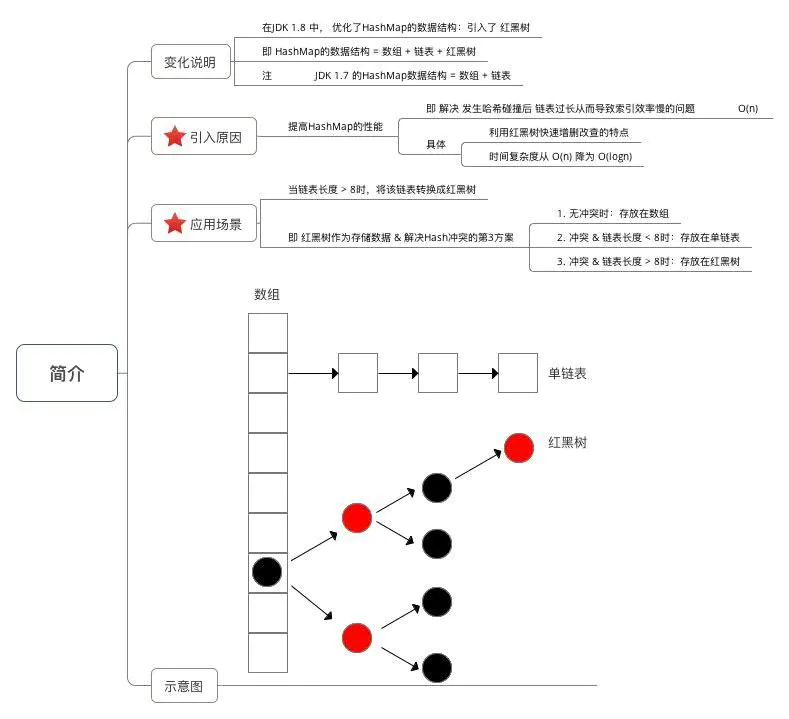
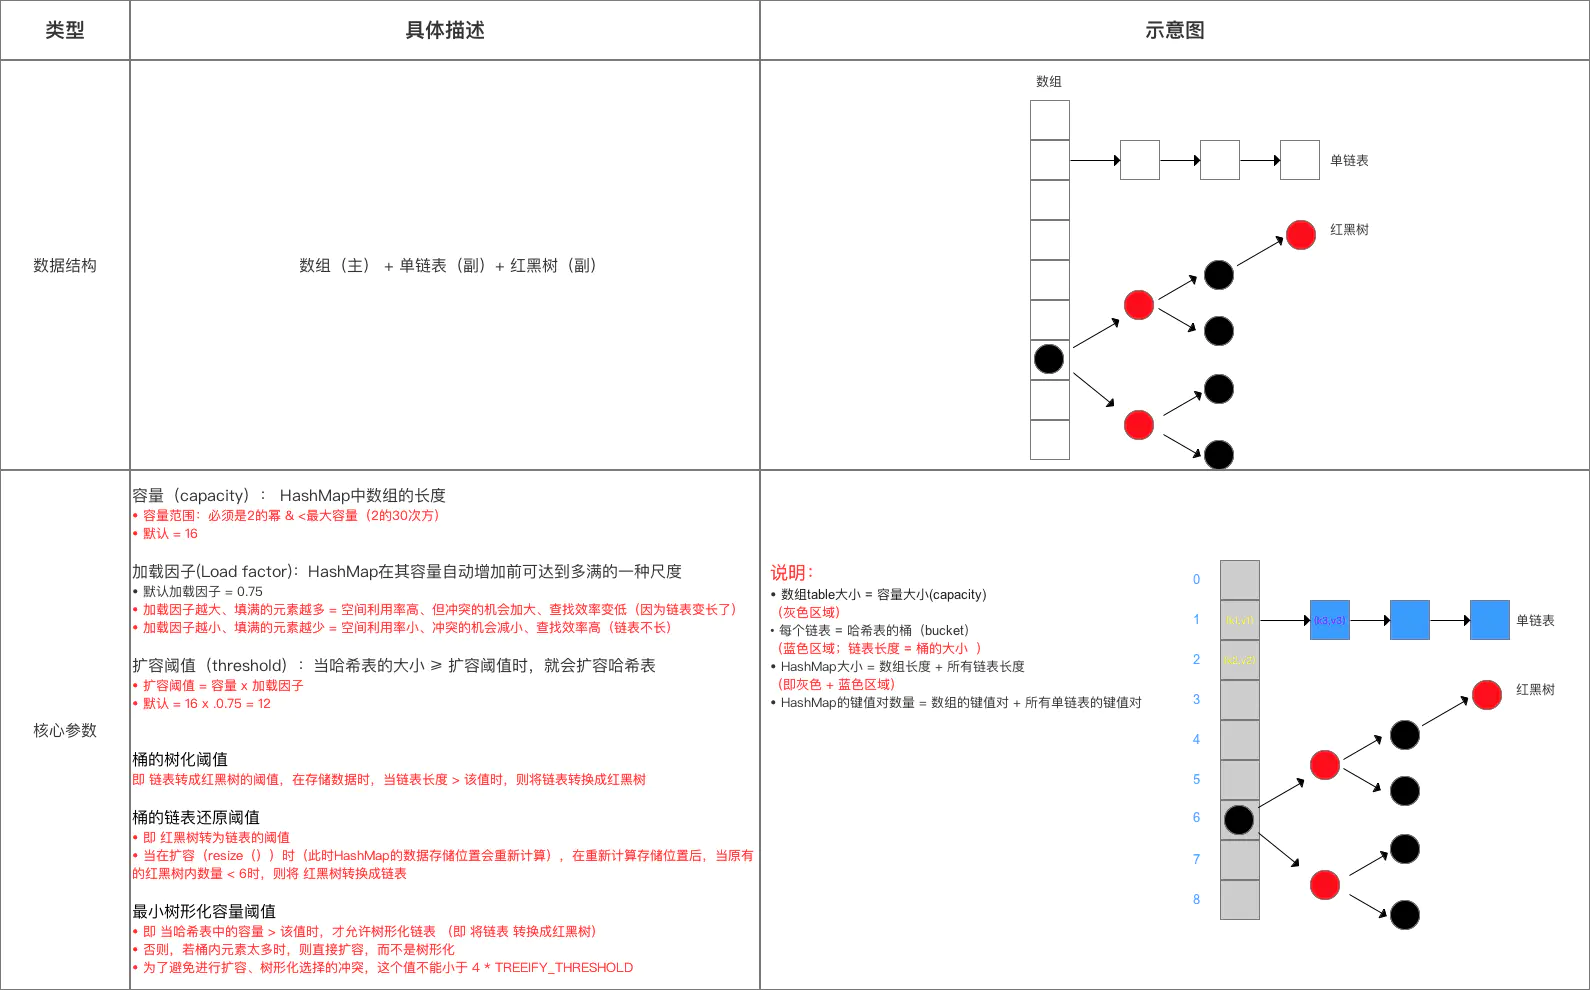
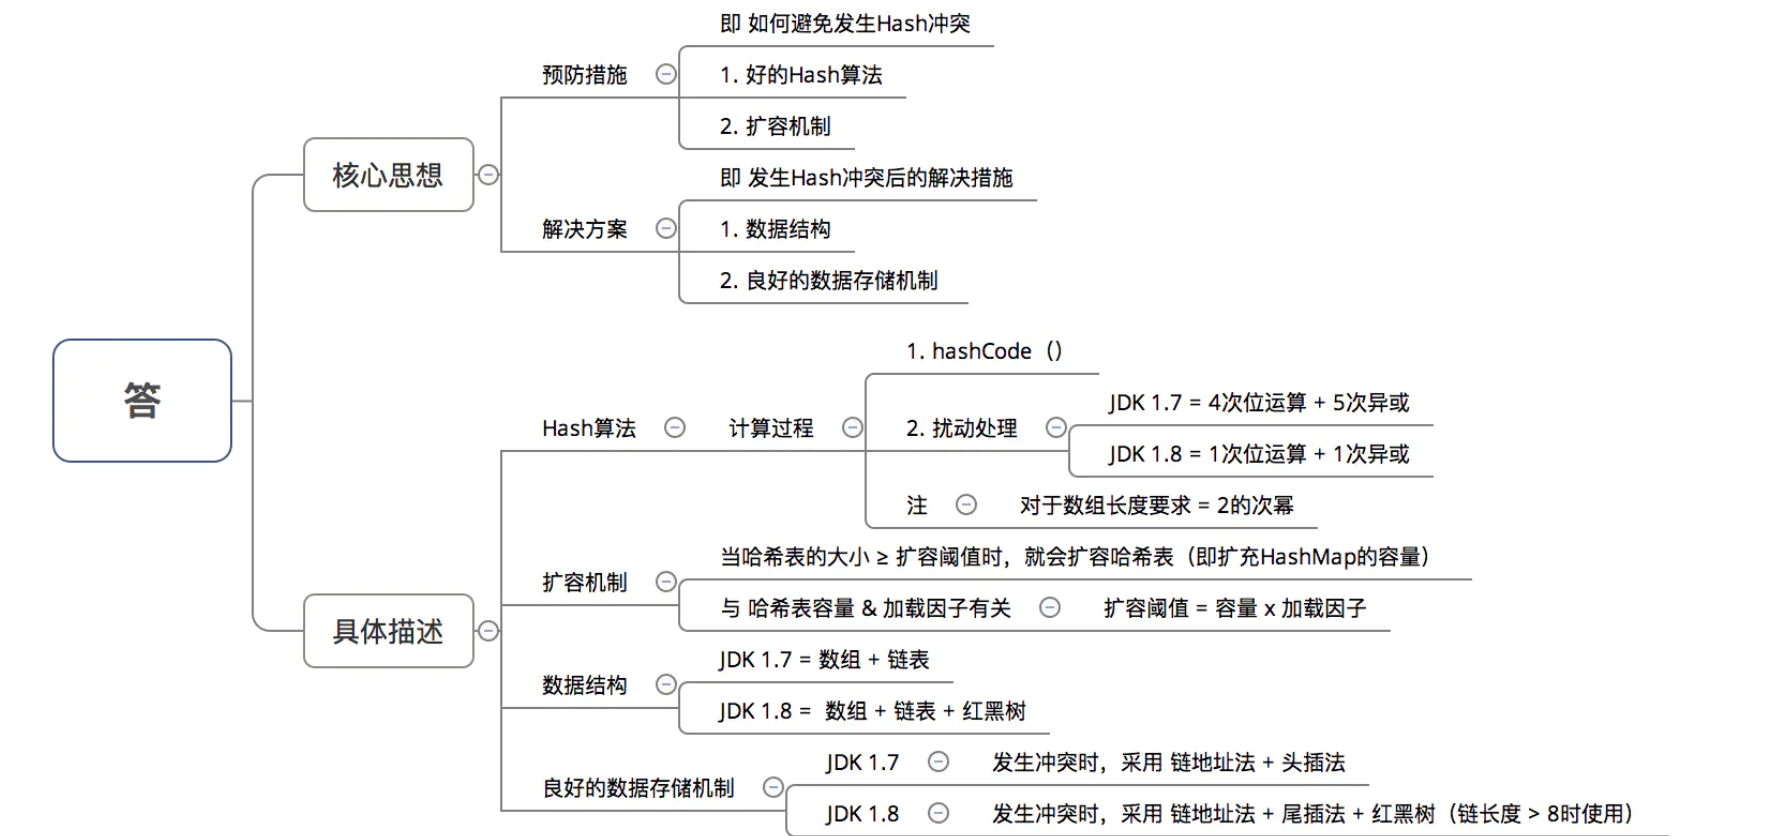
数据结构:引入了 红黑树
存储流程
数组元素 & 链表节点的 实现类
红黑树节点实现类
具体方法使用 主要使用API(方法、函数)
与 JDK 1.7 基本相同。
1 2 3 4 5 6 7 8 9 10 11 12 13 14 15 V get (Object key) ; V put (K key, V value) ; void putAll (Map<? extends K, ? extends V> m) V remove (Object key) ; boolean containsKey (Object key) boolean containsValue (Object value) Set<K> keySet () ; Collection<V> values () ; void clear () int size () boolean isEmpty ()
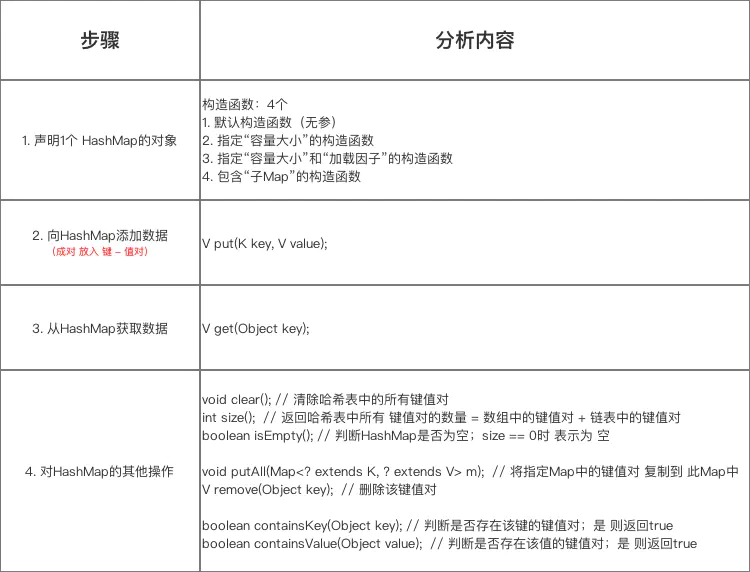
使用流程
与 JDK 1.7 基本相同
在具体使用时,主要流程是:
声明1个 HashMap的对象;
向 HashMap 添加数据(成对 放入 键 - 值对);
获取 HashMap 的某个数据;
获取 HashMap 的全部数据:遍历HashMap。
示例代码:
1 2 3 4 5 6 7 8 9 10 11 12 13 14 15 16 17 18 19 20 21 22 23 24 25 26 27 28 29 30 31 32 33 34 35 36 37 38 39 40 41 42 43 44 45 46 47 48 49 50 51 52 53 54 55 56 57 58 59 60 61 62 63 64 65 66 67 68 69 70 71 72 73 74 75 76 77 78 79 80 81 82 83 84 85 86 87 88 89 90 91 92 93 94 95 96 97 98 99 100 101 102 103 104 105 106 import java.util.Collection;import java.util.HashMap;import java.util.Iterator;import java.util.Map;import java.util.Set;public class HashMapTest public static void main (String[] args) Map<String, Integer> map = new HashMap<String, Integer>(); map.put("Android" , 1 ); map.put("Java" , 2 ); map.put("iOS" , 3 ); map.put("数据挖掘" , 4 ); map.put("产品经理" , 5 ); System.out.println("key = 产品经理时的值为:" + map.get("产品经理" )); System.out.println("方法1" ); Set<Map.Entry<String, Integer>> entrySet = map.entrySet(); for (Map.Entry<String, Integer> entry : entrySet){ System.out.print(entry.getKey()); System.out.println(entry.getValue()); } System.out.println("----------" ); Iterator iter1 = entrySet.iterator(); while (iter1.hasNext()) { Map.Entry entry = (Map.Entry) iter1.next(); System.out.print((String) entry.getKey()); System.out.println((Integer) entry.getValue()); } System.out.println("方法2" ); Set<String> keySet = map.keySet(); for (String key : keySet){ System.out.print(key); System.out.println(map.get(key)); } System.out.println("----------" ); Iterator iter2 = keySet.iterator(); String key = null ; while (iter2.hasNext()) { key = (String)iter2.next(); System.out.print(key); System.out.println(map.get(key)); } System.out.println("方法3" ); Collection valueSet = map.values(); Iterator iter3 = valueSet.iterator(); while (iter3.hasNext()) { System.out.println(iter3.next()); } } }
运行结果:
1 2 3 4 5 6 7 8 9 10 11 12 13 14 15 16 17 18 19 20 21 22 23 24 25 26 27 28 29 30 方法1 Java2 iOS3 数据挖掘4 Android1 产品经理5 ---------- Java2 iOS3 数据挖掘4 Android1 产品经理5 方法2 Java2 iOS3 数据挖掘4 Android1 产品经理5 ---------- Java2 iOS3 数据挖掘4 Android1 产品经理5 方法3 2 3 4 1 5
HashMap中的重要参数(变量) 1 2 3 4 5 6 7 8 9 10 11 12 13 14 15 16 17 18 19 20 21 22 23 24 25 26 27 28 29 30 31 32 33 34 static final int DEFAULT_INITIAL_CAPACITY = 1 << 4 ; static final int MAXIMUM_CAPACITY = 1 << 30 ; final float loadFactor; static final float DEFAULT_LOAD_FACTOR = 0.75f ; int threshold; transient Node<K,V>[] table; transient int size; static final int TREEIFY_THRESHOLD = 8 ; static final int UNTREEIFY_THRESHOLD = 6 ; static final int MIN_TREEIFY_CAPACITY = 64 ;
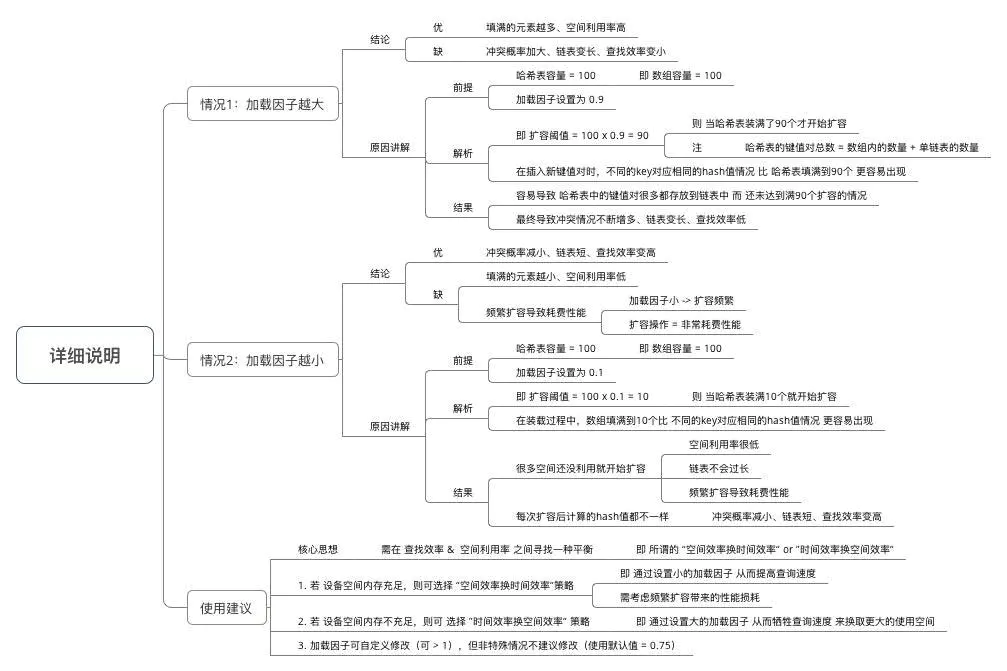
加载因子
同 JDK 1.7,但由于其重要性,故此处再次说明。
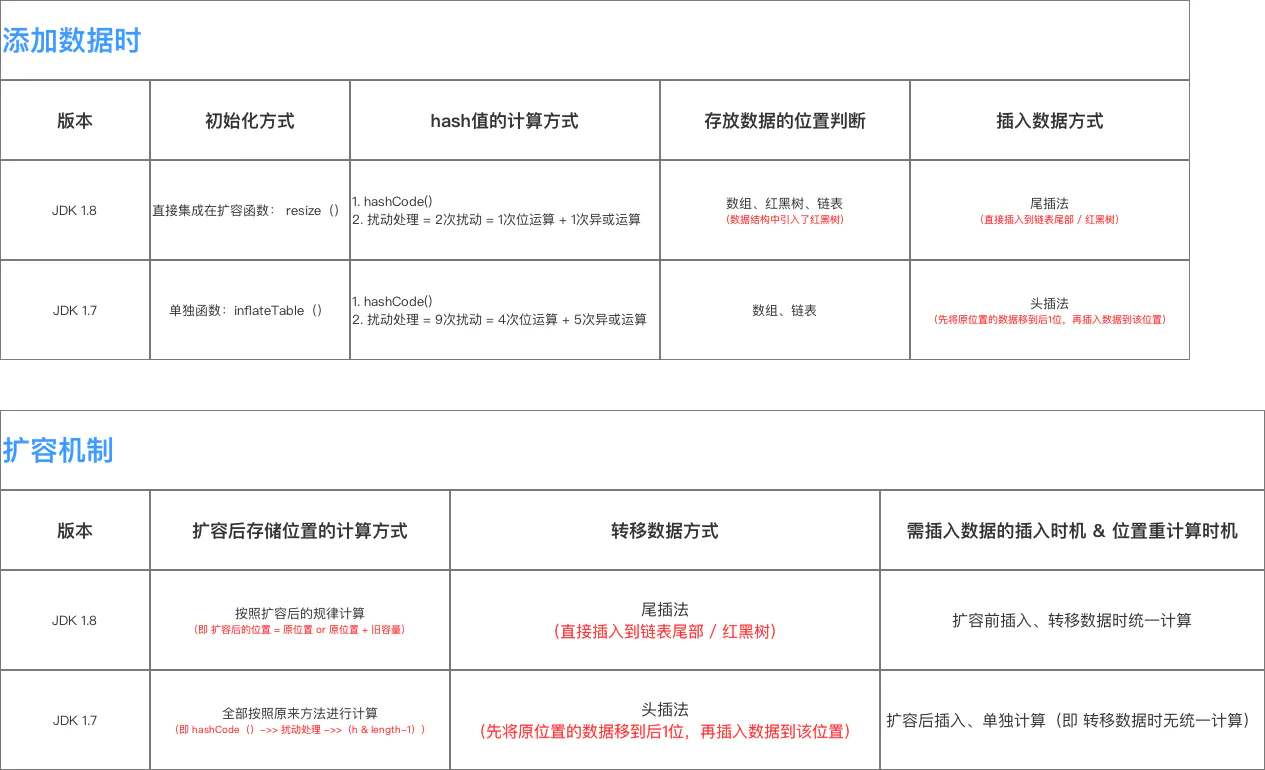
总结 数据结构 & 参数方面与 JDK 1.7的区别:
源码分析 本次的源码分析主要是根据 使用步骤 进行相关函数的详细分析,主要分析内容如下:
源码中数据结构 & 主要参数
步骤1:声明1个 HashMap的对象 此处主要分析的构造函数类似 JDK 1.7。
源码分析:
1 2 3 4 5 6 7 8 9 10 11 12 13 14 15 16 17 18 19 20 21 22 23 24 25 26 27 28 29 30 31 32 33 34 35 36 37 38 39 40 41 42 43 44 45 46 47 48 49 50 51 52 53 54 55 56 57 58 59 60 61 62 63 64 65 66 67 68 69 70 71 72 73 74 75 76 77 78 79 80 81 82 83 84 85 86 87 88 89 90 91 92 93 94 Map<String,Integer> map = new HashMap<String,Integer>(); public class HashMap <K ,V > extends AbstractMap <K ,V > implements Map <K ,V >, Cloneable , Serializable { public HashMap () this .loadFactor = DEFAULT_LOAD_FACTOR; } public HashMap (int initialCapacity) this (initialCapacity, DEFAULT_LOAD_FACTOR); } public HashMap (int initialCapacity, float loadFactor) if (initialCapacity < 0 ) throw new IllegalArgumentException("Illegal initial capacity: " + initialCapacity); if (initialCapacity > MAXIMUM_CAPACITY) initialCapacity = MAXIMUM_CAPACITY; if (loadFactor <= 0 || Float.isNaN(loadFactor)) throw new IllegalArgumentException("Illegal load factor: " + loadFactor); this .loadFactor = loadFactor; this .threshold = tableSizeFor(initialCapacity); } public HashMap (Map<? extends K, ? extends V> m) this .loadFactor = DEFAULT_LOAD_FACTOR; putMapEntries(m, false ); } } static final int tableSizeFor (int cap) int n = cap - 1 ; n |= n >>> 1 ; n |= n >>> 2 ; n |= n >>> 4 ; n |= n >>> 8 ; n |= n >>> 16 ; return (n < 0 ) ? 1 : (n >= MAXIMUM_CAPACITY) ? MAXIMUM_CAPACITY : n + 1 ; }
注:(同JDK 1.7类似)
此处仅用于接收初始容量大小(capacity)、加载因子(Load factor),但仍无真正初始化哈希表,即初始化存储数组table。
此处先给出结论:真正初始化哈希表(初始化存储数组table)是在第1次添加键值对时,即第1次调用put()时。下面会详细说明 。
步骤2:向HashMap添加数据(成对 放入 键 - 值对) 在该步骤中,与JDK 1.7的差别较大:
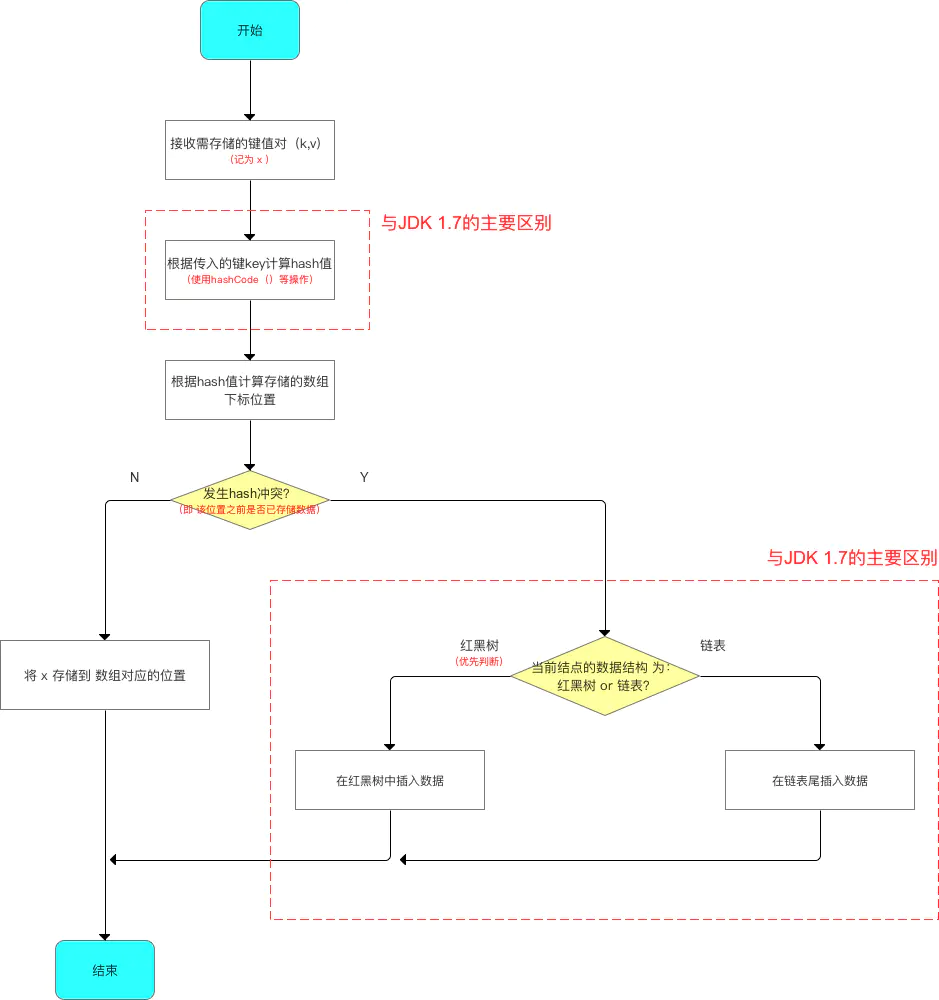
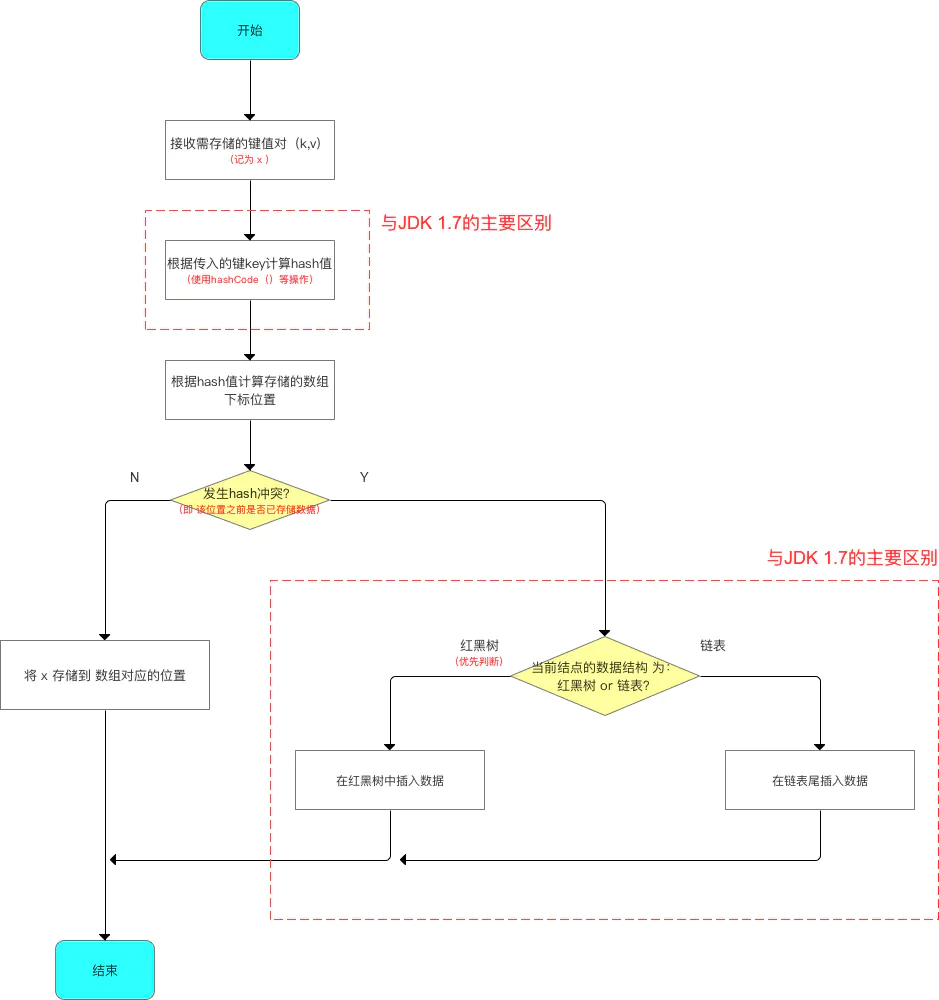
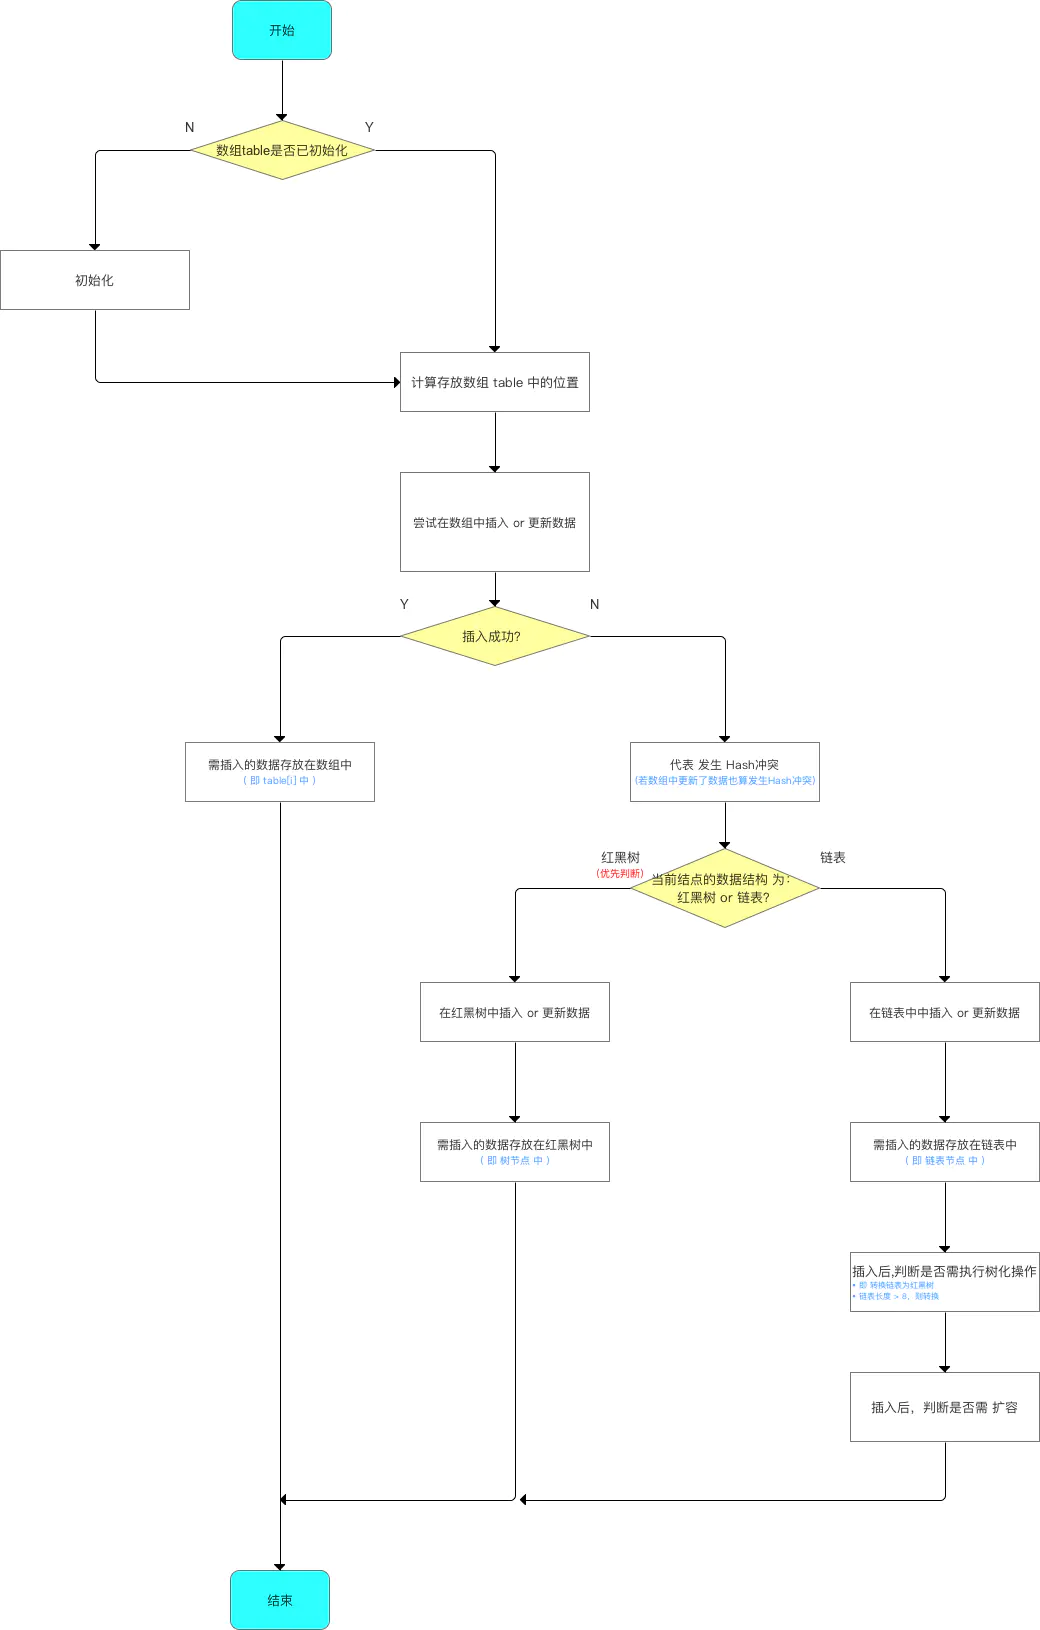
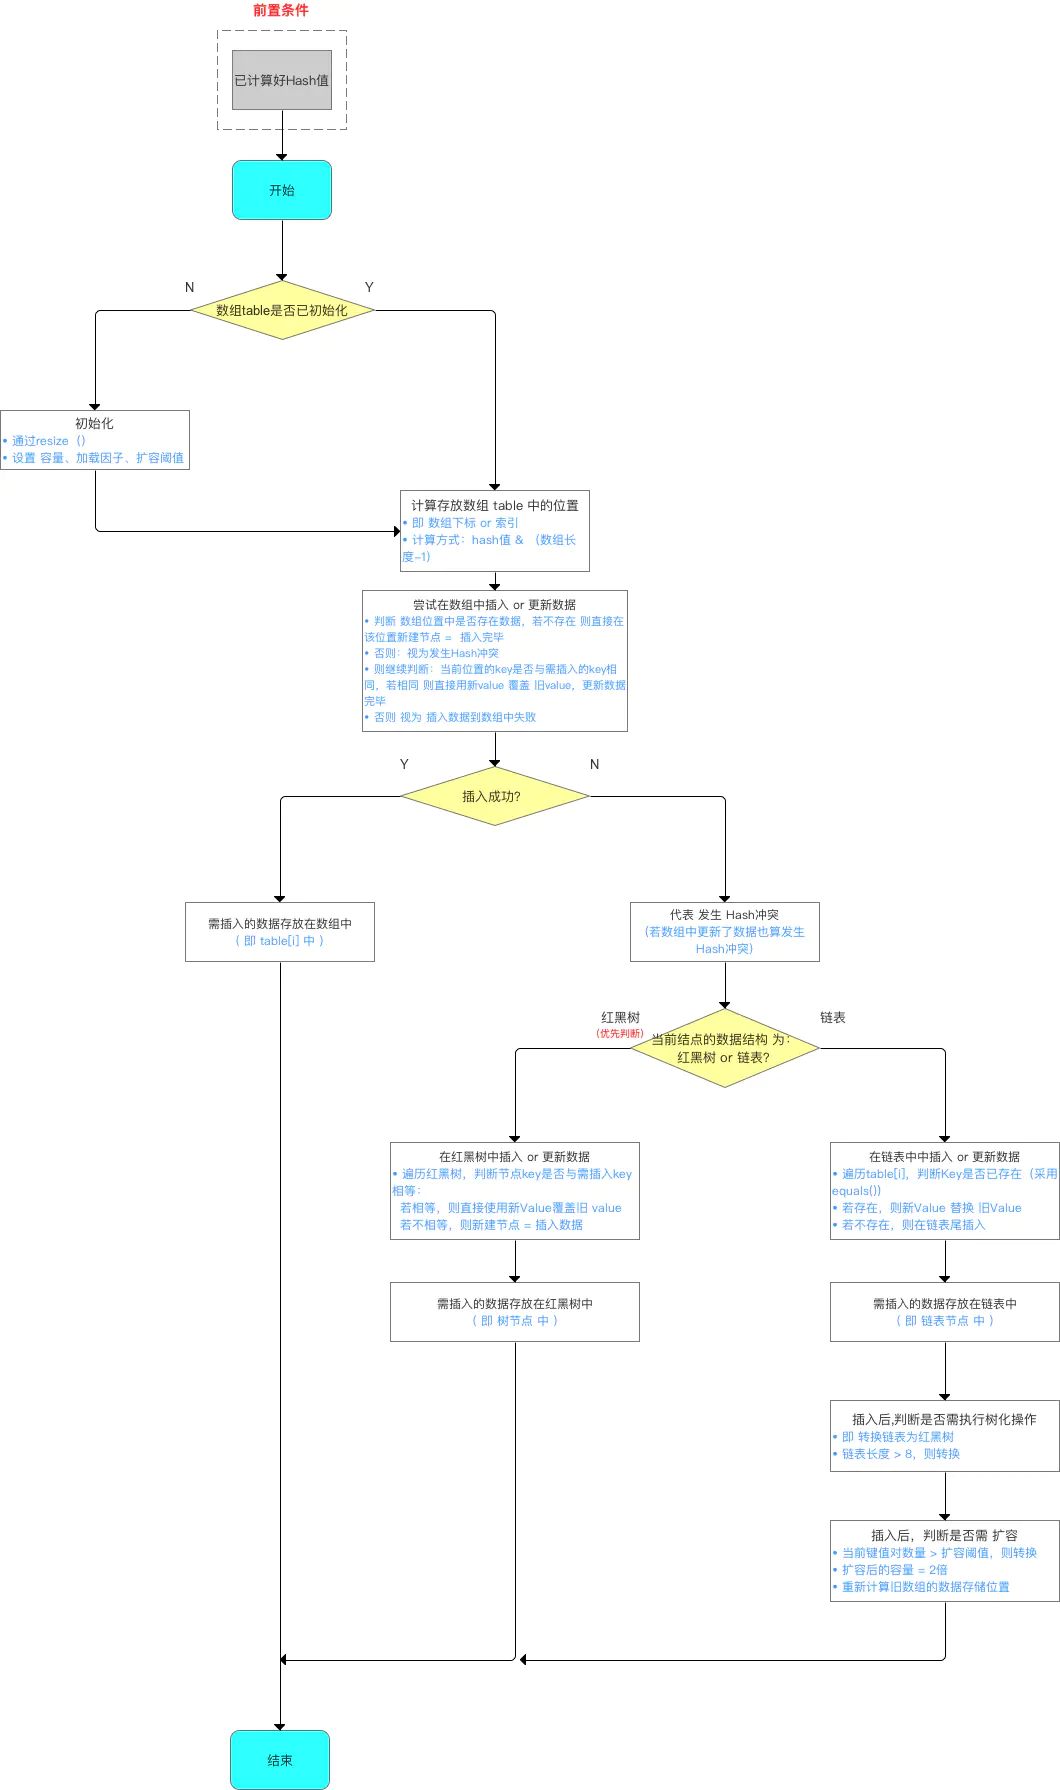
添加数据的流程如下:
源码分析
1 2 3 4 5 6 7 8 9 10 11 12 13 14 15 16 17 map.put("Android" , 1 ); map.put("Java" , 2 ); map.put("iOS" , 3 ); map.put("数据挖掘" , 4 ); map.put("产品经理" , 5 ); public V put (K key, V value) return putVal(hash(key), key, value, false , true ); }
分析1:hash(key) 1 2 3 4 5 6 7 8 9 10 11 12 13 14 15 16 17 18 19 20 21 22 23 24 25 26 27 28 29 30 31 32 33 34 35 static final int hash (int h) h ^= k.hashCode(); h ^= (h >>> 20 ) ^ (h >>> 12 ); return h ^ (h >>> 7 ) ^ (h >>> 4 ); } static final int hash (Object key) int h; return (key == null ) ? 0 : (h = key.hashCode()) ^ (h >>> 16 ); } static int indexFor (int h, int length) return h & (length-1 ); }
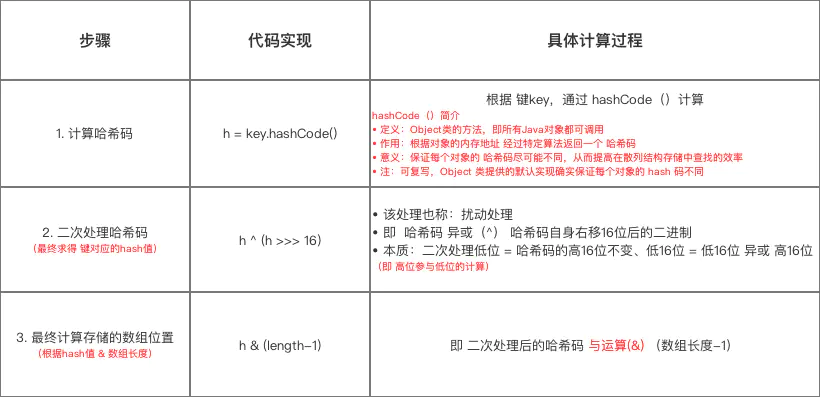
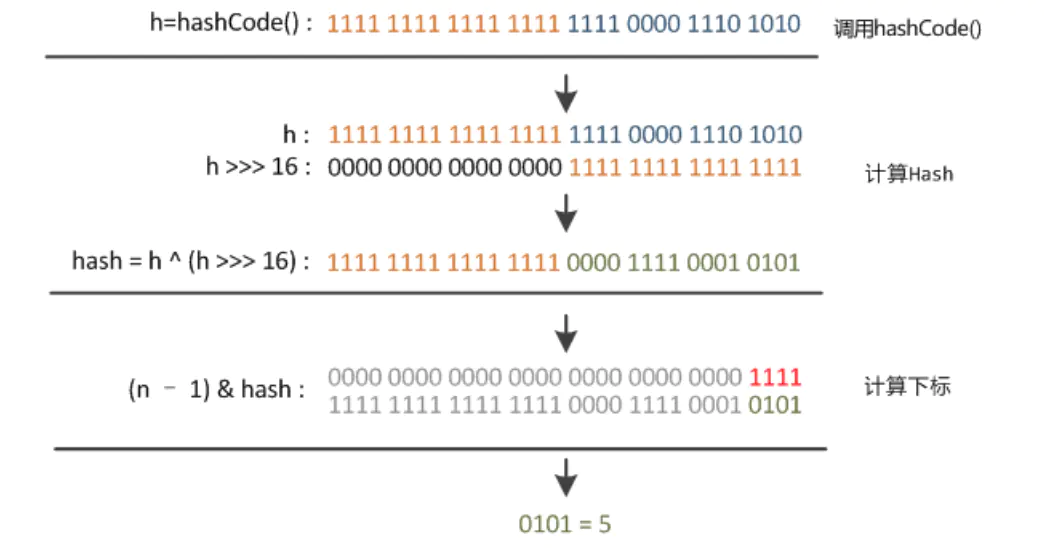
计算存放在数组 table 中的位置(即数组下标、索引)的过程:
此处与 JDK 1.7的区别在于:hash值的求解过程中哈希码的二次处理方式(扰动处理)。
步骤1、2 = hash值的求解过程。
计算示意图:
在了解如何计算存放数组table 中的位置 后,所谓 知其然而需知其所以然 ,下面讲解为什么要这样计算,即主要解答以下3个问题:
为什么不直接采用经过hashCode()处理的哈希码作为存储数组table的下标位置?
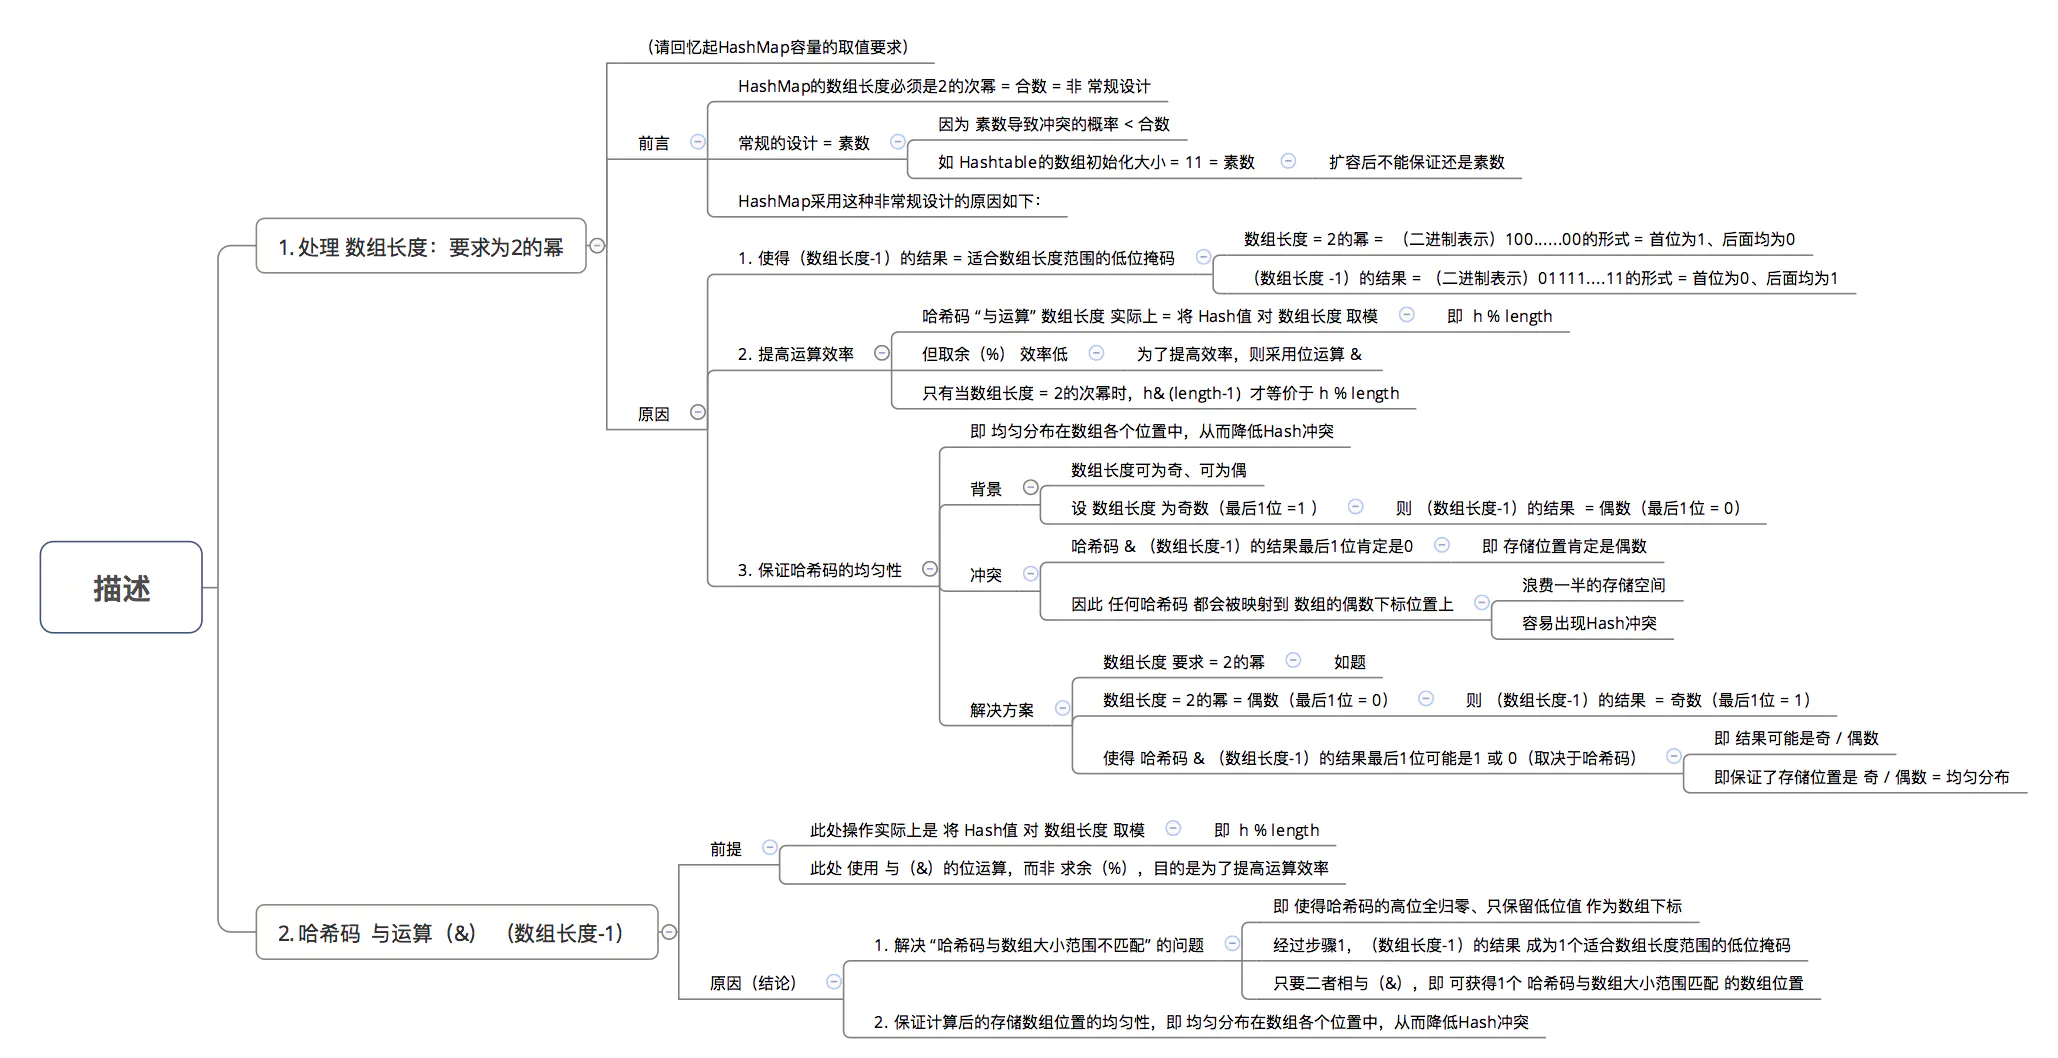
为什么采用 哈希码 与运算(&) (数组长度-1) 计算数组下标?
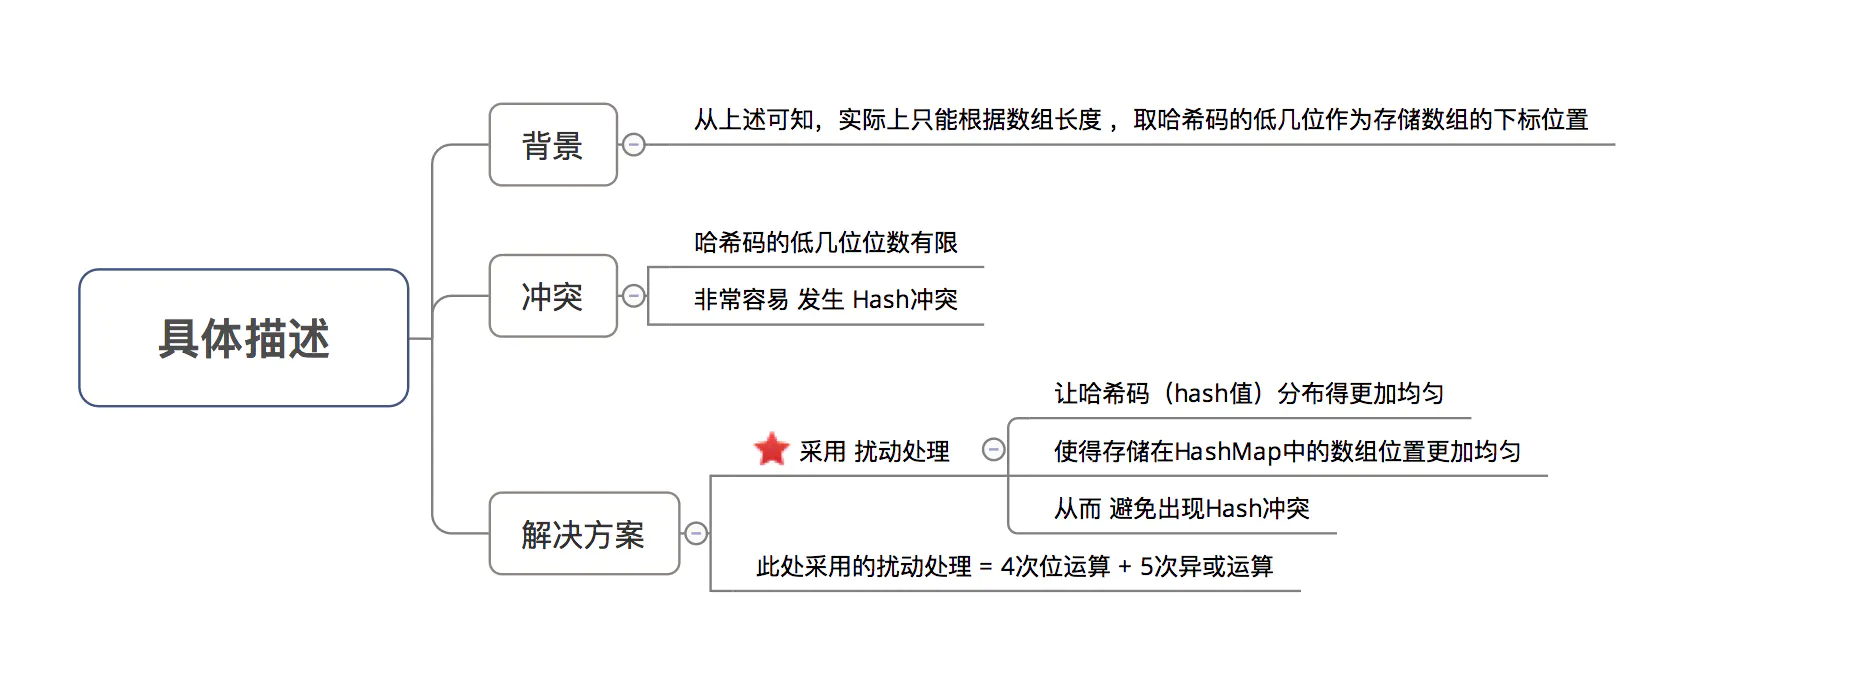
为什么在计算数组下标前,需对哈希码进行二次处理:扰动处理?
在回答这3个问题前,请大家记住一个核心思想:所有处理的根本目的,都是为了提高存储key-value的数组下标位置的随机性 & 分布均匀性,尽量避免出现hash值冲突 。即:对于不同key,存储的数组下标位置要尽可能不一样。
为什么不直接采用经过hashCode()处理的哈希码作为存储数组table的下标位置?
结论:容易出现哈希码与数组大小范围不匹配的情况,即计算出来的哈希码可能不在数组大小范围内,从而导致无法匹配存储位置。
为了解决 “哈希码与数组大小范围不匹配” 的问题,HashMap给出了解决方案:哈希码与运算(&) (数组长度-1) ,即问题3。
为什么采用哈希码与运算(&) (数组长度-1) 计算数组下标?
结论:根据HashMap的容量大小(数组长度),按需取哈希码一定数量的低位作为存储的数组下标位置,从而 解决“哈希码与数组大小范围不匹配”的问题。
为什么在计算数组下标前,需对哈希码进行二次处理:扰动处理?
结论:加大哈希码低位的随机性,使得分布更均匀,从而提高对应数组存储下标位置的随机性 & 均匀性,最终减少Hash冲突。
分析2:putVal(hash(key), key, value, false, true)
计算完存储位置后,具体该如何存放数据到哈希表中。
具体如何扩容,即 扩容机制 。
由于数据结构中加入了红黑树,所以在存放数据到哈希表中时,需进行多次数据结构的判断:数组、红黑树、链表 。
与 JDK 1.7的区别: JDK 1.7只需判断 数组 & 链表。
源码分析:
1 2 3 4 5 6 7 8 9 10 11 12 13 14 15 16 17 18 19 20 21 22 23 24 25 26 27 28 29 30 31 32 33 34 35 36 37 38 39 40 41 42 43 44 45 46 47 48 49 50 51 52 53 54 55 56 57 58 59 60 61 62 63 64 65 66 67 68 69 70 71 72 73 74 75 76 77 78 79 80 81 82 83 84 85 86 87 88 89 90 91 92 93 94 95 96 97 98 99 100 101 102 103 104 105 106 107 108 109 110 111 112 113 114 115 116 117 118 119 120 121 122 123 124 125 126 127 128 129 130 131 132 133 134 135 136 137 138 139 140 141 142 final V putVal (int hash, K key, V value, boolean onlyIfAbsent, boolean evict) Node<K,V>[] tab; Node<K,V> p; int n, i; if ((tab = table) == null || (n = tab.length) == 0 ) n = (tab = resize()).length; if ((p = tab[i = (n - 1 ) & hash]) == null ) tab[i] = newNode(hash, key, value, null ); else { Node<K,V> e; K k; if (p.hash == hash && ((k = p.key) == key || (key != null && key.equals(k)))) e = p; else if (p instanceof TreeNode) e = ((TreeNode<K,V>)p).putTreeVal(this , tab, hash, key, value); ->>分析3 else { for (int binCount = 0 ; ; ++binCount) { if ((e = p.next) == null ) { p.next = newNode(hash, key, value, null ); if (binCount >= TREEIFY_THRESHOLD - 1 ) treeifyBin(tab, hash); break ; } if (e.hash == hash && ((k = e.key) == key || (key != null && key.equals(k)))) break ; p = e; } } if (e != null ) { V oldValue = e.value; if (!onlyIfAbsent || oldValue == null ) e.value = value; afterNodeAccess(e); return oldValue; } } ++modCount; if (++size > threshold) resize(); afterNodeInsertion(evict); return null ; } final TreeNode<K,V> putTreeVal (HashMap<K,V> map, Node<K,V>[] tab, int h, K k, V v) Class<?> kc = null ; boolean searched = false ; TreeNode<K,V> root = (parent != null ) ? root() : this ; for (TreeNode<K,V> p = root;;) { int dir, ph; K pk; if ((ph = p.hash) > h) dir = -1 ; else if (ph < h) dir = 1 ; else if ((pk = p.key) == k || (k != null && k.equals(pk))) return p; else if ((kc == null && (kc = comparableClassFor(k)) == null ) || (dir = compareComparables(kc, k, pk)) == 0 ) { if (!searched) { TreeNode<K,V> q, ch; searched = true ; if (((ch = p.left) != null && (q = ch.find(h, k, kc)) != null ) || ((ch = p.right) != null && (q = ch.find(h, k, kc)) != null )) return q; } dir = tieBreakOrder(k, pk); } TreeNode<K,V> xp = p; if ((p = (dir <= 0 ) ? p.left : p.right) == null ) { Node<K,V> xpn = xp.next; TreeNode<K,V> x = map.newTreeNode(h, k, v, xpn); if (dir <= 0 ) xp.left = x; else xp.right = x; xp.next = x; x.parent = x.prev = xp; if (xpn != null ) ((TreeNode<K,V>)xpn).prev = x; moveRootToFront(tab, balanceInsertion(root, x)); return null ; } } }
put流程:
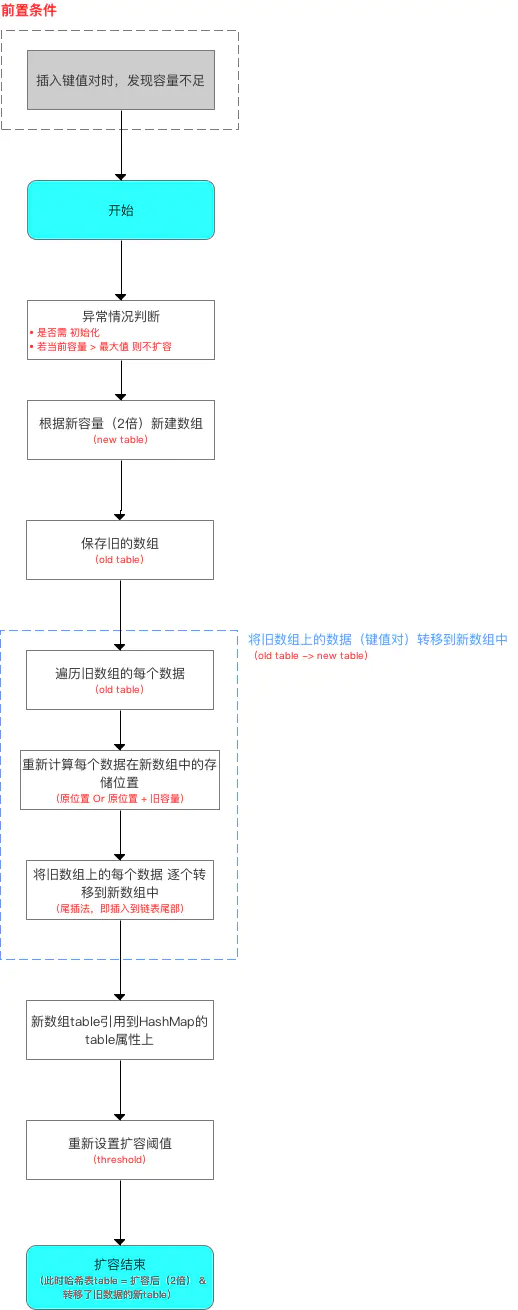
扩容机制(即 resize()函数方法) 扩容流程如下:
源码分析:
1 2 3 4 5 6 7 8 9 10 11 12 13 14 15 16 17 18 19 20 21 22 23 24 25 26 27 28 29 30 31 32 33 34 35 36 37 38 39 40 41 42 43 44 45 46 47 48 49 50 51 52 53 54 55 56 57 58 59 60 61 62 63 64 65 66 67 68 69 70 71 72 73 74 75 76 77 78 79 80 81 82 83 84 85 86 87 88 89 90 91 92 93 94 95 96 97 98 99 100 101 102 103 104 105 final Node<K,V>[] resize ( Node<K,V>[] oldTab = table; int oldCap = (oldTab == null ) ? 0 : oldTab.length; int oldThr = threshold; int newCap, newThr = 0 ; if (oldCap > 0 ) { if (oldCap >= MAXIMUM_CAPACITY) { threshold = Integer.MAX_VALUE; return oldTab; } else if ((newCap = oldCap << 1 ) < MAXIMUM_CAPACITY && oldCap >= DEFAULT_INITIAL_CAPACITY) newThr = oldThr << 1 ; } else if (oldThr > 0 ) newCap = oldThr; else { newCap = DEFAULT_INITIAL_CAPACITY; newThr = (int)(DEFAULT_LOAD_FACTOR * DEFAULT_INITIAL_CAPACITY); } if (newThr == 0 ) { float ft = (float)newCap * loadFactor; newThr = (newCap < MAXIMUM_CAPACITY && ft < (float)MAXIMUM_CAPACITY ? (int)ft : Integer.MAX_VALUE); } threshold = newThr; @SuppressWarnings({"rawtypes" ,"unchecked" }) Node<K,V>[] newTab = (Node<K,V>[])new Node[newCap]; table = newTab; if (oldTab != null ) { for (int j = 0 ; j < oldCap; ++j) { Node<K,V> e; if ((e = oldTab[j]) != null ) { oldTab[j] = null ; if (e.next == null ) newTab[e.hash & (newCap - 1 )] = e; else if (e instanceof TreeNode) ((TreeNode<K,V>)e).split(this , newTab, j, oldCap); else { Node<K,V> loHead = null , loTail = null ; Node<K,V> hiHead = null , hiTail = null ; Node<K,V> next; do { next = e.next; if ((e.hash & oldCap) == 0 ) { if (loTail == null ) loHead = e; else loTail.next = e; loTail = e; } else { if (hiTail == null ) hiHead = e; else hiTail.next = e; hiTail = e; } } while ((e = next) != null ); if (loTail != null ) { loTail.next = null ; newTab[j] = loHead; } if (hiTail != null ) { hiTail.next = null ; newTab[j + oldCap] = hiHead; } } } } } return newTab; }
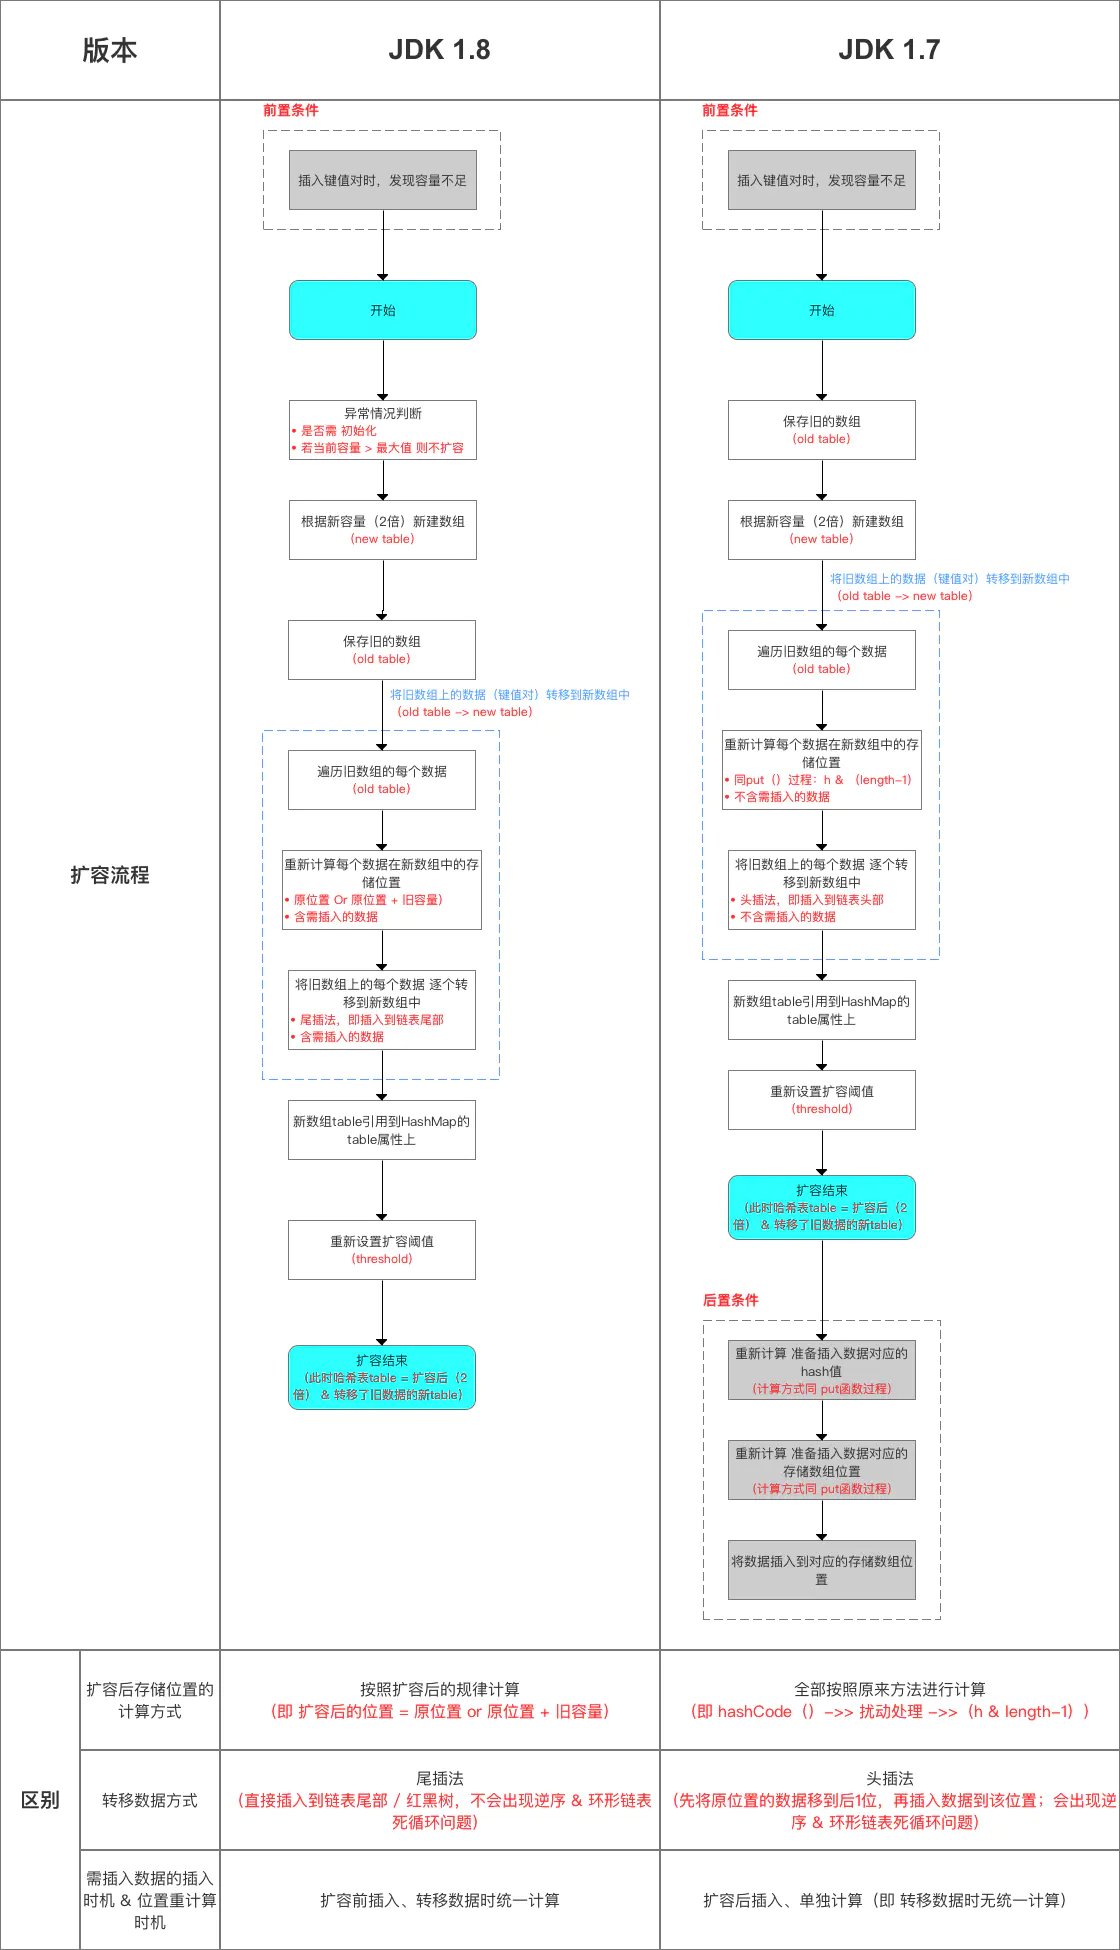
扩容流程(含 与 JDK 1.7 的对比):
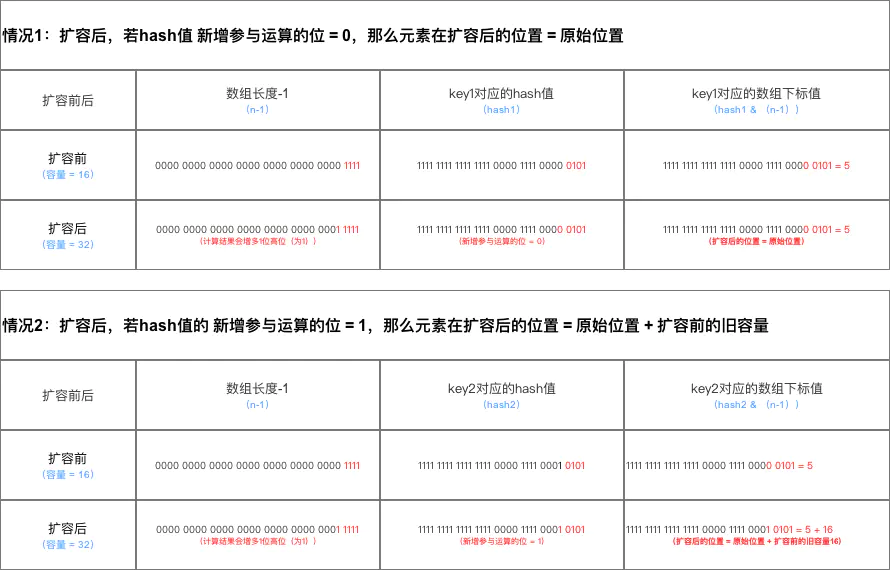
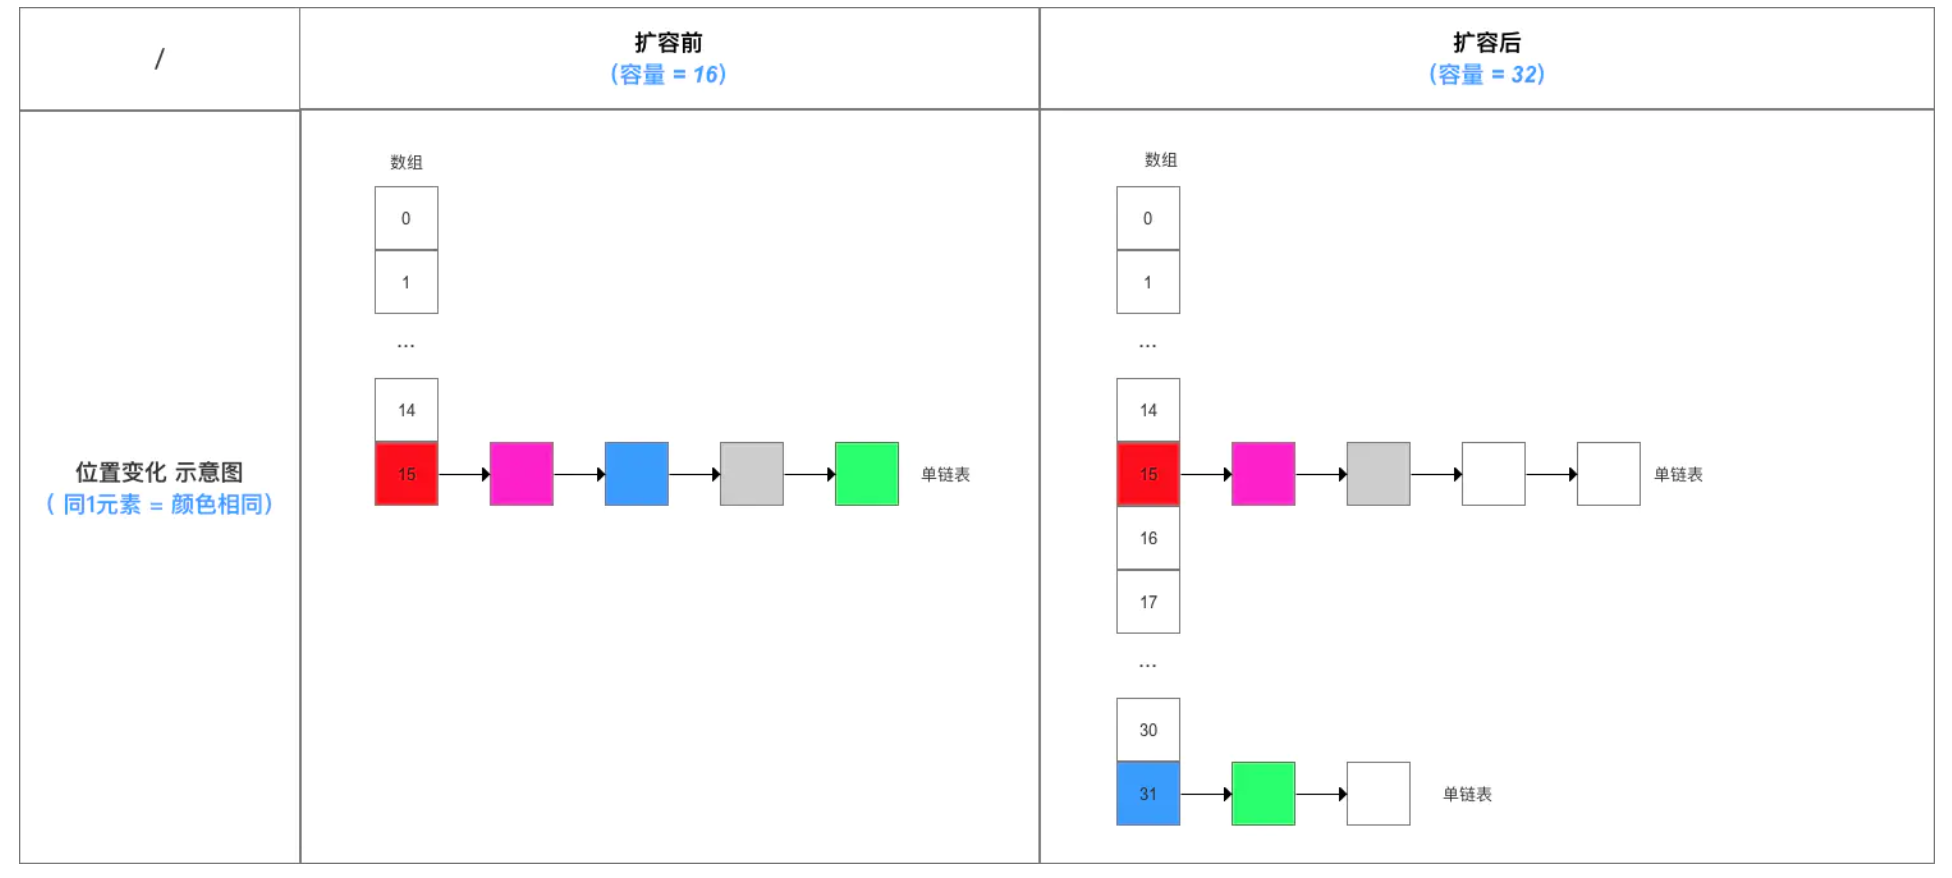
这里主要是JDK 1.8扩容时,数据存储位置重新计算的方式。
结论示意图:
数组位置转换的示意图:
JDK 1.8根据此结论作出的新元素存储位置计算规则非常简单,提高了扩容效率,具体如下图。
这与 JDK 1.7在计算新元素的存储位置有很大区别:JDK 1.7在扩容后,都需按照原来方法重新计算,即hashCode()->> 扰动处理 ->>(h & length-1))。
与 JDK 1.7的区别:
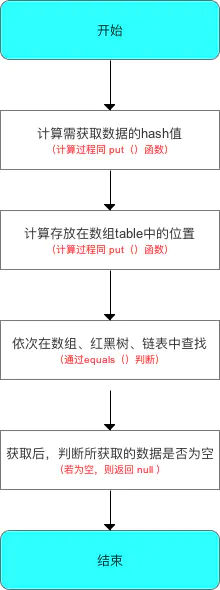
步骤3:从HashMap中获取数据
步骤4:对HashMap的其他操作 HashMap除了核心的put()、get()函数,还有以下主要使用的函数方法:
1 2 3 4 5 6 7 8 9 10 void clear () int size () boolean isEmpty () void putAll (Map<? extends K, ? extends V> m) V remove (Object key) ; boolean containsKey (Object key) boolean containsValue (Object value)
关于上述方法的源码的原理 同 JDK 1.7,此处不作过多描述。
总结内容 = 数据结构、主要参数、添加 & 查询数据流程、扩容机制.
removeNode() 1 2 3 4 5 6 7 8 9 10 11 12 13 14 15 16 17 18 19 20 21 22 23 24 25 26 27 28 29 30 31 32 33 34 35 36 37 38 39 40 41 42 43 44 45 46 47 48 49 50 51 52 53 54 55 56 57 58 59 60 61 62 63 64 65 66 67 68 final Node<K,V> removeNode (int hash, Object key, Object value, boolean matchValue, boolean movable) Node<K,V>[] tab; Node<K,V> p; int n, index; if ((tab = table) != null && (n = tab.length) > 0 && (p = tab[index = (n - 1 ) & hash]) != null ) { Node<K,V> node = null , e; K k; V v; if (p.hash == hash && ((k = p.key) == key || (key != null && key.equals(k)))) node = p; else if ((e = p.next) != null ) { if (p instanceof TreeNode) 判断当前桶位是否升级为红黑树 node = ((TreeNode<K,V>)p).getTreeNode(hash, key); else { do { if (e.hash == hash && ((k = e.key) == key || (key != null && key.equals(k)))) { node = e; break ; } p = e; } while ((e = e.next) != null );一直向下找 } } if (node != null && (!matchValue || (v = node.value) == value || (value != null && value.equals(v)))) { if (node instanceof TreeNode) ((TreeNode<K,V>)node).removeTreeNode(this , tab, movable); else if (node == p) tab[index] = node.next; else p.next = node.next; ++modCount; --size; afterNodeRemoval(node); return node; } } return null ; }
clear() 1 2 3 4 5 6 7 8 9 10 依次将数组中的元素重置为null public void clear () Node<K,V>[] tab; modCount++; if ((tab = table) != null && size > 0 ) { size = 0 ; for (int i = 0 ; i < tab.length; ++i) tab[i] = null ; } }
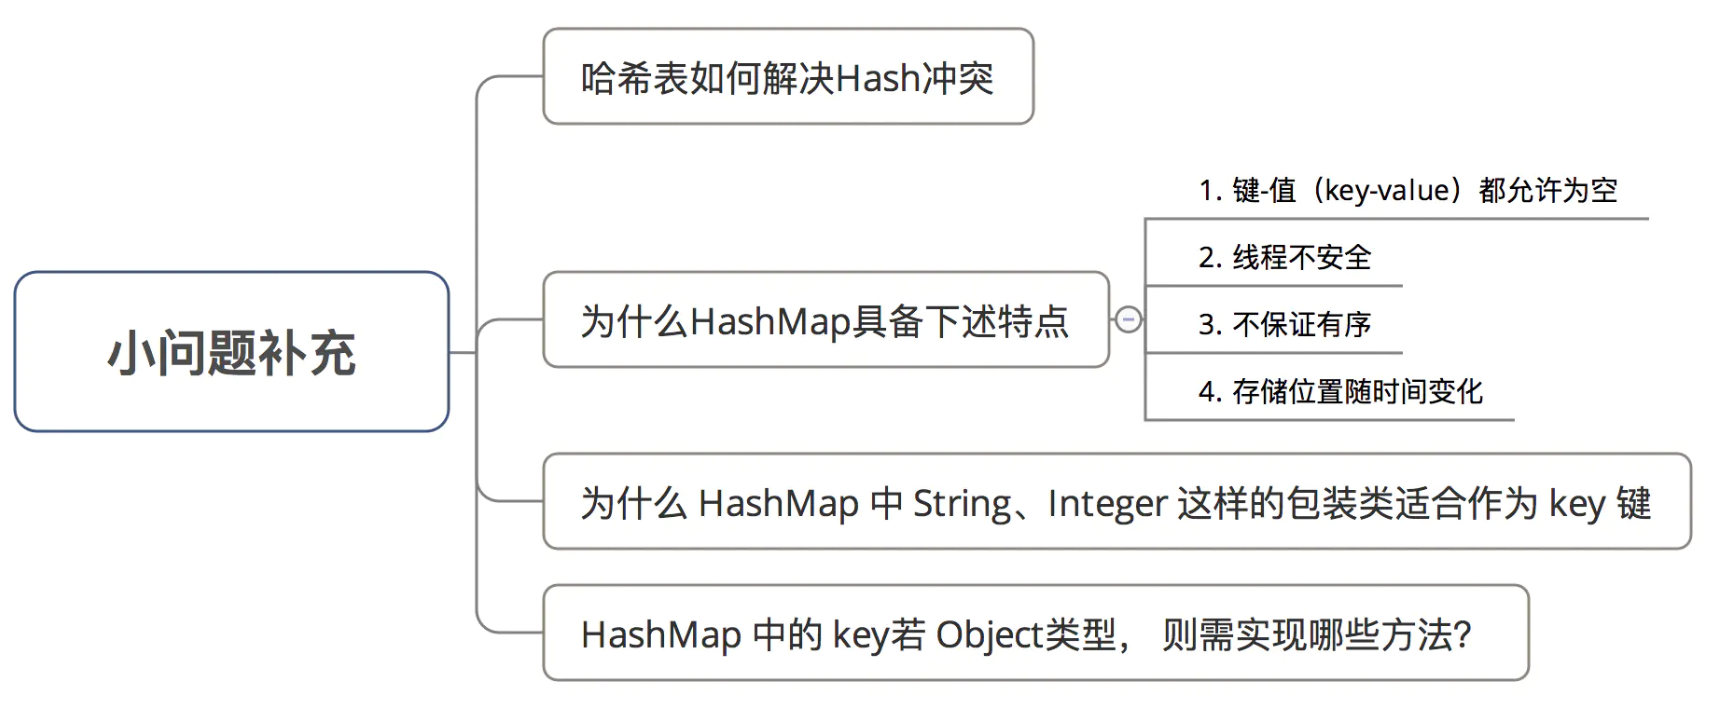
额外补充:关于HashMap的其他问题 哈希表如何解决Hash冲突?
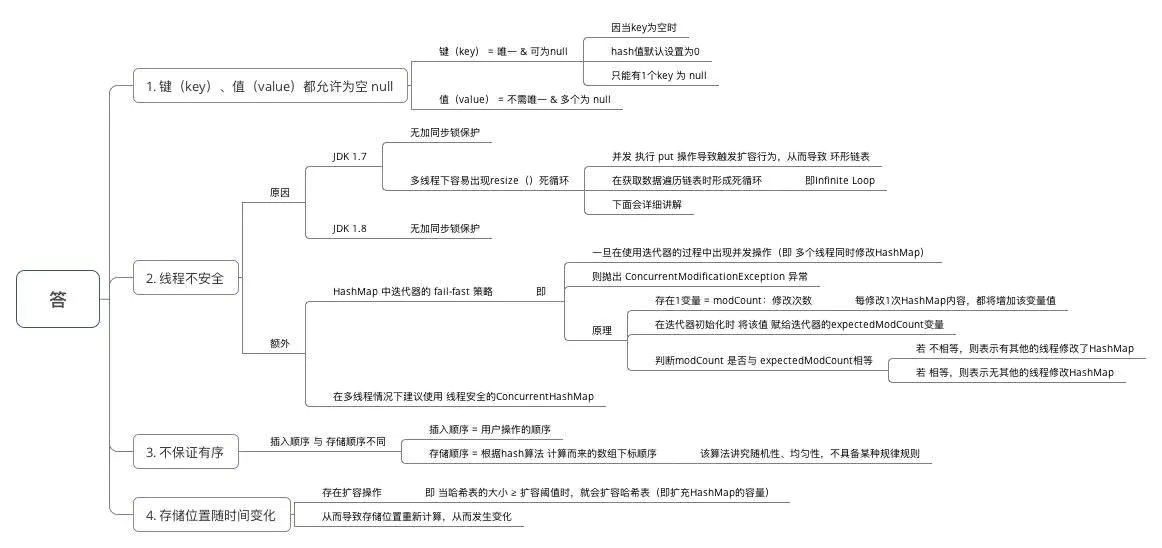
为什么HashMap具备下述特点:键-值(key-value)都允许为空、线程不安全、不保证有序、存储位置随时间变化?
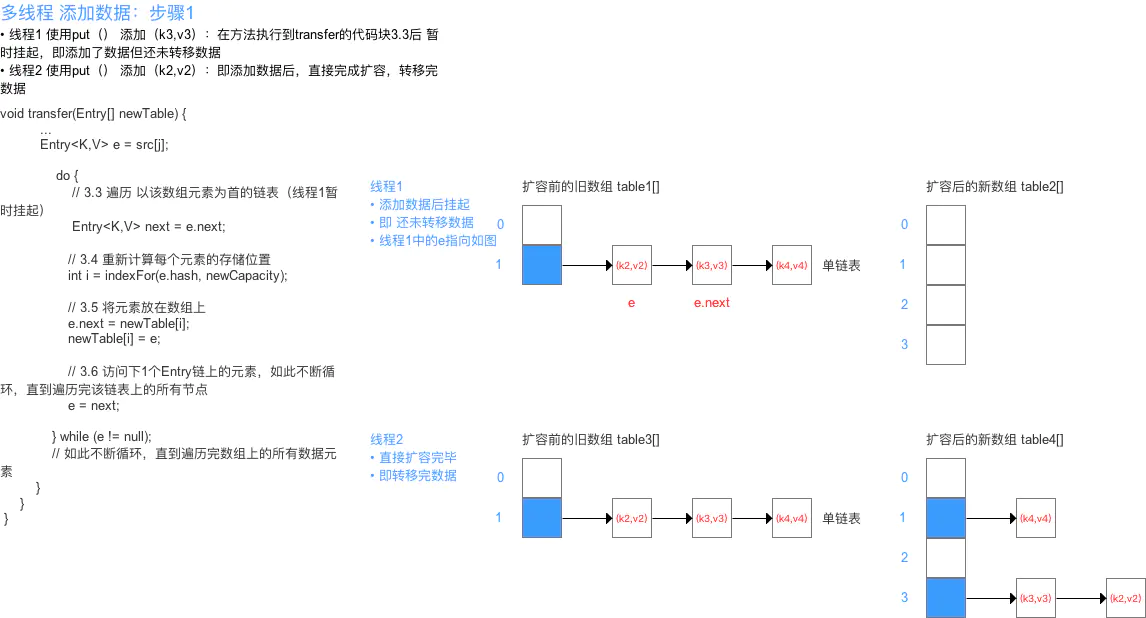
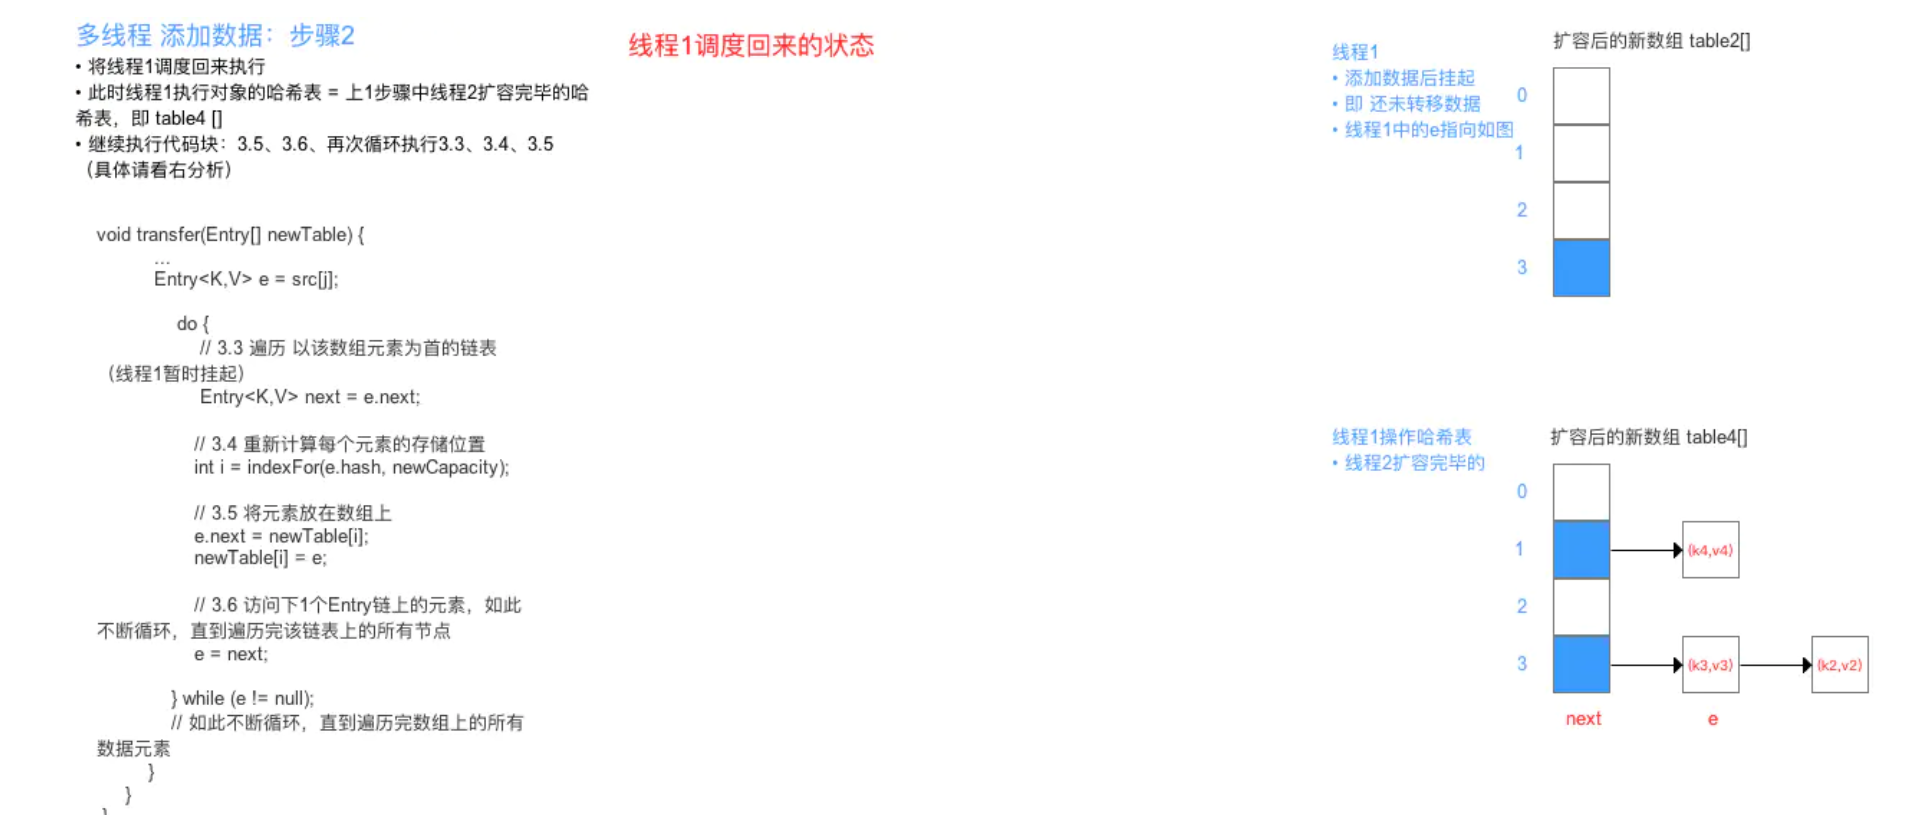
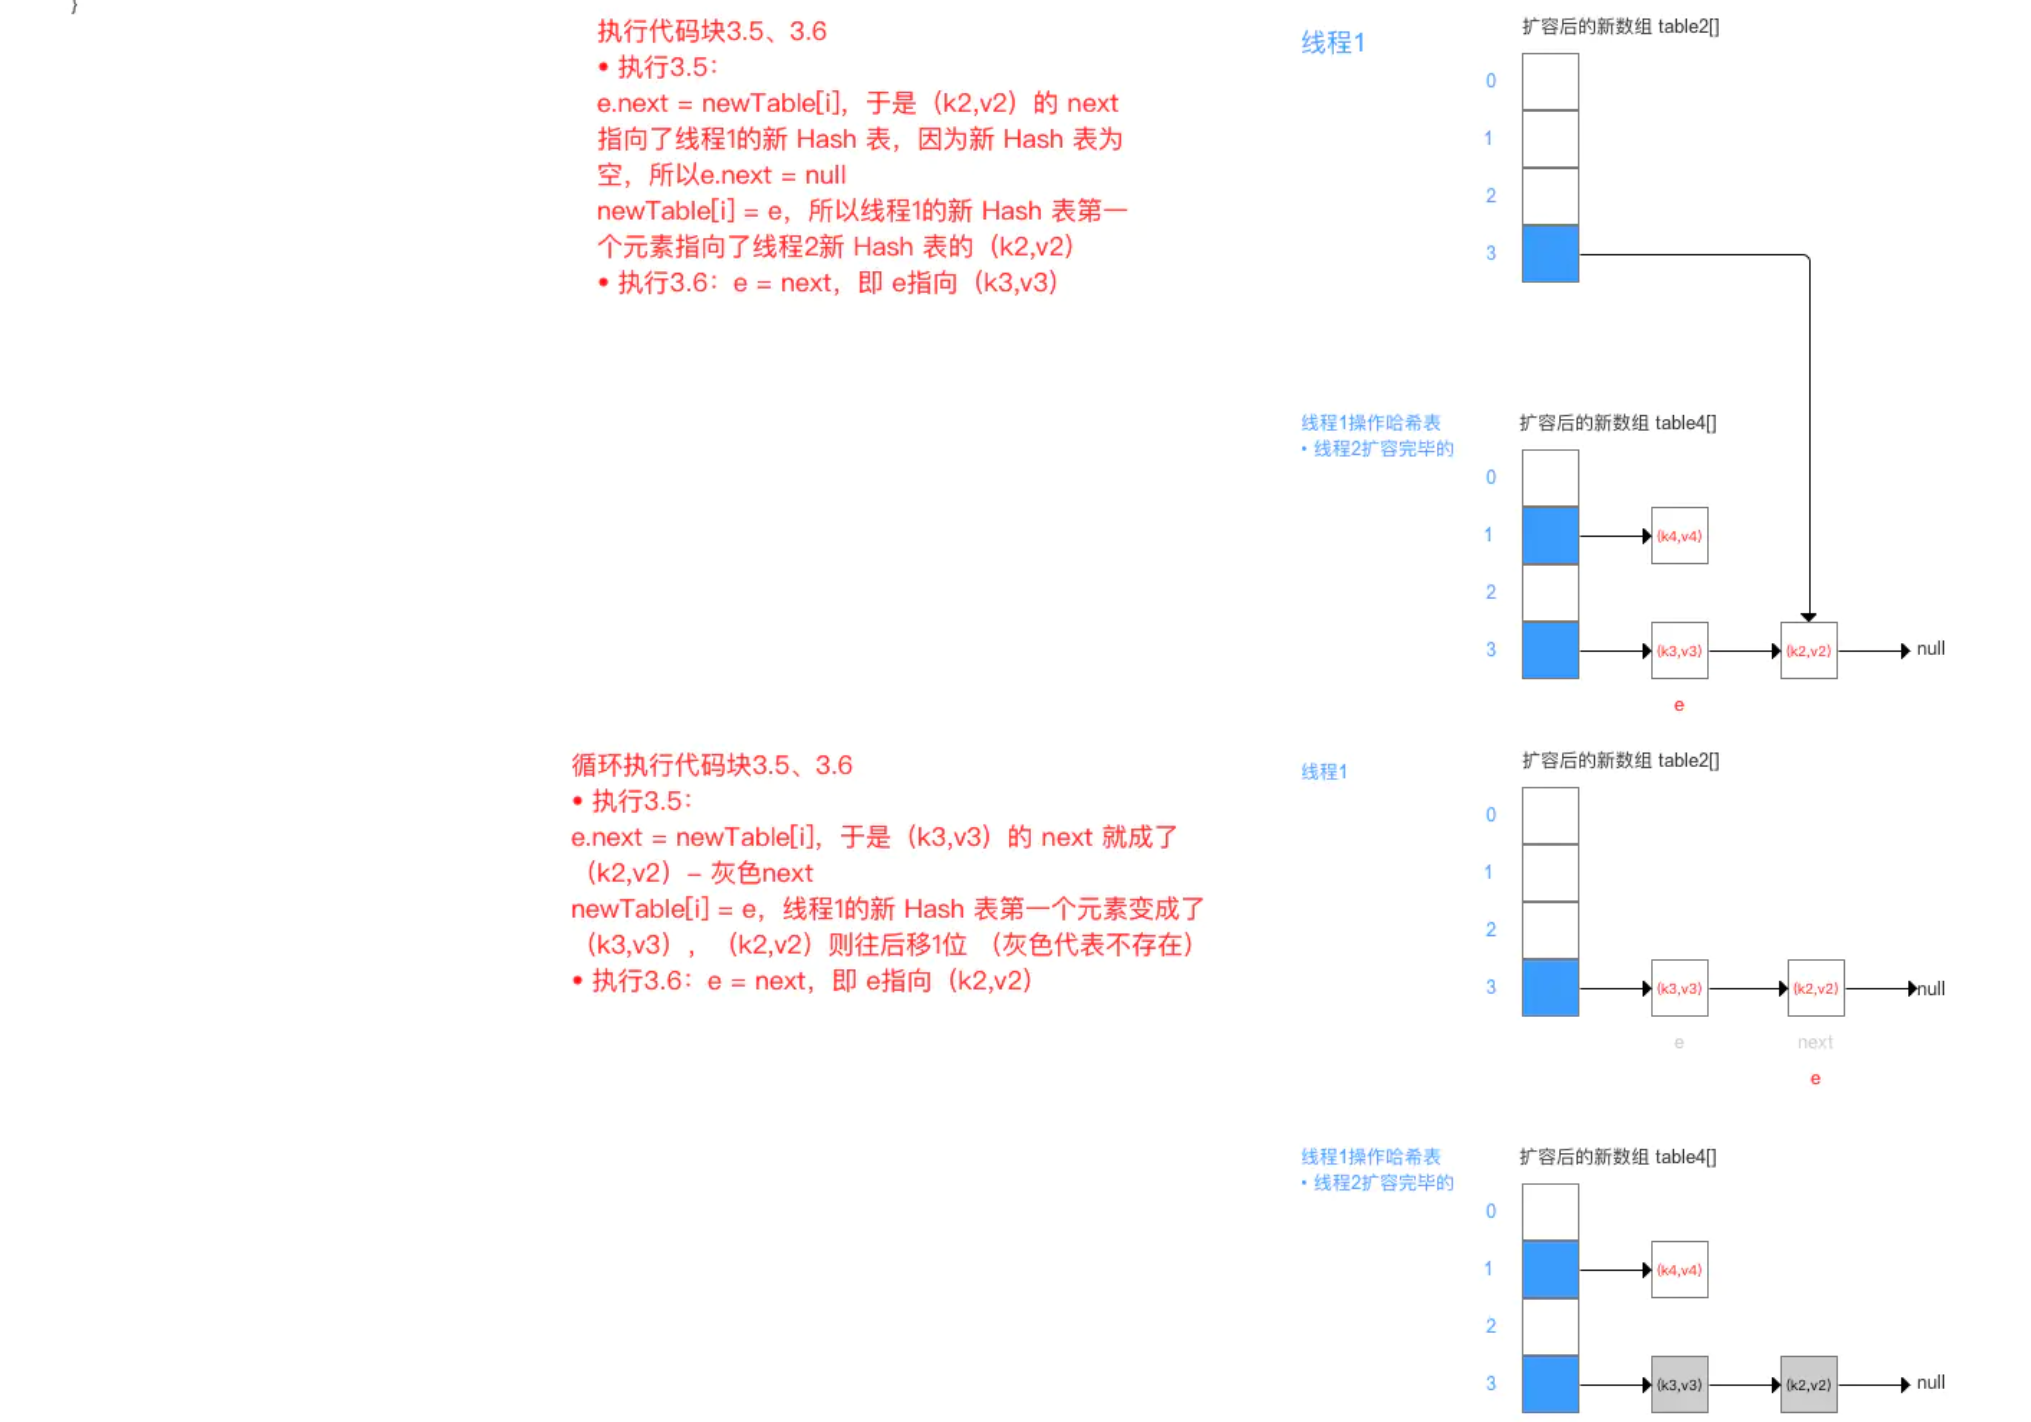
HashMap 线程不安全的其中一个重要原因:多线程下容易出现resize()死循环。 本质 = 并发 执行 put()操作导致触发 扩容行为,从而导致 环形链表,使得在获取数据遍历链表时形成死循环,即Infinite Loop
先看扩容的源码分析resize():
1 2 3 4 5 6 7 8 9 10 11 12 13 14 15 16 17 18 19 20 21 22 23 24 25 26 27 28 29 30 31 32 33 34 35 36 37 38 39 40 41 42 43 44 45 46 47 48 49 50 51 52 53 54 55 56 57 58 59 60 61 62 63 64 65 66 67 68 void resize (int newCapacity) Entry[] oldTable = table; int oldCapacity = oldTable.length; if (oldCapacity == MAXIMUM_CAPACITY) { threshold = Integer.MAX_VALUE; return ; } Entry[] newTable = new Entry[newCapacity]; transfer(newTable); table = newTable; threshold = (int )(newCapacity * loadFactor); } void transfer (Entry[] newTable) Entry[] src = table; int newCapacity = newTable.length; for (int j = 0 ; j < src.length; j++) { Entry<K,V> e = src[j]; if (e != null ) { src[j] = null ; do { Entry<K,V> next = e.next; int i = indexFor(e.hash, newCapacity); e.next = newTable[i]; newTable[i] = e; e = next; } while (e != null ); } } }
从上面可看出:在扩容resize()过程中,在将旧数组上的数据 转移到 新数组上时,转移数据操作 = 按旧链表的正序遍历链表、在新链表的头部依次插入 ,即在转移数据、扩容后,容易出现链表逆序的情况 。
设重新计算存储位置后不变,即扩容前 = 1->2->3,扩容后 = 3->2->1
此时若(多线程)并发执行 put()操作,一旦出现扩容情况,则 容易出现 环形链表 ,从而在获取数据、遍历链表时 形成死循环(Infinite Loop),即 死锁的状态,具体请看下图:
由于 JDK 1.8 转移数据操作 = 按旧链表的正序遍历链表、在新链表的尾部依次插入 ,所以不会出现链表 逆序、倒置 的情况,故不容易出现环形链表的情况。
为什么 HashMap 中 String、Integer 这样的包装类适合作为 key 键?
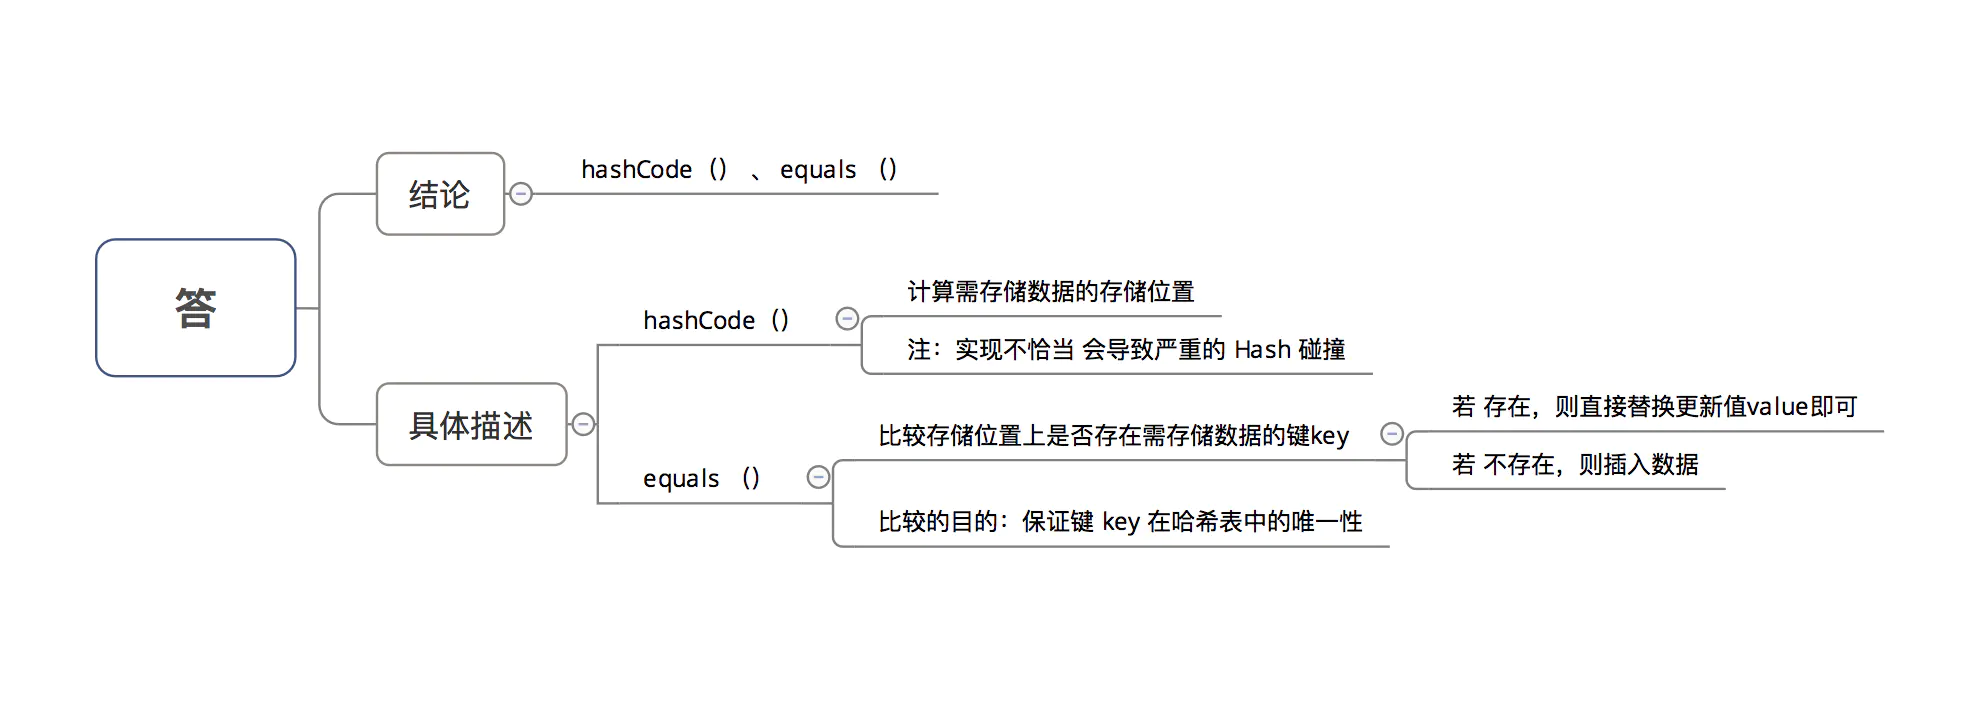
HashMap 中的 key若 Object类型, 则需实现哪些方法?
